Sunday, February 27, 2011

Vada Pav Recipe - Step by Step Included

The first time I had vada pavs was during our college tour to Mumbai as my friend suggested to taste it and I just loved it. This is a famous chat item/street food in Mumbai and after that I didnt get chance to taste it anywhere else. Recently when hubby got these pav buns I didnt have any clue of what to do with it as I didnt have any ingredients required for Pav Bhaji so googled and found this to be interesting from Tarla Dalal site, I modified the measurement a bit and here is the recipe
    Vada Pav Recipe
Vada Pav Recipe

Recipe Source :Tarla Dalal
Makes 4 vada pavs


Ingredients:
  • Pav Buns - 4
  • Red chutney - See recipe below ( 2 tbsp)
  • Green chutney - as required ( 2 tbsp)
For the vadas :
  • Boiled Potatoes - 2 medium sized
  • Cumin seeds - 1/2 tsp
  • Green chillies - 1/2 tsp chopped finely
  • Mustard seeds - 1/2 tsp
  • Ginger garlic paste - 1 tsp
  • Onion - 1 medium sized chopped finely
  • Turmeric powder - 1/2 tsp
  • Coriander leaves - 2 tsp
  • Oil - 2 tsp
For Vada outer coating:
  • Besan flour - 1/4 cup
  • Rice flour - 1 tbsp
  • Chilli powder - 1/2 tsp
  • Salt - to taste
  • Baking soda - a pinch
  • Oil - to toast / deep fry
      Vada Pav Recipe
Red Garlic chutney:
  • Coconut - 5 tbsp
  • Red Chillies - 1
  • Garlic - 4 chopped finely
  • Tamarind - 1 tsp
  • Salt - to taste
Dry roast coconut and tamarind till lightly browned. Grind together with all other ingredients. Do not add water its slighly pastey and dry.


Method:
For the vadas:
Heat oil, add mustard seeds and jeera, allow it to crackle. Add green chillies, ginger garlic paste and saute for mins.Add onions and saute till it turns lightly browned. Then add mashed potatoes, turmeric powder, required salt and mix well. Add chopped coriander leaves,mix well and switch off. Allow it to cool and make small balls and keep it ready.

Vada Pav Recipe Step1

For the vada coating
Mix besan flour, rice flour, salt, turmeric, chilli powder, baking soda.Add little water to form a paste like we do for bajjis and bondas.
Vada Pav Recipe Step2

Now take the balls and dip it to the flour paste and deep fry it till golden brown (I didnt deep fry them instead toasted them in a paniyaram pan)

Vada Pav Recipe Step3

For the vada pav assembling:
Take the buns slit it into halves taking care one end is still connected to the other bun.Apply the green chutney on one side , red chutney on another side. Keep the prepared vadas in between as shown and enjoy your vada pavs!
Vada Pav Recipe Step4


This is very famous chat in north india especially Mumbai and Kolkata. If you dont pav buns go ahead with normal buns.
Vada Pav Recipe
My Notes:
  • This sure needs time but when you are ready with the chutneys then making vadas and assembling them as vada pavs is easy.


  • Usually the vadas are nothing but our aloo bondas. The chutney combination and assembling it as vada pav gives a unique taste.


  • I chose to toast in paniyaram pan, instead you can deep fry them as the orginal recipe says.
Vada Pav Recipe


You can make the chutneys ready the before day itself and refrigerate them. The red garlic chutney is fiery hot which makes a apt combination for this vada pav.

Vada Pav Chutneys Recipe

Thursday, February 24, 2011

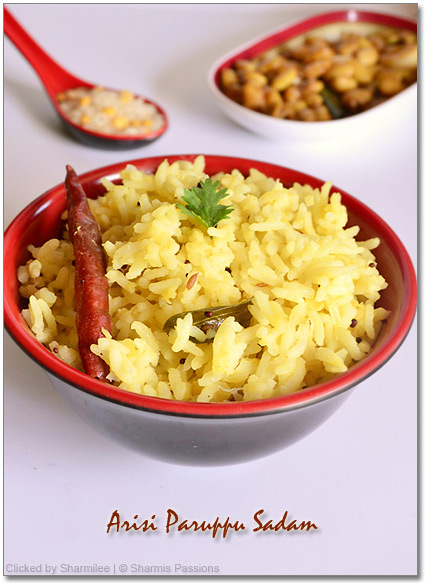
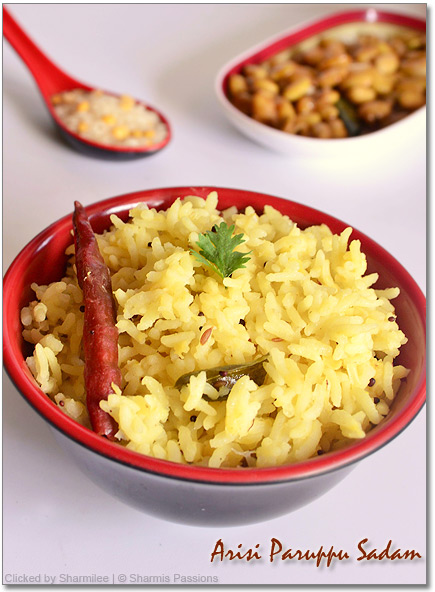
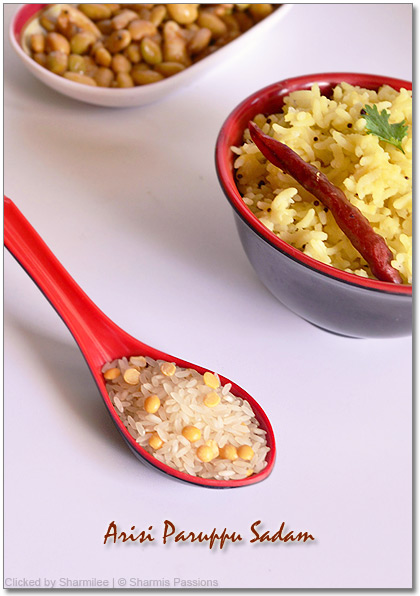
Arisi Paruppu Sadam (Dhal Rice)

This is very quick to fix up for lunch but a very tasty variety rice. This is kongunadu special and my best friend Sowmya used to bring it during our college days and I used to happily finish up half of her lunch during interval itself lending herself my tiffin box for lunch :) I called her up last week to get the recipe and here it is for you....
Arisi Paruppu Sadam (Dhal Rice) Recipe


Ingredients:
  • Rice - 1 cup
  • Thoor Dhal - 1/4 cup
  • Garlic - 4 chopped finely
  • Onion - 1
  • Tomato - 1
  • Mustard - 1/2 tsp
  • Jeera - 1 tsp
  • Red chillies - 2
  • Curry leaves - few
  • Coriander leaves - 1 tsp
  • Ghee - 1 tsp
  • Oil - 3 tsp
  • Water - 2.5 cups
  • Salt - as required


Method :
  1. Soak rice and dhal for 15mins and keep aside.


  2. Heat oil in a pressure cooker, add mustard seeds and jeera, allow it to crackle. Then add red chillies and curry leaves fry it for 2mins. Now add onions, garlic and saute till lightly browned.


  3. Add tomatoes and saute till raw smell leaves off and is slightly mushy.


  4. Drain water from rice and dhal, add it to the tempered items and fry for 2mins. Now add water,required salt and pressure cook for 3 whistles.


  5. After pressure is released, add ghee, switch off and garnish with coriander leaves.


I love paruppu sadam and this one obviously is my favourite too. Its easy to prepare and kids will like it too.


Arisi Paruppu Sadam (Dhal Rice) Recipe


My Notes :
  • Arisi Paruppu sadam should be slightly mushy but if you like your rice to be seperated then the measurement above will be correct. If you want it mushy then add 2 and 3/4 cups of water.


  • I didnt add tomatoes, you can add them while tempering. This is flavourful inspite of the less ingredients.


Arisi Paruppu Sadam (Dhal Rice) Recipe


Tuesday, February 22, 2011

Vanilla Chocolate Yo Yo Biscuits

Yo-Yo!! I've made these biscuits thrice so far as its everyones favourite at home including my little one. Inspite of the amount of butter the recipe calls, I am addicted to its taste. My lil one likes it without cream so I sandwiched the cream only for few biscuits as I too dont like cream in biscuits.


I was very surprised and happy when my lil one refused to have the bakery bought butter biscuit after she had these yo yo.......Wat else can make the best compliment for a mother?!


Yo Yo Biscuits Recipe


Vanilla Chocolate Yo Yo Biscuits


Recipe Source :
My Diverse Kitchen

Makes 25-30 biscuits


Ingredients:
For the biscuits:
  • Maida - 1 cup
  • Powdered Sugar - 1/4 cup
  • Butter, softened - 125 gms
  • Vanilla essence - 1 tsp
  • Vanilla flavoured custard powder - 1/4 cup
For the cream:
  • Butter, softened - 25 gms
  • Powdered sugar - 1/4 cup
  • Coco Powder - 2 tsp
  • Custard powder - 1/2 tsp


Yo Yo Biscuits Recipe
Method:
  1. Mix custard powder and maida, keep aside. Cream butter and sugar until creamy, add vanilla essence to it.


  2. Now add custard powder, maida to butter sugar mixture and mix well to form smooth dough.Chill the dough for 30mins.


  3. The dough would be firm by this time. Now pinch off equal bits and roll them into balls and press it lightly with the fork dipped in flour to get the marks on top. Repeat this for the entire dough and place them in the baking tray.


  4. Chill the biscuits until preheating time. Preheat the oven to 170 deg C for 10mins. Now bake the biscuits for 15-17mins. Allow them to cool completely.


  5. Now add the ingredients under buttercream and beat well until creamy. Sandwich the cream between 2 biscuits and enjoy your yoyo biscuits. Store it in airtight container.


Yo Yo Biscuits Recipe
My Notes :
  • Do not be tempted to overbake, it will make the cookies loose the melt in the mouth texture.


  • Try to make balls with no cracks, so that your biscuits would be smooth when you press them with fork.The biscuits stay crispy for about a week in room temperature itself.


  • You can also keep the buttercream , apply it whenever u need instead of applying and storing it.


  • I reduced the sugar level for the cream part as the biscuits are already sweet themselves.You can increase it of you want your cream to be more sweeter.


Yo Yo Biscuits Recipe


These biscuits just melt in the mouth so take care not to overbake. It has a unique taste and custard powder adds a different flavour to these biscuits. I havent tasted any biscuit with custard flavour so instantly got addicted to its taste.


Once it cools down, store in airtight container to enjoy the crispness for a week. These biscuits tastes good even without the cream, and cream adds an extra touch to these cuties. These biscuits are named after the famous yoyo toy .


Yo Yo Biscuits Recipe

Sunday, February 20, 2011

Oats, Dates and Almonds Milkshake

I am very much impressed with saffola oats advertisement and the additional attraction was the recipe book. Yes the main reason for me to get saffola oats is this free recipe book. The book has some basic recipes and few interesting recipes as well. This is one such quick filling and tasty drink I tried from that book.
Oats, Dates and Almonds Milkshake Recipe


Oats, Dates and Almonds Milkshake Recipe

Recipe Source : Saffola Oats Recipe Book

Makes 4 small glasses


Ingredients:
  • Oats - 4 tbsp
  • Dates - 10
  • Almonds - 6
  • Milk - 3 cups
Method:
  1. Dry roast oats till a nice nutty aroma comes. Chop almonds and dates roughly.


  2. Grind oats, almonds, dates with milk until a creamy consistency is reached,Refrigerate for 30mins and Serve chilled. Sugar is not needed as the sweetness of dates is just enough.


  3. Garnish with dates and almonds and serve chilled.


Oats, Dates and Almonds Milkshake Recipe


This cannot be called for a recipe but just wanted to share about the combination that can be added with oats to get a tasty breakfast drink.


I searched for a specific brown color chart since the day I started blogging and finally found it in odyssey last month. I was waiting for a chance to use this chart and this was another reason for me to choose this drink for trying :)


This drink is very creamy and thick, when serve chilled its very tasty. You can have this drink after a mild breakfast. The pictures in the book are super tempting so more recipes will be coming up soon.


Oats, Dates and Almonds Milkshake Recipe


Oats being regular in our breakfast menu atleast twice to thrice a week in the form of kanji/porridge I always look for alternatives to the usual oats porridge and this one is apt when there is less time.


Apart from the health benefits I am used and prefer to have such porridge for breakfast than idlis and dosas. I tell you dates oats combination is always a hit either in cakes, cookies or milkshakes and the addition of almonds makes it all the more creamier and tastier.


Attimes when the lunch menu is not my favourite , I sometimes have this drink after lunch to fill my tummy :)


Variations:
  • You can add any fruit of your choice and blend it with oats.
  • Add sugar only if needed as the fruit pulp is also sweet.
Oats, Dates and Almonds Milkshake Recipe


Thursday, February 17, 2011

Chilli Paneer Recipe | Indian Paneer Recipes

Actually soups and starters are out of my menu, I start with the dishes right away. So the first time I tasted chilli paneer was very recently only, and the one served in the restaurant I tried was more like gobi 65 and they called it chilli paneer. So I browsed to find the exact recipe and after few googling I found this recipe from Vahrevah.com and loved it instanty.
Chilli Paneer Recipe


Ingredients
:

  • Paneer - 1 cup cubed
  • Capsicum - 1 chopped finely
  • Onions - 1 chopped finely
  • Garlic - 5 minced finely
  • Green Chillies - 1 chopped finely
  • Soya sauce - 1.5 tsp
  • Pepper powder - a pinch
  • Tomato sauce - 1/2 tbsp
  • Coriander leaves - 1 tbsp chopped finely
  • Oil - 1 tbsp
  • Salt to taste
For the Marinade:
  • Maida - 2 tbsp
  • Corn flour - 1.5 tbsp
  • Salt - a pinch
  • Ginger garlic paste - 1 tsp
  • Water - as to form a paste


Chilli Paneer Recipe
Method:
  1. Make a thick batter of the ingredients under 'to marinade' and add paneer to it and coat it well. Then toast the coated paneer in dosa tawa and drain it in tissue. (You can deep fry them too).


    Chilli Paneer Recipe


  2. Heat oil in a pan, add chopped onions and saute till lightly browned, then add minced garlic fry till golden brown.


  3. Then add green chillies and capsicum and saute for 2mins. Dont make it soggy, it should still be crunchy. Add soyasauce, tomato sauce, pepper, salt and mix well in low flame.


  4. Now add the toasted paneer pieces and mix well until everything is evenly blended. Granish with coriander leaves, give it a quick stir and switch off. Serve hot as a starter.


Chilli Paneer Recipe

Wednesday, February 16, 2011

Paneer stuffed Cauliflower Kofta Curry | Side dish for Chapathi

I love koftas based gravies, and whenever we dine out I make it a point to order it as a side dish. As hubby is not fond of it I dont order it often, now the fact that my lil one loves it and I've a company and have been ordering it often. The one I tasted recently in Annapurna Gowrishankar was a different white based gravy(with milk, cashew paste and cream) and I totally luved it, I will surely try to recreate it and post it.
Paneer stuffed Cauliflower Kofta  Recipe
From the day I saw the cauliflower kofta curry in Raks Kitchen I wanted to try it. She has well explainatory stepwise pictures but still my queries were endless as usual. Though everything is self explained, when the chef is ur friend why not take advantage of it ;) Ha ha hope she doesnt kick me. But she patiently answered everything I asked and also suggested paneer as stuffing when I asked for cheese alternative.


Even before she posted, when she mentioned about this gravy with broccoli I was way too tempted as its my fav veggie. But then here fresh broccoli isnt easy to find and I didnt want the healthy veggie to take oil bath ;) so went ahead with cauliflower as she did.


Ingredients:
For Kofta:
Makes 10-12 kofta balls
  • Cauliflower,grated - 1 small flower
  • Potatoes - 3 medium sized
  • Cornflour - 1 tblsp
  • Garam masala -1/4 tsp
  • Pepper powder - 1/4 tsp
  • Baking powder - 1 pinch
  • Oil - for frying
  • Paneer- small cubes around 10
  • Salt - as required
For Gravy
Serves 3
  • Tomato puree - 3/4 cup
  • Oil - 2 tsp
  • Jeera- 1 tsp
  • Ginger garlic paste - 1 tsp
  • Garam masala Powder - 1/4 tsp
  • Red chilli powder - 1/2 tsp
  • Coriander powder - 1/2 tsp
  • Salt As needed
  • Coriander leaves - 2 tbsp chopped
  • Milk - 1 cup
  • Cream - 2 tbsp


Paneer stuffed Cauliflower Kofta Recipe
Method:
For the koftas :
  1. Pressure cook potatoes until soft, peel off he skin and mash them well. Heat a pan with oil, add cauliflower and saute it well for 3 mins until raw smell leaves. Close with a lid for 5 mins, stirring in between.


  2. In a mixing bowl, add mashed potatoes, cooked cauliflower, cornflour, pepper, salt, garam masala, baking powder and mix well.


  3. Make small balls , flatten them then keep paneer cubes inside and then close it as shown in the below pic. I didnt deep fry them instead toasted them in kuzhipaniyaram pan till golden brown.
Paneer stuffed Cauliflower Kofta Recipe
This is a sure a bit lengthy process, the moment you feel tired after all the lengthy cooking ur koftas bring a smile to ur face....Yes they are truely yummy and just melt in the mouth.


You can deep fry them too, then drain it in a tissue for the excess oil to be absorbed. Ur koftas are ready now, keep it aside.


For the gravy:
  1. Heat a pan with oil, add jeera allow it to splutter, add ginger garlic paste fry for 2mins.


  2. Then add tomato puree, allow it cook till raw smell of tomatoes leave.Add 1/4 cup water and allow it to boil.


  3. At this stage add garam masala,red chilli,coriander powders along with salt and leave it until the gravy is thick.


  4. Again,add little water, add coriander leaves and simmer for another 4-5 mins.


  5. Add milk and cream and mix well,in low flame. When it is about to boil add the koftas and garnish with coriander leaves, switch off. Serve hot with phulkas / naans.
Paneer stuffed Cauliflower Kofta Recipe
My Notes:
  • The koftas are very soft so take care not to break them while deep frying or toasting in kuzhipaniyaram pan.


  • Do not keep in stove for more time(more than 5mins) after milk is added, there is chance for milk to curdle. At the final stage before milk is added make sure ur gravy is thick.


  • You can add in cheese as stuffing mentioned in the orginal recipe too.
Paneer stuffed Cauliflower Kofta Recipe


Sunday, February 13, 2011

Eggless Hearty Jam Biscuits

I baked these biscuits last week and these biscuits were a instant hit at home. I had valentines day in mind so planned for this post in advance :) Will you believe I took around 500 pics in 3 schedules and most of them dissatisfied me, but finally selected these....:)
Eggless Hearty Jam Biscuits Recipe
U want & u get, that's luck,
U want & u wait, that's time.
U want but u compromise, that's life.
U want & u wait & u don't compromise that's LOVE!!
Happy Valentines Day!!


Eggless Hearty Jam Biscuits Recipe
Recipe Source : Divine Taste
Makes 25-30 biscuits


Ingredients:
  • Maida - 1 cup
  • Custard Powder - 3/4 cup
  • Thick Curd - 1/4 cup (adjust according to the dough consistency)
  • Butter - 2 tbsp
  • Icing Sugar - 1/2 cup
  • Cornflour - 1 tbsp
  • Vanilla extract - 1/2 tsp
  • Mixed Fruit Jam - As required


Eggless Hearty Jam Biscuits Recipe
Method:
  1. Mix maida, cornflour and custard powder, keep aside.Soft butter, add sugar to it and cream well. Then add curd, vanilla essence and beat well until creamy.


  2. Then add custard powder mixture to the butter sugar mixture and make it to soft dough. If your dough is sticky add little maida to make it a soft pilable dough.


  3. Roll the dough on a flat surface using chapathi roller for about 5mm thickness. Then cut out shapes using cookie cutter. Collect the remaining dough and repeat the process.


  4. Eggless Hearty Jam Biscuits RecipePreheat oven to 180 deg C for 10mins. Meanwhile make a small dent in the middle of all the biscuits using a small round lid and apply a very thin layer of jam in it.Arrange it in a baking tray with aluminium foil lined.


  5. Bake it for 12-15mins at 180 deg C. Allow it to cool and store them in airtight container.
Eggless Hearty Jam Biscuits Recipe
My Notes:
  • As I reduced the butter and replaced it with curd, the biscuits slightly puffed up, oozing out jam. So in the next batch I applied a very thin layer of jam.


  • Though the butter is reduced, the crispness is perfect. The only difference I found with reducing butter was that the biscuits started to soften after 3 days. I'm sure it will stay crispy for more time when the orginal mentioned quantity of butter is added.


  • I used mixed fruit jam, you can use your favorite flavour of jam. But mixed fruit went well with the custard powder flavour.
Eggless Hearty Jam Biscuits Recipe
I am sure this is a kid pleaser as my lil one enjoyed it to the core. Though she first licked only the jam, later she liked the taste of the biscuits too.

Thursday, February 10, 2011

Instant Oats Dosa | Oats Breakfast Recipes

I love rava dosa and that was the main reason I tried oats dosa in that style. I still am not very confident in making rava dosa because of the spreading method so was skeptical about this oats dosa but to my surprise, it came out very well after trying with 2-3 dosas and obviously meet my expectation. So now I can confidently try rava dosa :)


Though this click is not so good, it is always special to me as it was my first foodie click from my new DSLR :)
Instant Oats Dosa Recipe


Ingredients:
  • Oats - 1 cup
  • Rice flour - 1/4 cup
  • Rava -1/4 cup
  • Jeera - 1 tsp
  • Onion - 1 chopped finely
  • Pepper powder - a pinch [optional] - If you are omitting this add 1 finely chopped green chillies
  • Oil - as required
  • Salt - to taste
  • Water - as required
Method:
  1. Dry roast oats for 2 mins and powder it finely.Transfer to mixing bowl.


  2. Add rice flour, rava, jeera, onion, pepper powder, salt and mix well. Add water and make a thin batter like rava dosa batter.


  3. Heat the dosa tawa, take one laddle of batter and drizzle it from the corners and finishing off in the middle like we do for rava dosas. There will be holes seen as in the pic.


  4. Drizzle oil, allow it cook till golden brown and turn over to other side, leave it for 2 seconds then transfer to the serving plate. Enjoy ur crispy oats dosa hot.


Instant Oats Dosa Recipe


After 2 trials I adjusted and made the oats dosa close to the style of rava dosa. The result was crispy dosas do try it out for yourself. Since the day I tried this oats dosa, its regular on our menu atleast once a weekm it is sure a better alternative to the usual oats porridge.


Serve with idli podi or any spicy chutney. I like it with idly podi and molaga chutney.


My Notes:
  • Just drizzle only a thin layer of the batter dont spread it , else you will not get crispy dosas.


  • I like pepper flavour in this, if you omit pepper, then add finely chopped green chillies to the batter.


  • You can dry roast oats, powder it and store it in advance so that its very helpful during our morning hurry burries.
Instant Oats Dosa Recipe

Tuesday, February 8, 2011

Vendakai Mor Kuzhambu / Okra Buttermilk Curry

I know most of us have our own version of more kuzhambu, and here is mine which I learnt from my mother. I wanted to have it in my site for future reference so thought to share it here. I like this curry anytime, its quick and tasty with rice.
Vendakai Mor Kuzhambu Recipe


Ingredients:
  • Sour curd - 1 cup
  • Okra - 4 to 5 chopped into 1 inch pieces
  • Turmeric powder - 1 tsp
  • Salt As needed
  • Curry leaves - few
  • Oil - 1 tsp
To Roast and powder:
  • Urud dal - 1/2 tsp
  • Channa Dhal - 1 tbsp
  • Red chillies - 1/2
  • Coconut - 1.5 tbsp
To Temper:
  • Mustard -1 tsp
  • Curry leaves - few
  • Red Chillies - 1/2
  • Oil - 1/2 tsp
Method:
  1. Heat a tsp of oil in a kadai and saute okras till the stickiness is gone. Sprinkle little water and cook the okras until slightly soft. Dont make it soggy.


  2. Dry roast the ingredients under 'to roast' till golden brown and grind it to a semi coarse powder.


  3. Now add the powder, salt and turmeric powder to sour curd and beat it well. Heat this, add cooked okras. Allow it until the mixture boils and is frothy. Switch off and transfer to serving bowl.


  4. Now add 1/2 tsp of oil, add mustard seeds, curry leaves and red chillies allow it to temper then transfer to the curd and mix well. Serve with hot rice.


Vendakai Mor Kuzhambu Recipe
Even methu vadai can be added to this kuzhambu, we call it vadai kuzhambu :) It tastes divine when the vadais are nicely dunk in the curry.


My Notes:
  • The pale yellow color comes only after the curry boils so dont add more turmeric powder than the mentioned quantity.Also adjust red chillies according to your spice level.


  • You can add any cooked vegetable of your choice : Chow chow, Sepankizhangu or even methu vadai.
Vendakai Mor Kuzhambu Recipe


Sunday, February 6, 2011

Black Forest Trifle for a celebration

Black Forest Trifle Recipe
Yayyy!! Another year and Sharmis Passions turns 2!!
Sharmis Passions is celebrating its 2nd birthday and I thank all my readers and blogger friends for such an enormous support, encouragement and wishes in the form of mails and comments and making this happen.


Sharmis Passions is more than just a cooking site to me these days.It has been a solace, a shoulder to lean on at times of grief, my companion when I am elated and what not?! Sometimes when I feel dull all that I want to do is log into blogger, edit and publish a post from my drafts which instantly cheers me up. Truely this has happened many a times, it has lifted my spirits high.The first thing in the morning(even before brushing;)) I check my dashboard , and each comment I moderate brings a level of warm comfort to me.


So here is a virtual treat of Black Forest Trifle to you all for my bloggie babies birthday. And a slightly new look for the site as I intend to stick to the same template after almost trying out 6-7 templates..yes sometimes I'm unable to accept change though I try to :)


Black Forest Trifle Recipe
I wanted to try this black forest trifle when I saw in Pavis space, I did and was really happy with the results. Once I served it for my guests too, and was really happy to receive their appreciations.


Black Forest Trifle - It has all the ingredients a black forest cake has...so should I mention about the taste?! A bite of layered chocolaty cake along with a layer of fluffy fresh cream, then chocolate sauce and choco chips and cherries!!! Truely a treat to all chocolate lovers I will say!


Ingredients
Serves 2 small sized glasses (smaller one than in the pic)
  • Chocolate cake - 1 big piece [I used homemade moist chocolate cake]
  • Cherries - 4 chopped finely and 2 for garnishing
  • Cream - 2.5 tbsp
  • Milk - 1.5 tbsp
  • Choco chips - 1tbsp
  • Chocolate sauce/Chocolate melted - 1 tbsp
  • Hide and seek biscuits - 2
Method:
  1. Crumble the cake, powder the biscuits coarsely and keep aside.


  2. First take a glass and layer the crumbled cake at the bottom. Next spoon fresh cream and add it, add a little milk on top of it.


  3. Next spoon out cherries and spread out the cherries as the next layer.Spread out a thin layer of powdered biscuits, then add choco chips and chocolate sauce.


  4. Repeat this process till the top of the glass is reached, then top with a cherry and sprinkle powdered biscuits.


  5. Refrigerate it for an hr or 2 to impress your guests with this simple, rich and delicious dessert. :) Serve chilled!


Black Forest Trifle Recipe
My Notes:
  • There is no certain restriction on arranging the layers, so do it as per your liking.


  • While serving I made layers in 2 small glasses. When you are serving it after dinner then shorter glass would do as this may be heavy if served in a big glass after dinner or lunch. If at all you are planning it as a after snack dessert then plan a taller glass as in the below pic.


  • Be creative and use variations of layering as per your liking and enjoy it.
Black Forest Trifle Recipe

Thursday, February 3, 2011

Chikki (Peanut Burfi) / Kadala Mittai

I think most of us must have tasted chikki/peanut burfi. It is one of my favourites, but never knew this could be so easy to make with only 2 main ingredients.
Peanut Burfi(Chikki) Recipe
I was not aware that caramelising sugar is as simple as just melting the sugar in a dry pan until nithi cleared me :)


Ingredients:
Recipe Reference : 4th sense cooking
  • Peanuts - 1 cup
  • Sugar - 3/4 cup (Orginal called for 1 cup, but 3/4 cup was sufficient for me)
Method:
  1. Dry roast the peanuts until crsipy and when the skin starts coming out. Take out the skin of the peanuts and powder them until fine. Grease a pan with butter/ghee and keep it ready.


  2. Take a dry pan and add sugar in it. Heat it till the sugar melts completely(Do not add water). Simmer, add the peanut powder and mix well until no lumps are formed. Swich off.


  3. Immediately transfer it to the greased plate and flatten them using chapathi roller. Then draw line with butter/ghee greased knife immediately. Be very quick in doing this step else the chikkis will harden and the lines cant be drawn.


  4. Allow it to cool down for 10mins and break the chikkis along the drawn lines.Chikkis are ready!


Peanut Burfi(Chikki) Recipe
My Notes:
  • The only and main important thing to note down is you have to be very quick after the peanut powder is added. You cannot mark lines when the burfi is cooled so draw lines immediately.


  • These are slightly sticky by texture and crispy like the store bought ones.
Isnt that super fast and easy?! I bet kids will luv it! The only time consuming part is peeling the skinof peanuts. You can get readymade roasted skin peeled peanuts which makes it all the more easy.


Peanut Burfi(Chikki) Recipe