Showing posts with label Dips and Chutneys. Show all posts

Tuesday, May 31, 2011

Mango Pachadi / Maanga Pachadi

Mango pachadi is my fav, esp with curd rice....the combination is so so tasty. This is the method amma follows, so the recipe is from her.The tanginess in the mangoes, sweetness from the jaggery, the spiceness from the chillies...all blended together...yummmm!!
Maanga Pachadi Recipe


Maanga Pachadi Recipe:
Serves 3


Ingredients:
  • Raw mango - 1 medium sized
  • Jaggery - 1/2 cup
  • Salt - as required
  • Rice flour - 1 tbsp
  • Turmeric powder - 1/2 tsp
To Temper:
  • Mustard seeds - 1 tsp
  • Urad dal - 1 tsp
  • Green chilliies - 2 slitted into half
  • Curry leaves - few
  • Hing(perungayam) - a pinch
  • Oil - 2 tsp


Maanga Pachadi RecipeMethod:

  1. Wash the mangoes and chop them into small cubes roughly, keep aside.
  2. In a pressure cooker add the mangoes and water till mangoes immersing level and pressure cook mango with salt and turmeric powder until soft.
  3. By now the mango must have turned mushy, add powdered jaggery mix well in low flame. Then add 1/4 cup water and allow it to boil till it becomes jam consistency.Add required salt and 1 tbsp of rice flour to make it thick.
  4. Meanwhile in a pan heat oil, add mustard seeds, urad dal allow it to splutter. Add greenchillies and curry leaves, saute for a minute. Add hing, give a quick stir.
  5. Then add the tempered items to the mango mixture. Give a quick stir and switch off.
Mango Pachadi Recipe
My Notes:
  • Adding rice flour will thicken the mixture. So adjust the quantity of rice flour accordingly.
  • We add the mango pieces as such in the pachadi. You can peel the skin and slice the pieces too and make it totally like a jam
  • This will surely keep well for 2 days when refrigerated.
  • Do not add more rice flour , it will change the taste of the pachadi.
Mango Pachadi Recipe


This is more like jam so luv it with bread and chapathis too. But the ultimate combination is with curd rice, try once and see and am sure you will thank me for it :)


You can skip rice flour if your pachadi is thick enough. I have seen few adding coconut paste too, it will sure give a rich taste but the shell life is less.


Choose a mango that is slightly ripe, which is apt for this pachadi. The color of the pachadi totally depends on the amount of turmeric powder and the jaggery variety.


Mango Pachadi Recipe

Sunday, May 1, 2011

Maanga Thokku / Raw Mango Pickle

After 6 months of unplanned break, I am joining back work tomorrow. I have the same feeling of a kid going to school reopening for the first day. New people, environment, duties am kind of excited at the same time tensed too. I have enjoyed this 6months completely and have done all those things which I've loved to do. Especially for sharmis passions I have stocked up with drafts so guess that will keep this space occupied for the months to come:)


Since the mango season has started, I am experimenting on them...Will you believe this space has no mango recipes so far?! So more mango recipes to come......Maanga thooku is hubys fav as he says for thokku homemade tastes best...Now to the maanga thokku recipe:
Recipe


Ingredients:
  • Raw Mango - 2
  • Chilli powder - 2 tsp
  • Turmeric powder - 1/2 tsp
  • Fenugreek seeds (Venthayam) - 1/4 tsp
  • Powdered Jaggery -1/2 tsp (optional)
  • Salt - to taste
  • Oil - 1 tbsp
To temper:
  • Oil - 2 tbsp
  • Mustard seeds - 1tsp
  • Curry leaves - 6
  • Hing- a generous pinch


Recipe
Method:
  1. Peel of the skin of mangoes and grate them finely and keep aside.
  2. Dry roast fenugreek, powder it and keep aside.
  3. First heat oil in a pan and add grated mango and saute until the moisture leaves completely It may take 7-10mins. Then add chilli powder, turmeric powder, salt and mix well.
  4. Keep in low flame and fry for 5-7mins. Add fenugreek powder and powdered jaggery and mix well.
  5. Meanwhile in another kadai heat oil and temper the items listed one by one mustard seeds, hing followed by curry leaves and then transfer this tempered items to the mango thokku in the pan and mix well.
  6. Fry for 2mins, by now oil will start oozing out at this stage, switch off.
  7. Cool down completely and then transfer to airtight container. Keep refrigerated and use clean spoon everytime.
Recipe
My Notes:
  • You can add the tempering items in the beginning itself and then add raw mango to it.
  • Sauting and frying well in low flame is very important for the mango thokku to keep well for long else it will get spoiled soon.
  • Adding jaggery is purely optional, you can skip that if you dont like ur thokku to be sweet.
Recipe


Being mango season you can make this and store this for a month(refrigerated). This tastes yummy with curd rice or even chapathis. It has the tangy flavour from the raw mango and the sweetness from jaggery apt to lick as such too :)


If you feel grating difficult, you can cut the raw mango into tiny cut pieces and use the same recipe for thokku.


Recipe


Raw mango with salt and chilli powder is my favourite and brings back school childhood memories. Add required salt and chilli powder to eat the raw mangoes as such yum!!


Raw maangoes in sambar or any curry gives a very nice flavour to the curry with the tangy taste. Maanga pachadi is my fav too, am waiting to make it next time to post it here....


Recipe


Wednesday, March 30, 2011

Vegetable Kati Roll / Kathi Roll | Indian Wrap

Rolls or Wraps or Frankies I like them very much. They are perfect for on the go snacks/breakfast for kids.I had this feeling in mind that making kathi roll was time consuming until I saw the recipe in a TV show. It was well explained and sounded simple to me.So here goes the recipe with minor modifications from the orginal.And now u know how I finished the paneer bhurji :)
Kati Roll Recipe


Kathi Roll | Indian Wrap Recipe:
Recipe Courtesy:Vijay Tv show
Makes 5-6 kathi rolls


Ingredients:


For parathas:
  • Whole wheat flour - 1 1/4 cups
  • Maida - 1/4 cup
  • Salt - to taste
  • Oil - 1 tsp
  • Milk - as needed to knead the dough


For the stuffing:
  • Mixed vegetables(I used carrot,capsicum and beans) - 3/4 cup (Chop it lengthwise)
  • Turmeric pwd - a pinch
  • Garam masala powder or chat masala - 1/2 tsp
  • Ginger green chilli paste - 1 tsp (Recipe below)
  • Lemon juice - 1 tbsp
  • Green chutney - few tbsp
  • Onion -1 finely sliced
  • Olive oil - 1 tbsp
  • Salt to taste


Kathi Roll RecipeMethod:


To make ginger green chilli paste:
Take a small piece of ginger and 1 green chilli, grind it to a smooth paste with little salt and your ginger green chilli paste is ready :)


To prepare the parathas:
  1. Mix salt, wheat flour and maida. Add milk slowly to form a soft dough.
  2. Keep covered and let it rest till the stuffing is done
To prepare the stuffing
  1. Heat oil, add onions and saute until golden brown.Add ginger chilli paste and saute for a min then add all the veggies, saute for 3mins or until cooked till the veggies are crunchy.
  2. Add turmeric, garam masala powder and lemon juice mix well. Cook keeping lid closed for 2more minutes and switch off.
Paneer Bhurji Kati Roll Recipe
To make it as a wrap:
  1. Pinch a lemon sized ball from the dough and flatten it like we do for chapathis. Dust flour if needed.
  2. Then heat a dosa pan,once it is hot place the prepared parathas and cook on both sides.Likewise prepare all the parathas and keep aside.
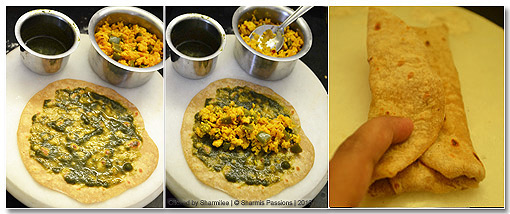
  3. At the time of serving, add little oil and toast the prepared parathas . Then spread 1/2 tbsp of green chutney, add a heaped tbsp of stuffing(either paneer bhurji/veg stuffing).
  4. Then gently seal it from the bottom then close it tightly from the both the sides(left & right) to form a roll as shown in the pic(Rolling this way avoids stuffing from dropping out)
  5. Then wrap the lower part of the parathas with butter paper/silver foil and enjoy ur kati rolls.
Kati Roll Recipe

I love paneer bhurji in wraps and rolls. So reserved little for this sake itself and made these rolls. You can keep the stuffing in middle and close from oth the sides and prick a tooth pick in the middle and serve but wrapping in the above said method avoids filling from coming out and its easy to hold too :)


The recipe is the same for paneer bhurji too just filling differs and you can find paneer bhurji recipehere.


When I googled to find the orgin of Kathi rolls, found that it orginated from Kolkata where kathi roll is a famous street food.
Veg Kati Roll RecipeMy Notes :
  • The stuffing idea is endless, you can even make chicken vegetable stuffing. You can also makepaneer tikka kathi roll.
  • You can make the stuffing and parathas ready the previous night and just assemble the wrap, there you go with your yummy, filling on the go wraps for breakfast. It is a perfect evening snack for kids.
  • Serve with tomato sauce or can be had as such itself also. The thickness of each parathas can be slightly thicker also.
Veg Kati Roll Recipe
And I am sending this to Fast Food NOT Fat food event


Sunday, March 20, 2011

Side dish for Idly, Dosa | Onion Tomato Chutney

We are just back from Chennai, though it was tiresome I'm back with lots of memories and contentment. And when it came to shopping the only shop I insisted to go was Santosh super stores and I enjoy(ed) shopping there :)


Thanks EC for featuring me in Sundays Super Blogger Series :)


Now coming to todays recipe, am sure everyone makes this chutney in their own variation. I wanted to share ammas version of making this chutney in thokku style and here it is:


 Onion Tomato Chutney Recipe


Onion Tomato Chutney Recipe
Serves 3


Ingredients:
To grind to a smooth paste:
  • Tomato -3
  • Onion - 1/2
  • Garlic - 6 cloves
  • Red chillies -2
To temper:
  • Oil - 2 to 3 tsp
  • Mustard Seeds - 1 tsp
  • Urad Dal - 1/2 tsp
  • Onion -1/2
  • Curry leaves - 1 tbsp halved


Onion Tomato Chutney Recipe
Method:
  1. First grind the ingredients under 'to grind' to a smooth paste and keep aside.


  2. Heat oil, add mustard seeds, urad dhal and allow mustard seeds to splutter and urad dal to brown a little. Then add curry leaves fry for a min then add onions and saute until golden brown


  3. Now add the ground paste and allow it to boil with 1tbsp of water. Saute it and simmer it until the raw smell leaves and the chutney thickens like thokku. Switch off and transfer to serving bowl or an airtight container.
Onion Tomato Chutney Recipe


Serve the chutney with idlis / dosas or even rotis. Amma makes this chutney 2 other ways too but this version is liked by all of us so wanted to share it here.


This chutney goes well with idlis and rotis too and thats the speciality with this chutney that it goes almost with any tiffin item. The chutney should be in thokku consistency. And you can add gingelly oil(nalennai)/ ghee and enjoy it with hot idlis. I served them with kuzhipaniyaram and it tasted divine :)


Onion Tomato Chutney Recipe
My Notes:
  • It keeps good for 3 days when refrigerated, ideal for a days travel too,


  • Allow the chutney to thicken in sim, saute it now and then to avoid burning at the bottom. Thickening in simness gives it a unique flavour and taste.


  • You can omit onions for sauting and add it fully for grinding too.
Onion Tomato Chutney Recipe


Sunday, February 27, 2011

Vada Pav Recipe - Step by Step Included

The first time I had vada pavs was during our college tour to Mumbai as my friend suggested to taste it and I just loved it. This is a famous chat item/street food in Mumbai and after that I didnt get chance to taste it anywhere else. Recently when hubby got these pav buns I didnt have any clue of what to do with it as I didnt have any ingredients required for Pav Bhaji so googled and found this to be interesting from Tarla Dalal site, I modified the measurement a bit and here is the recipe
    Vada Pav Recipe
Vada Pav Recipe

Recipe Source :Tarla Dalal
Makes 4 vada pavs


Ingredients:
  • Pav Buns - 4
  • Red chutney - See recipe below ( 2 tbsp)
  • Green chutney - as required ( 2 tbsp)
For the vadas :
  • Boiled Potatoes - 2 medium sized
  • Cumin seeds - 1/2 tsp
  • Green chillies - 1/2 tsp chopped finely
  • Mustard seeds - 1/2 tsp
  • Ginger garlic paste - 1 tsp
  • Onion - 1 medium sized chopped finely
  • Turmeric powder - 1/2 tsp
  • Coriander leaves - 2 tsp
  • Oil - 2 tsp
For Vada outer coating:
  • Besan flour - 1/4 cup
  • Rice flour - 1 tbsp
  • Chilli powder - 1/2 tsp
  • Salt - to taste
  • Baking soda - a pinch
  • Oil - to toast / deep fry
      Vada Pav Recipe
Red Garlic chutney:
  • Coconut - 5 tbsp
  • Red Chillies - 1
  • Garlic - 4 chopped finely
  • Tamarind - 1 tsp
  • Salt - to taste
Dry roast coconut and tamarind till lightly browned. Grind together with all other ingredients. Do not add water its slighly pastey and dry.


Method:
For the vadas:
Heat oil, add mustard seeds and jeera, allow it to crackle. Add green chillies, ginger garlic paste and saute for mins.Add onions and saute till it turns lightly browned. Then add mashed potatoes, turmeric powder, required salt and mix well. Add chopped coriander leaves,mix well and switch off. Allow it to cool and make small balls and keep it ready.

Vada Pav Recipe Step1

For the vada coating
Mix besan flour, rice flour, salt, turmeric, chilli powder, baking soda.Add little water to form a paste like we do for bajjis and bondas.
Vada Pav Recipe Step2

Now take the balls and dip it to the flour paste and deep fry it till golden brown (I didnt deep fry them instead toasted them in a paniyaram pan)

Vada Pav Recipe Step3

For the vada pav assembling:
Take the buns slit it into halves taking care one end is still connected to the other bun.Apply the green chutney on one side , red chutney on another side. Keep the prepared vadas in between as shown and enjoy your vada pavs!
Vada Pav Recipe Step4


This is very famous chat in north india especially Mumbai and Kolkata. If you dont pav buns go ahead with normal buns.
Vada Pav Recipe
My Notes:
  • This sure needs time but when you are ready with the chutneys then making vadas and assembling them as vada pavs is easy.


  • Usually the vadas are nothing but our aloo bondas. The chutney combination and assembling it as vada pav gives a unique taste.


  • I chose to toast in paniyaram pan, instead you can deep fry them as the orginal recipe says.
Vada Pav Recipe


You can make the chutneys ready the before day itself and refrigerate them. The red garlic chutney is fiery hot which makes a apt combination for this vada pav.


Vada Pav Chutneys Recipe

Monday, December 13, 2010

Paruppu Urundai Kuzhambu - Step by Step Recipe

The very first time when I tried this I felt it was a very lengthy process with few confusions and was disturbing amma now and then so thought I should have this in my space with stepwise for my readers and for my future reference as well :) So here goes the recipe with stepwise:
Paruppu Urundai Kuzhambu Recipe
Paruppu Urundai Kuzhambu - (Lentil Balls in Coconut Tamarind Sauce)


Ingredients for the urundai:
  • Toor dal (Thuvaram paruppu) - 1/2 cup
  • Channa dal (Kadala paruppu) - 1/4 cup
  • Onion - 1 tbsp
  • Ginger garlic paste - 1 tbsp
  • Coconut grated(optional) - 1.5 tbsp
  • Red chillies - 2
  • Fennel(Sombu) - 1/2 tsp
  • Salt - to taste
To grind to a paste:
  • Coconut - 1/2 cup
  • Big onion - 1/2
  • Tomato - 1/2
For Kuzhambu:
  • Tamarind - 1 lemon sized ball
  • Tomato - 1/2 small (chopped)
  • Chilli powder - 1 tsp
  • Coriander powder - 1 tsp
  • Turmeric - a pinch
  • Salt - to taste
To temper :
  • Oil - 1 to 2 tbsp
  • Fenugreek seeds (Vendhayam ) - 1/4 tsp
  • Mustard - 1 tsp
  • Small Onion - 6 to 8 [Recommended to use small onions but I used big onions as I didnt have small onions at that time]
  • Tomato - 1/2
  • Curry leaves - 1 tbsp


Paruppu Urundai Kuzhambu Recipe
Method:
Soak the dals in water for 2 hrs. Add lemon sized tamarind in 1/4 cup water, extract juice and keep aside. Then drain water from the dal, grind it with red chillies and fennel to a semi coarse mixture. Sprinkle only little water say 1 to 2 tsp while grinding.
Paruppu Urundai Kuzhambu Recipe


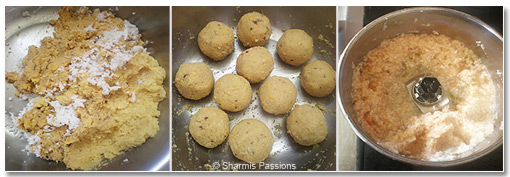
Now add salt, coconut, onion and ginger garlic paste with the grinded mixture and mix well. Alternatively you can add garlic and ginger in the previous step itself and grind it together with the dal. Make lemon sized balls out of it and keep aside. Grind onion, tomato with coconut(ingredients mentioned under 'to grind') to a fine paste and keep aside.
Paruppu Urundai Kuzhambu Recipe


Heat oil in a kadai and add the ingredients under 'to temper' one by one : First add mustard seeds allow it to crackle, then fenugreek seeds, onions, tomato and curry leaves. Saute for 3mins then add 2.5 cups of water with chilli and coriander powder and allow it to boil. Once the water starts boiling, simmer and gently add the lentil balls one by one taking care not to mush it.
Paruppu Urundai Kuzhambu Recipe


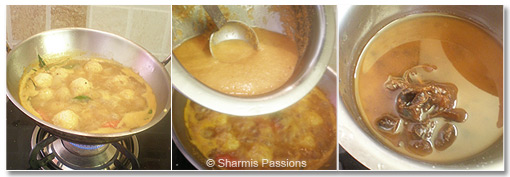
Allow it to get cooked, dont turn over which will make the balls mushy. Once the balls are cooked it will become firm, then you can turn over once and thats the stage you have to add the grinded paste and tamarind juice.Add required salt and mix well.
Paruppu Urundai Kuzhambu Recipe


Now let the gravy thicken and boil for few minutes. Simmer it after boiling and let it cook for another 2-3 mins. When the gravy is as thick as in the below pic, Switch off and garnish with chopped coriander leaves.
Paruppu Urundai Kuzhambu Recipe


I have watched amma making it many times and wanted to give a try and this is the 2nd time I'm trying it myself....Its my favorite gravy with rice. The lentil balls in coconut tamarind sauce tastes best, I luv it even with dosas and chapathis. This seems to be a lengthy process but once you taste it am sure you will not regret for the pain taken.


Paruppu Urundai Kuzhambu Recipe


My Notes:
  • I was very much skeptical about adding the lentil balls as such in the gravy but it works fine. I've heard from my friends that the balls need to be steamed before adding it to the gravy but I find adding it directly is messfree and easy.


  • Be careful in turning over the balls before its cooked. Also add them only after the water starts boiling and dont forget to simmer after the balls are added.


  • The texture of the balls is purely your choice, we usually like it a bit smooth. You can make it even more coarse too.


Paruppu Urundai Kuzhambu Recipe
Flavorful & Tempting Lentil Balls

Thursday, December 9, 2010

Poondu Thokku (Garlic Pickle)

This pickle/thokku with tangy taste of tamarind is the best combination for curd rice. It is easy to make, you can add in onions too with this thokku.
Poondu Thokku (Garlic Pickle) Recipe


Ingredients:
  • Garlic - 1/2 cup
  • Mustard seeds - 1 tsp
  • Red Chillies - 1
  • Tamarind - 1 small sized ball
  • Powdered Jaggery - 1.5 tsp
  • Oil - 1 tbsp
Method:
  1. Peel the garlic skin and grind it with red chillies to a coarse paste and keep aside. Dont make it to a fine paste, the bits of garlic in the pickle tastes best.


  2. Add tamarind to 1/4 cup water and extract thick pulp from it and keep aside


  3. Heat oil, add mustard seeds allow it to crackle then add the garlic paste and saute till raw smell leaves and it starts turning light brown.


  4. Now add tamarind pulp, powdered jaggery and mix well. Keep sauting till the mixture turns brown color as in the pic. Switch off and store in a airtight container.


Poondu Thokku (Garlic Pickle) Recipe
I like this thooku with almost anything idli, dosa, roti or rice. Sometimes I have this as such too :)


Wednesday, December 1, 2010

Dates Tamarind and Green Chutney for Sandwiches and Chats | Chat Chutneys

Green & Red Chutney Recipe

Red Chutney(Dates Tamarind) and Green Chutney(Coriander Mint)

Does anyone say no to chats?! I am not a crazy fan of chats but then few items like dahi poori and pav bhaji are my fav. One fine day when I was craving for a chat and it was raining outside, I decided to give a try at home myself. So my first attempt was to make these chutneys ready. And these chutneys comes in handy for sandwiches too, it gives a nice flavour to it.Stay tuned for the low fat chats coming up soon here...so get ready with ur chutneys and store them in advance :)


Dates Tamarind Chutney(Red Chutney) Ingredients:
  • Dates - 10
  • Tamarind - 1 tbsp
  • Jaggery - 3/4 tbsp
  • Jeera - 1tsp roasted powder [Dry roast it and grind it to a coarse powder]
  • Red Chilli Powder - 1 tsp
Method:
  1. Pressure cook dates and tamarind(seperately in a small container) with very little water for 2 whistles.


  2. Grind dates to a smooth paste. Extract thick pulp from tamarind and mix with dates mixture.


  3. Take a kadai/pan add dates tamarind paste, then add jaggery and bring it to a boil.


  4. Now add red chilli powder and roasted jeera powder and give another boil till the chutney becomes thick like sauce consistency.


  5. Switch off and store it in clean container, refrigerate until use.


Green & Red Chutney Recipe


Coriander Mint Chutney(Green Chutney) Ingredients:
  • Coriander Leaves - 1/4 cup
  • Puthina/Mint Leaves - 1/4 cup
  • Green Chillies - 1
  • Lemon juice - 1 tsp
  • Garam masala / Chat masala powder - 1/2 tsp
Method:
  1. Clean mint and coriander leaves,remove the root part and wash it well.


  2. Grind all the ingredients mentioned above along with coriander and mint leaves to make a smooth chutney.Add water while grinding as needed but the chutney should be a little thick in consistency.


  3. Now add lemon juice to the chutney and mix well. Transfer to a clean container and refrigerate it until use.


Green & Red Chutney Recipe
This green chutney has become my fav these days. It goes well with murukku, papad or any fry items apart from being a main ingredient for chats and sandwiches. The puthina with coriander flavour is so good, try it for urself and see.


You can use this chutneys even for sandwiches. Spread one layer red chutney and another layer green chutney in 2 breadslices with raw onions in one layer and enjoy your sandwich. You can toast them too.


Green & Red Chutney Recipe

Saturday, November 20, 2010

Dal Tadka / Tadka Dal Fry

When we moved to the new place and the house works were going on, we relied on easy yet nutritious dishes for lunch. Having very little time in hand, and a naughty kiddo all that we could do is such simple meals only. One such days lunch was this simple yet flavorful dal with potato curry and steamed rice....YUM! Do check out the "Coming up next" section which is newly located on the right tab.
Dal Tadka Recipe


Ingredients:
  • Toor dal (Thuvaram Paruppu) - 1 cup [You can use yellow moong dhal too]
  • Tomato - 1 chopped
  • Small Onions - 4 halved
  • Turmeric powder - a pinch
  • Kasoori Methi leaves - 1 tsp
  • Hing - a pinch
  • Salt - to taste
  • Oil - 2 tsp
To Temper :
  • Oil / Ghee - 1 tbsp
  • Mustard seeds - 1 tsp
  • Jeera - 1 tsp
  • Garlic - 3 cloves
  • Dry red chillies - 2 halved
  • Curry leaves - 4 to 5


Dal Tadka Recipe


Method:
  1. Pressure cook dal with enough water and a pinch of turmeric powder until soft or give 3 whistles in a pressure cooker.Drain water, mash the dal once but not too mushy and keep aside.


  2. Heat oil in a pan, add 1/2 mustard seeds and allow it to splutter.Then add jeera, onions, garlic and 1 red chilli one by one and saute for 2-3mins


  3. Now add tomato and saute till raw smell of tomato leaves. Next add salt, hing and sprinkle little water and let it boil for 2mins.


  4. Now add mashed dal, mix well and let it boil for 3 more mins. Add kasoori methi leaves and mix well. Switch off and transfer to a serving bowl.


  5. Heat a tsp of ghee, add remaining 1/2 tsp mustard seeds, 1 red chilli and curry leaves. Allow it to crackle, switch off and transfer this tadka to the dal in the serving bowl .
Tadka is nothing but the seasoning we do with ghee / oil which gives a nice flavour to the simple dal.


Dal Tadka Recipe
[Source : Google]
  • Dal Tadka is a staple dish in several Indian households and is generally eaten with rice or rotis (indian flat-bread).


  • The traditional Dal Tadka Recipe is a preparation made from a variety of different lentils and a lot of spices making it a favourite accompaniment with Rice or Rotis/Naan etc.


  • Dal refers to the dry pulses that come as a result of splitting the whole pulses, and ridding them of their husks/hulls and shells.


  • Dal forms a very important part of the daily Indian meal, as it is one major source of proteins and energy.


  • Dal is generally eaten as accompaniment to Roti or Steamed white rice.Toor Dal or split Pigeon peas are generally used in preperation of this dish.
Dal Tadka Recipe
Anytime comfort and nutrtious dal, do include it in your menu and enjoy!! Happy Karthigai Deepam wishes to all!