Showing posts with label Bread based. Show all posts

Thursday, August 25, 2011

Baked Bread Rolls - Healthy teatime snack | Healthy Diet Plan #4

Hope you are enjoying this series as much as I do, please be a part of the voting poll on the sidebar. Its a short break now...No no! I am not taking a break, only this series is taking a short break, will resume this series by next weekend with the remaining teatime drink and a dinner idea. It is sure better than the deep fry way so when I saw it in Tarladalal site I instantly want to try it and just luved it.
Baked Bread Rolls Recipe


Baked Bread Rolls Recipe

Recipe Source : Tarladalal


Ingredients:

  • Wheat Bread - 5 slices
  • Ghee / Oil - 2 tsp
For the stuffing:

  • Onion - 1 finely chopped
  • Potato - 1 medium sized
  • Carrot - 1
  • Peas - a handful
  • Turmeric powder - a pinch
  • Fennel(Sombu) powder - a pinch (optional)
  • Ginger garlic paste - 1 tsp
  • Red chilli powder - 1/2 tsp
  • Garam masala powder - 1/4 tsp
  • Coriander leaves - 1 tbsp chopped finely
  • Oil - 1 tsp
  • Salt - as required


Baked Bread Rolls Recipe
Method :
For the stuffing :
  1. Cube the veggies and pressure cook them with water and turmeric powder until soft. Keep aside. Mash the potatoes well and combine it with other veggies.
  2. Heat oil in a pan, add sombu powder, ginger garlic paste, saute for 2mins. Then add chopped onions saute until slightly browned. Then add the veggies, chilli powder and garam masala powder, required salt and give a stir.Sprinkle little water just for the masalas to combine well with the veggies.
  3. Cook covered for 5mins, giving it a stir inbetween.Switch off and garnish with coriander leaves.Now the stuffing is ready.
Baked Bread Rolls Stuffing Recipe
For the bread rolls:
First cut the sides of the bread for the 5 slices. Then roll slightly using a chapathi roller, cover it with a wet muslin cloth and keep aside for 5-10mins.Then add the stuffing inbetween, add water at the edges and seal it.


Baked Bread Rolls Step1

Seal it completely on all sides.As I used wheat bread it was a bit difficult to roll it as it was very small too. Try to use sandwich sized breads so that rolling is easier, mine was normal bread.


Baked Bread Rolls Step2

Apply ghee evenly on all sides. Meanwhile preheat oven at 200 deg C for 10mins and bake it at 200 deg C for 15-20mins or till the rolls turn golden brown. Check inbetween and turn over if required. Serve it with tomato ketchup the best combination.

Baked Bread Rolls Step3
My Notes:
  • The timing differs from oven to oven so check exactly after 15mins then proceed with remaining 5mins.
  • If you feel uneven cooking, you can turn over in between like what I did.
  • If you want you can add more ghee or butter as per liking.
  • The stuffing can be of your choice, you can use mushroom, paneer, corn etc
Baked Bread Rolls Recipe

Wednesday, June 29, 2011

Bread Cup Pizza and Bread Channa Cups | Bread Cups

Bread Cup Pizza Recipe
I have seen and tasted cup pizza at Nilgiris and I badly wanted to try it with the normal pizza dough recipe. Fortunately when I saw the bread cup channa chat recipe at Nithis space, I took the idea of bread cups from there and took the short route of making the bread cup pizza :) I also tried the channa in bread cups as in the orginal recipe and I luved both of them. As the cup pizza ingredients are instant and readily available in most of our kitchens, I almost make these cup pizzas everytime I buy bread.


As I have mentioned in this space so many times, I luv bread in any form so this adds another feather to the cap :)


Bread Cup Pizza Recipe


Bread Cup Pizza Ingredients:

  • Bread(white or wheat) - 3 slices
  • Butter - 1 tsp
  • Capsicum - a handful finely chopped
  • Onion - a handful finely chopped
  • Pizza sauce - 2 tbsp
  • Tomato Ketchup - 1 tbsp
  • Cheese - 2 tbsp ( as required to cover the topping)


Bread Channa Cups Recipe
Method:
  1. First cut the edges of the bread. Now cut circles using a round cookie cutter or a container lid. Flatten the bread circles using a chappathi roller. Dont try to stretch too much, just flatten a bit.
  2. Apply butter slightly on both sides of the circles. Now spread the pizza sauce in the 3 slices and then gently fit in the muffin pan. I didnt grease the muffin pan.
  3. As shown in the below pic I left three bread cups empty to bake and then after baking filled it up with channa masala.
  4. For the remaining 3 breadcups for making bread cup pizza, add capsicum, onion on top of the pizza sauce. Grate the cheese over it then finally add tomato sauce in each of the cups.
  5. Preheat the oven to 190 deg C and bake it for 10-12mins until the bread turns slightly golden brown at the corners.My bread cups were done exactly in 12mins. They were firm and cripsy to hold the filling.
Bread Cup Pizza Recipe


Bread Channa Cups Ingredients:

  • Bread(milk or wheat) - 3 slices
  • Butter - 1 tsp
  • Onion - 1/2 finely chopped
  • Chat Chutneys - 1 tbsp in each (optional) - I had no stock so didnt add :)
  • Channa Masala - 3 tbsp
  • Coriander leaves - 3 tsp


Bread Cup Pizza Recipe
For assembling the Channa Cups:
  1. Once the bread cups are done, add channa masala with less gravy as it will make the bread cups soggy.
  2. Then add the onions, drizzle the dates and green chutney if you are adding and garnish with coriander leaves.
  3. Your bread channa cup chat is ready :)
Bread Cup Pizza and Bread Channa Cups Recipe
My Notes:
  • The filling is endless you can even add paneer, babycorn , tomato etc as we do for normal pizzas
  • If you are using wheat bread, check carefully after 10mins as the browning doesnt show up clearly as in white bread
  • If you use milk bread variety then flattening it will crumble the bread so flatten it slightly or even fit it in the muffin pan without flattening it
  • It is easy to hold and eat and truely fancy to attract the kids
  • You can also use the bread as such with the edges, no need to trim it. It tastes good even with the bread edges, I have tried that way too.
Bread Cup Pizza and Bread Channa Cups Recipe

Tuesday, June 21, 2011

Eggless Mango Cake / Mango Loaf Bread

I wanted to utilise the mango season completely and no mango recipe collection is complete with a mango cake...Agree?! I have seen mango cakes, muffins and bread in so many blogs and when I wanted to try I went ahead searching for them. The one that suited my constraints(Yes I wanted a low fat version) was the mango banana bread from litebite. I am always amazed by her low fat baking goodies that I went ahead to try this with few modifications to suit my taste and it turned out super good.
Eggless Mango Cake / Mango Loaf Bread Recipe


Eggless Mango Cake (Mango Loaf Bread)

Recipe Source : Litebite.in


Ingredients:
  • Maida - 1 cup (150 gms)
  • White Rava(fine variety) - 1/2 cup (100 gms)
  • Mango - 1 big sized
  • Walnuts chopped - 2 tbsp
  • Granulated Sugar - 3/4 cup (200 gms)
  • Curd - 1/4 cup (60 ml)
  • Olive oil - 2 tbsp
  • Baking soda - 1/2 tsp
  • Baking powder - 1 tsp
  • Salt - a pinch
  • Cardamom powder - 1/2 tsp


Eggless Mango Cake / Mango Loaf Bread Recipe
Method:
  1. Chop the mangoes and puree it without water to get a thick pulp. Keep aside.
  2. Sift maida, baking soda, baking powder and salt atleast twice for even spread of baking powder and soda.Now add rava to the maida mixture, keep aside.
  3. In a seperate bowl, add oil,yogurt, mango pulp, cardamom powder,sugar and mix well till sugar is completely dissolved.
  4. Now add the curd mango mixture to rava maida mixture slowly and mix until a thick batter is formed. Add chopped walnuts and mix once. Reserve 1 tbsp of walnuts for topping.
  5. Preheat the oven at 190 deg C for 10mins. Meanwhile grease the pan with little oil and sprinkle maida. Arrange butter paper if you use it(I use for most of the cake for easy unmoulding).
  6. Transfer the batter to the cake pan. Top the cake batter with remaining chopped walnuts and bake it for 35-40mins at 190 degree C.In my OTG it took exactly 40mins for the mango bread to get baked.
  7. The top would have turned to a golden brown color by this time. Check with a toothpick in the center of the cake and if it comes out clean then ur cake is done.Cool it for atleast 15mins before you unmould and slice them
Eggless Mango Cake Recipe


I dont miss to use a butter paper these days as its mess free to unmould and cleaning the pan is also easy. For the tart mould I didnt even grease but still unmoulding was super easy.


Eggless Mango Muffins RecipeMy Notes:

  • I used a bread loaf pan and 3 small tart moulds.You can use a normal cake pan but see to it that the pan is as big as to hold the batter only to 1/2 or slightly more than the pan .
  • The baking time totally depends on the cake mould and the oven, usually my bread loaf pan takes a little longer so it took me 40mins. So keep an eye after 30mins and then extend baking time accordingly.
  • The cake in the tart moulds were done in 20mins. Only the bread loaf pan took 40mins to complete.So if you are planning for muffins it will take just 20-30mins.
  • Adding sooji gives a wonderful texture to the cake. Mango and cardamom combination is heavenly so dont skip it.
  • The orginal recipe calls for only 1/2 cup sugar but I felt my mangoes were not that sweet so I used 3/4 cup and it was perfect.
  • As the cake uses mango pulp, it keep well only for 2 days. Dont refrigerate the cake, as it would become hard.
Eggless Mango Cake / Mango Loaf Bread Recipe


Mango, curd and rava gives a wonderful texture to the cake/bread that the cake came out beyond my expectation that everyone loved it at home. The nutty crunch in every bite tasted out of the world...yummmy.


Eggless Mango Cake / Mango Loaf Bread Recipe


The mango bread looked so lovely that my camera didnt stop clicking at all :) The smell of the mango cake while it was baking was too gud that I cudnt move out of the kitchen. Usually I like cutting cakes into pieces and when it comes to slicing breads I just luv them and this cakes texture was just perfect to make slices. Trust me and go ahead to try this cake.


Eggless Mango Cake / Mango Loaf Bread Recipe

Making a blog post has become like one of my daily chores these days and I feel so much contented after making each new post and each comment I moderate justifies the hard work I put in for that post. Thank you readers :)


Eggless Mango Cake / Mango Loaf Bread  Recipe


Tuesday, April 5, 2011

Paneer Bread Balls / Paneer Balls

I have tasted paneer balls from Nilgiris and was wondering what ingredients went in to make these tasty balls. But I knew potato and panner were the main ingredients. And the moment I saw these spinach cheese balls from the cookbook by Tarladalal the idea struck me to make these paneer bread balls. But know what?! except the ball idea I totally modified the recipe to my convenience :)


Paneer Balls Recipe


Ingredients :
  • Paneer - 1 cup
  • Bread - 3 slices
  • Potato - 1/2 (just for binding)
  • Onion - 1 finely chopped
  • Coriander leaves - 2 tbsp
  • Tomato Sauce - 1 tbsp
  • Rava - 1/2 tbsp
  • Turmeric powder - 1/2 tsp
  • Chilli powder - 1 tsp
  • Oil - as required


Paneer Balls Recipe
Method:
  1. Crumble the paneer well. Knead it for 5mins until well combined. Boil potatoes until soft and combine with paneer and keep aside.
  2. Cut the corner of the bread slices, sip it in water and add it to crumbled paneer . then add all the other ingredients except oil and combine to form a smooth dough just enough to roll into balls.
  3. Now pinch equal sized balls and roll them into small balls and deep fry them in oil(I used my paniyaram pan to toast them to reduce oil)
Paneer Bread Balls Recipe


My Notes:
  • It is a very easy and interesting snack/starter idea. I have seen this in nilgiris in the name of paneer balls.
  • Alternatively you can dip the balls in maida water paste , them cover them with breadcrumbs as we do for veg cutlets and then deep fry or toast them.
Paneer Bread Balls Recipe


Monday, March 28, 2011

Bread Vegetable Masala Sandwich / Bread Masala Toast

Have u ever tasted Iyengar bakery bread sandwiches?! If not do give a try and am sure you will not regret and will ask for more. I just love them so much and when I saw the recipe I wanted to give a try instantly. Its easy, quick and tasty sure a must try for all bread lovers like me :)
Bread Masala Toast Recipe


Bread Vegetable Masala Toast / Iyengar Bakery Style Sandwiches Recipe
Recipe Source : Sailus Food


Ingredients:
  • Bread - 4 slices
  • Onion - 1
  • Carrot - 1 chopped finely
  • Capsicum - 1 chopped finely
  • Tomato - 1/2 finely chopped
  • Green Chillies - 1 finely chopped
  • Chilli powder - 1/2 tsp
  • Tomato sauce - 3 tbsp
  • Ghee - to toast
  • Coriander leaves - 1 tbsp chopped finely
  • Oil - 2 tsp


Bread Vegetable Masala Sandwich Recipe
Method:
  1. Heat oil, add onions and green chillies. Saute until onions turn golden brown. Add tomatoes,carrot and capsicum, saute till raw smell leaves.
  2. Now add turmeric powder, red chilli powder and saute for 3-4mins. Add a tbsp of tomato ketchup, give a quick stir.
  3. Garnish with coriander leaves and switch off. Now the stuffing for sandwich is ready.
  4. Toast bread slices until slightly cripy with a tsp of ghee. Apply tomato sauce on one side then spoon out the vegetable stuffing and spread it on the sauce. Your open sandwich is ready
  5. You can make it as a regular sandwich also by spreading the vegetable stuffing between two slices of bread with tomato sauce applied on one side of the slice.


Bread Masala Toast Recipe
My Notes
  • You can add any vegetable of your choice, you can even include tomato if you like them.
  • You can either make it as open sandwich(iyengar bakery style) or make it as a sandwich in sandwich maker and enjoy them.
  • The vegetables should not be mushy, it should be crunchy and firm enough to bite.
  • Toasting slightly is enough, it need not be very crispy.You can use wheat(brown) bread too.
Bread Vegetable Masala Sandwich Recipe


This is easy to fix up with very less effort(so sure my kind of recipe) and yet a tasty snack for kids. If you are packing up you can make it as a sandwich and enjoy them.


The vegetables are your choice, but the iyengar bakery sandwiches uses these veggies I used them too :)
Bread Vegetable Masala Sandwich Recipe


Tuesday, March 15, 2011

Eggless Whole Wheat Garlic Buns / Garlic Rolls - Step by Step Recipe

I am fond of the flavoured buns and rolls which we get in bakeries. When I saw these buns I quickly wanted to try it and so far I have made it thrice with different proportions of the flour. I always want to try my hands with wheat flour when it comes to buns/rolls - One such example is these savoury buns because it is the only chance I can experiment. Because I havent succeeded using wheat flour for cakes , atleast cookies I can say they are good.


Whole Wheat Garlic Rolls Recipe


Whole Wheat Garlic Rolls Recipe
Makes 6 medium sized rolls
    Ingredients:
    • Wheat Flour - 1 and 1/2 cup
    • Plain Flour - 1/2 cup
    • Warm Water- 3/4 cup
    • Milk - 2 tbsp (optional)
    • Yeast - 1/2 tbsp
    • Salt - 1 tsp
    • Sugar - 1/2 tbsp
    • Olive Oil - 1/2 tbsp
    • Sesame seeds - 1 tbsp
    For Garlic Spread:
    • Salted butter, at room temperature - 2 tbsp
    • Minced garlic - 6 big cloves
    • Chopped coriander leaves - 1 tbsp
    • Green chillies - 1 finely chopped / paste


    Whole Wheat Garlic Rolls Recipe

    Method:

    Add warm water,milk,oil,sugar and salt in a wide bowl, add yeast to it and dissolve completely.Then add maida, wheat flour and knead it to a soft sticky dough.


    Whole Wheat Garlic Rolls Step1

    Keep the dough in a warm place(near your kitchen stove) undisturbed for 1 hr. Keep covered with a wet muslin cloth/plastic wrapper. By this time the dough would have raised well. Now knead it once again with 1/2 tsp of oil and spread it out using chapathi roller for about 1/2inch thickness to form a rectangle/square. Dust flour if needed.

    Whole Wheat Garlic Rolls Step2

    Prepare the garlic spread by mixing butter, coriander leaves and chilli paste. Now spread this garlic spread on one side of the rolled dough.Roll from one end to another gently and firmly.Reserve little spread for the topping.

    Whole Wheat Garlic Rolls Step3

    Now cut it into 2 halves. Then cut each halves into 3 rolls each so that you get 6 large rolls(I got a extra tiny one too:)). Brush it with little milk on top. Then spread the remaining garlic spread on top of the cut side and sprinkle sesame seeds on top of it.Now keep them arranged in a greased tin with cut side up.

    Whole Wheat Garlic Rolls Step4

    Now allow it to raise again for 30mins. Then preheat the oven for 180 deg C for 10mins.Keep the tin near the oven for good raising again, it will start sticking to each other.The first pic below is after 30mins, the second pic is after the preheating time. Bake it at 180 deg C for 25-30mins or until the buns starts browning like in the third pic below.

    Whole Wheat Garlic Rolls Step5


    Now pull them apart and enjoy every bite.These buns are very soft and has a very aromatic flavour which fills in your home with its flavour when its baking.


    Whole Wheat Garlic Rolls RecipeMy Notes:
    • Water quantity purely depends on the flour so adjust accordingly. Judge the dough such that the dough is slightly sticky.


    • You can add 1 tbsp yeast to make to raise even faster. You can even add 1tsp and allow it to raise for a longer time say 2-3 hours.


    • The spread can be your own choice, you can even try vegetable/paneer stuffing. You can use the same method for making basic buns too.


    • You can also replace the entire 2cups of flour with maida for a even more softer and bakery kind of bun. With full maida you will get a very softer bakery style buns.


    • The buns starts browning to golden brown only during the last 10-15mins so dont panic like me :) Check if the buns are done after 25 mins then proceed with the extra baking time.


    Eggless Whole Wheat Garlic Buns


    Sunday, January 2, 2011

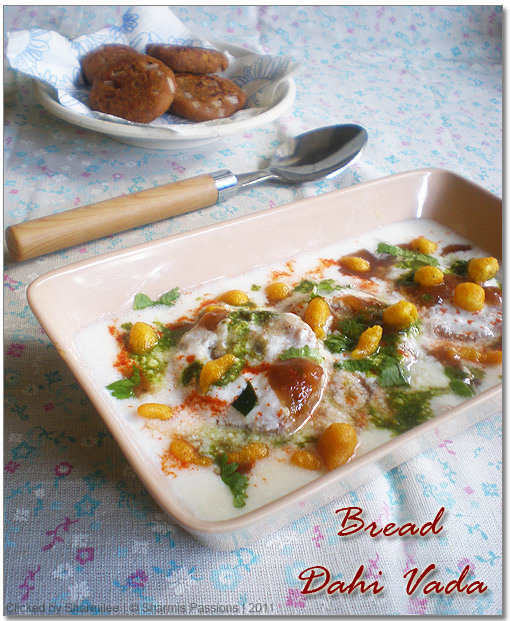
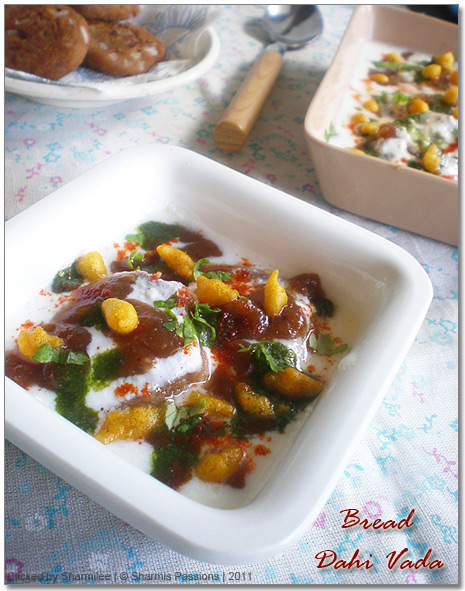
    Bread Dahi Vada and Bread Dahi Chat

    Hope you all had a great new year. I made a simple baking on new years eve - Eggless basic sponge cake which is everyones favorite at home, will post the recipe sooner. The day went great too, started off with receiving phone calls, then visiting temple, then to a near by park finishing it up with a dinner at a new restaurant.


    When it comes to chats I can never say no to it. Bread being my favourite thought to give a try chats with it and it has been a instant hit at home. Here goes the easy and sure low fat chats:


    Bread Dahi Vada - Chat Style Recipe
    Bread Dahi Vada - Ingredients :
    Makes 8 to 10 vadas
    • Wheat Bread - 4 slices
    • Onion - 2 tbsp chopped finely
    • Salt- to taste
    • Turmeric powder - a pinch
    • Chilli powder - 1/2 tsp
    • Red Chutney - 1 tbsp
    • Green Chutney - 1 tbsp
    • Boondi - 1 tbsp
    • Chopped coriander leaves - 1 tbsp
    • Oil - to toast
    • Curd - 3/4 cup
    Bread Dahi Vada - Chat Style Recipe
    Method:
    1. Dip the bread slices in water, immediately squeeze it and transfer this to a bowl and smash it.


    2. Now add chopped onions, turmeric powder, chilli powder and mix it well enough to form patties. Now form small sized balls and pat them using ur palms. Heat oil in a dosa pan and toast the vadas till slightly cripsy and browned


    3. Now for the assembling : First add little curd mixed, drizzle very little green and red chutneys then add the vadas on top of it add the remaining curd enough for the vadas to immerse fully. Then drizzle the remaining green and red chutney on top. Garnish with boondis and finely chopped coriander leaves.
    Bread Dahi Vada - Chat Style Recipe
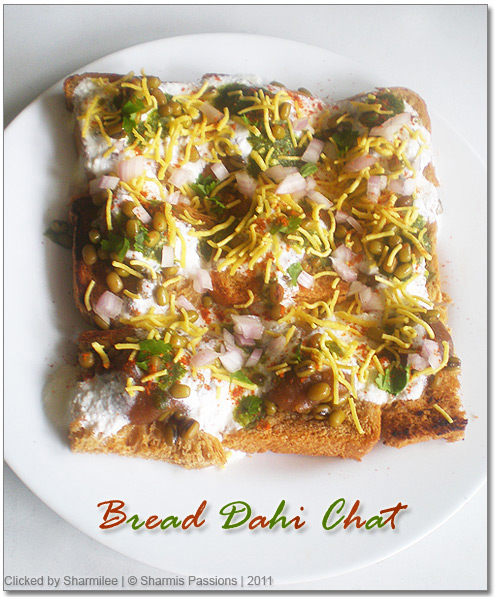
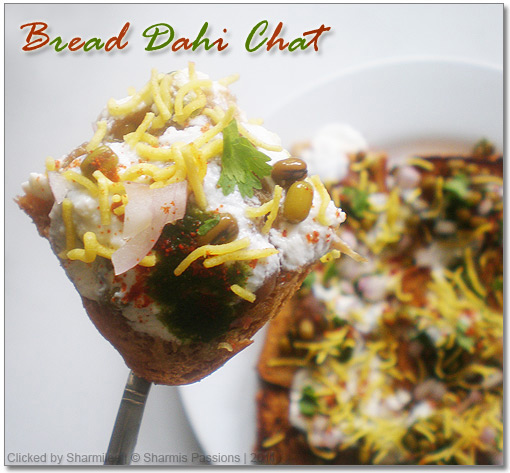
    Bread dahi chat is an out come of trying to reproduce dahi poori cutting down the deep frying and potatos alone. So instead of bread you can use pooris too.


    Bread Dahi Chat - Ingredients
    • Wheat Bread - 4 slices
    • Red Chutney - 1 tbsp
    • Green Chutney - 1 tbsp
    • Sev - 1/4 cup
    • Green Gram - 1/4 cup
    • Raw Onions - 2 tbsp
    • Chopped Coriander Leaves - 1 tbsp
    • Curd - 3 tbsp
    Method :
    1. Soak green gram for 30mins and pressure cook until soft and keep aside.


    2. Dry toast the bread in a dosa pan (or add little oil and toast) until crispy or toast it using a toaster which makes it very crispy. Cut each bread slice into 4.


    3. Now for the assembling : Lay the bread slices first(may be 9 peices in a plate), add boiled green gram, then add the chutneys generously. Spread a layer of curd over it, then chopped raw onions then garnish it with sev and chopped coriander leaves.


    Bread Dahi Chat Recipe
    Both the chats are very easy to make if you have the chutneys ready. The chutneys keeps well for about a month so make it in advance and refrigerate them.


    The idea of bread dahi vada was from a TV show but I vaguely remembered the recipe, so modified it according to our taste, it is ammas most favorite and bread dahi chat is my favorite :)


    Bread Dahi Chat Recipe


    Wednesday, December 1, 2010

    Dates Tamarind and Green Chutney for Sandwiches and Chats | Chat Chutneys

    Green & Red Chutney Recipe

    Red Chutney(Dates Tamarind) and Green Chutney(Coriander Mint)

    Does anyone say no to chats?! I am not a crazy fan of chats but then few items like dahi poori and pav bhaji are my fav. One fine day when I was craving for a chat and it was raining outside, I decided to give a try at home myself. So my first attempt was to make these chutneys ready. And these chutneys comes in handy for sandwiches too, it gives a nice flavour to it.Stay tuned for the low fat chats coming up soon here...so get ready with ur chutneys and store them in advance :)


    Dates Tamarind Chutney(Red Chutney) Ingredients:
    • Dates - 10
    • Tamarind - 1 tbsp
    • Jaggery - 3/4 tbsp
    • Jeera - 1tsp roasted powder [Dry roast it and grind it to a coarse powder]
    • Red Chilli Powder - 1 tsp
    Method:
    1. Pressure cook dates and tamarind(seperately in a small container) with very little water for 2 whistles.


    2. Grind dates to a smooth paste. Extract thick pulp from tamarind and mix with dates mixture.


    3. Take a kadai/pan add dates tamarind paste, then add jaggery and bring it to a boil.


    4. Now add red chilli powder and roasted jeera powder and give another boil till the chutney becomes thick like sauce consistency.


    5. Switch off and store it in clean container, refrigerate until use.


    Green & Red Chutney Recipe


    Coriander Mint Chutney(Green Chutney) Ingredients:
    • Coriander Leaves - 1/4 cup
    • Puthina/Mint Leaves - 1/4 cup
    • Green Chillies - 1
    • Lemon juice - 1 tsp
    • Garam masala / Chat masala powder - 1/2 tsp
    Method:
    1. Clean mint and coriander leaves,remove the root part and wash it well.


    2. Grind all the ingredients mentioned above along with coriander and mint leaves to make a smooth chutney.Add water while grinding as needed but the chutney should be a little thick in consistency.


    3. Now add lemon juice to the chutney and mix well. Transfer to a clean container and refrigerate it until use.


    Green & Red Chutney Recipe
    This green chutney has become my fav these days. It goes well with murukku, papad or any fry items apart from being a main ingredient for chats and sandwiches. The puthina with coriander flavour is so good, try it for urself and see.


    You can use this chutneys even for sandwiches. Spread one layer red chutney and another layer green chutney in 2 breadslices with raw onions in one layer and enjoy your sandwich. You can toast them too.


    Green & Red Chutney Recipe

    Saturday, November 13, 2010

    Homemade Veg Pizza / Paneer Tikka Pizza - Step by Step Recipe

    Veg pizza in 2 versions (Normal & Low Fat)
    I was postphoning this pizza post just for the reason that I had to write more ;) Also I wanted to compile all the pics with stepwise, and the variation that I had clicked each time I made Pizza. And with no doubt this recipe is a keeper but I made adjustments here and there each time and finally found the recipe for perfect pizzas, So no more pizzas from restaurants. I have tried with 2 different toppings and here am giving u both for normal as well as low fat version.
    Pizza pics updated on 22/7/11
    Homemade Veg Pizza


    Ingredients for Normal Pizza :
    [Recipe Source - Raks Kitchen]
    • All purpose flour/Maida - 1 & 1/2 cups [My 1 cup measures 200 gms]
    • Active dry yeast - 1 tbsp [but not a heaped one]
    • Milk - 1/4 cup
    • Water - 1/4 cup
    • Sugar - 1/2 tblsp
    • Salt - 3/4 tsp
    • Olive oil - 2 tbsp
    For the topping :
    • Pizza/Pasta Sauce - 1 tbsp
    • Tomato Sauce - 1/2 tbsp
    • Onion - 1/2 chopped
    • Capsicum - 1/2 chopped
    • Grated mozarella cheese - 2 tbsp or as required to cover the topping
    • Pepper powder - 1/2 tsp
    For Paneer tikka marinating:
    • Paneer - 10 to 12 small cubes
    • Chilli powder - 1 tsp
    • Turmeric powder - 1/2 tsp
    • Garam masala powder - 1/2 tsp
    • Coriander powder - 1/2 tsp
    • Lemon juice - 1 tsp
    • Curd - 1.5 tbsp


    Veg Pizza
    Method:
    Boil the water first in a wide vessel and keep aside. Now add milk, oil, sugar, salt to boiled water and mix well till sugar dissolves. Now add yeast to the milk oil solution.
    Veg Pizza Step1


    Mix well and keep aside for 5-7 mins stirring occassionally. After sometime you can see the yeast completely dissolved as shown below. Now add the flour.
    Veg Pizza Step2


    After adding the flour, gather to get a smooth pilable dough. No need to knead completely just bring it together that is enough.Keep covered with a wet cloth till an hour or 2, preferably in a warm place for best results.

    Veg Pizza Step3


    When u check after an hr, the dough would have been raised(I wouldnt say its exactly doubled) .Now again punch it down incase for any airbubbles and then keep aside. By the time cut paneer into small cubes add curd, salt, turmeric, chilli, coriander, garam masala powder and lemon juice - Marinate it for 15mins. I usually dont roast the paneer seperately but attimes when I have time in hand I do it and yes this time I toasted it in a tawa with little oil till golden brown. You can also just keep the paneer along with the topping to bake without toasting.
    Veg Pizza Step5


    Grease a baking tray with aluminium foil [I didnt dust flour or add oil] . Keep the dough on the tray, Now roll the dough a little thick as 1 to 1.5 inches and fold the ends as shown in the below pic. Just fold the ends inside and press it till u get a small depthness.Prick the base with fork to make sure of even cooking [I forget it everytime ;)]. Spread the pizza sauce, I used the readymade maggi pizza sauce.
    Veg Pizza Step4
    Arrange the toppings - I've used paneer, capsicum and onion here.Then grate the cheese till it covers topping.Just add tomato sauce on top this is purely optional but it tastes good with it. Then sprinkle pepper powder. Preheat the oven for 210 degree Celsius and bake for 15- 20 mins,till the base turns golden brown.If you cut a tiny area with a knife, u can see if its cooked fully by seeing the bread like texture.Mine gets done usually in 20mins, check at 15mins then proceed with the extra 5mins.


    Cut the pizzas with pizza cutter/knife, make wedges and enjoy hot and yummy pizza :)


    Veg Pizza
    The topping combination is endless.To me pizzas are only if they served from Pizzahut but sure homemade pizzas changed my mind :)


    Low Fat Version Ingredients :

    • Wheat Flour - 1 cup
    • Maida - 1/2 cup
    • Active dry yeast - 3/4 tblsp
    • Milk - 1/4 cup
    • Water - 1/4 cup
    • Sugar - 1/2 tblsp
    • Salt - 3/4 tsp
    • Oil - 1 tbsp
    For the topping:
    • Tomato Sauce - 1tbsp
    • Onion - 1 chopped
    • Capsicum - 1/2 chopped
    • Pepper powder - 1/2 tsp
    • Chilli powder 1/2 tsp [You can alternatively use chilli flakes also]
    • Cheese - 2 tsp grated
    • Paneer cubes - 6 to 8


    Low Fat version of Veg Pizza with thin crust/base
    Veg Pizza


    Except for the ingredients the method is the same just give an extra 3-5 mins while baking as wheat flour takes a little more time than maida.


    My Notes :
    • The dough shouldnt be sticky...if so then ur dough is watery so add in a little more flour. Give a slight press while arranging the topping, so that after baked the topping gets nicely blended with the base.


    • It is again a no fail recipe.The only thing to keep in mind is the measurements and the yeast activeness.With the measurement specified above , u can make 2 thin crust pizzas too, it tastes equally gud. If you are opting for one then u will get a big pizza a little bigger in radius than the ones u get in pizzahut.


    • I have tried with normal cube cheese but it never melts and spreads well like mozzarellacheese.If you use other cheese, it will sit in the place u have grated :)


    • Usually I roll the dough in the baking tray with aluminium foil which I opt to place it in oven, this way its messfree as u need not transfer from one to another carefully.