Wednesday, December 15, 2010

Easy Homemade Chocolates - No cook version

I know most of us love chocolates, but I like sweets more than chocolates. I had seen this recipe in video format so wanted to give a try and for this reason got a tin of condensed milk....hmm ok I agree, I had few eggless cakes in mind too :) Christmas is round the corner and so here I am with these easy no cook homemade chocolates as a first treat.


I like and respect the way each festival is celebrated with their own customs and traditions.Been brought up in a Christian institution Christmas was also a part of me. I am fond of watching the crib decoration , the christmas tree, the santa clause, the star being tied outside each house, the yummy cakes and the elaborate meal which includes the special biriyani and what not?! I used to even visit churches with my close friend during our college days and have special lunch served at her place. Last year we even hanged a star in our home and am planning to do it this year too :)
Easy Homemade Chocolates Recipe


Ingredients:
  • Milk Maid - 1/4 cup
  • Drinking Chocolate - 2.5 tbsp
  • Icing Sugar - 2.5 tbsp
  • Coco Powder - 3/4 tbsp
  • Milk Powder - 2 tbsp
  • Mixed nuts - 1 tbsp broken [optional]
Method:
  1. First mix drinking chocolate, coco powder, milk powder and icing sugar well till all are evenly mixed.


  2. Next add the condensed milk little by little to the above milk powder mixture and mix well. It will form a slightly sticky dough.


  3. Grease your palm with little butter, Pinch a small portion from the dough and roll them into balls or required shapes. You can add nuts inside and roll them into balls too. Garnish few nuts on top for the extra crunchy taste.


  4. Refrigerate them for an hour or two and your chocolates are ready to be served. Enjoy eating!!


Easy Homemade Chocolates Recipe


These homemade chocolates are very easy to make which takes only around 30mins for the whole process excluding refrigerating time. To be frank these were not exactly like the shop bought ones but sure did not fail to please any chocolate lover. Proof is my daughter who was wandering around the fridge till the chocolates got emptied. Since this is the first time I am trying, I halved the recipe and got around 8-10 small chocolates....It depends on size and shape we make too.


Isnt that easy?! Just mix, refrigerate and your chocolates are ready in no time. It is as simple and easy as it sounds there is no complicated steps, so anyone can try this. I luv the nuts in chocolates so all my share of chocolates had nuts in it both inside and outside :)


Easy Homemade Chocolates Recipe


Monday, December 13, 2010

Paruppu Urundai Kuzhambu - Step by Step Recipe

The very first time when I tried this I felt it was a very lengthy process with few confusions and was disturbing amma now and then so thought I should have this in my space with stepwise for my readers and for my future reference as well :) So here goes the recipe with stepwise:
Paruppu Urundai Kuzhambu Recipe
Paruppu Urundai Kuzhambu - (Lentil Balls in Coconut Tamarind Sauce)


Ingredients for the urundai:
  • Toor dal (Thuvaram paruppu) - 1/2 cup
  • Channa dal (Kadala paruppu) - 1/4 cup
  • Onion - 1 tbsp
  • Ginger garlic paste - 1 tbsp
  • Coconut grated(optional) - 1.5 tbsp
  • Red chillies - 2
  • Fennel(Sombu) - 1/2 tsp
  • Salt - to taste
To grind to a paste:
  • Coconut - 1/2 cup
  • Big onion - 1/2
  • Tomato - 1/2
For Kuzhambu:
  • Tamarind - 1 lemon sized ball
  • Tomato - 1/2 small (chopped)
  • Chilli powder - 1 tsp
  • Coriander powder - 1 tsp
  • Turmeric - a pinch
  • Salt - to taste
To temper :
  • Oil - 1 to 2 tbsp
  • Fenugreek seeds (Vendhayam ) - 1/4 tsp
  • Mustard - 1 tsp
  • Small Onion - 6 to 8 [Recommended to use small onions but I used big onions as I didnt have small onions at that time]
  • Tomato - 1/2
  • Curry leaves - 1 tbsp


Paruppu Urundai Kuzhambu Recipe
Method:
Soak the dals in water for 2 hrs. Add lemon sized tamarind in 1/4 cup water, extract juice and keep aside. Then drain water from the dal, grind it with red chillies and fennel to a semi coarse mixture. Sprinkle only little water say 1 to 2 tsp while grinding.
Paruppu Urundai Kuzhambu Recipe


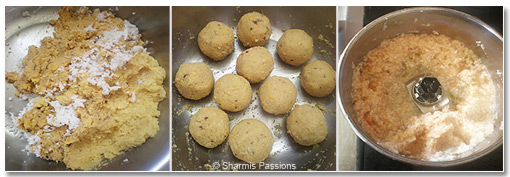
Now add salt, coconut, onion and ginger garlic paste with the grinded mixture and mix well. Alternatively you can add garlic and ginger in the previous step itself and grind it together with the dal. Make lemon sized balls out of it and keep aside. Grind onion, tomato with coconut(ingredients mentioned under 'to grind') to a fine paste and keep aside.
Paruppu Urundai Kuzhambu Recipe


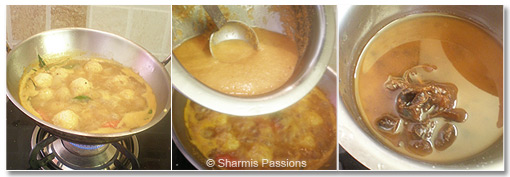
Heat oil in a kadai and add the ingredients under 'to temper' one by one : First add mustard seeds allow it to crackle, then fenugreek seeds, onions, tomato and curry leaves. Saute for 3mins then add 2.5 cups of water with chilli and coriander powder and allow it to boil. Once the water starts boiling, simmer and gently add the lentil balls one by one taking care not to mush it.
Paruppu Urundai Kuzhambu Recipe


Allow it to get cooked, dont turn over which will make the balls mushy. Once the balls are cooked it will become firm, then you can turn over once and thats the stage you have to add the grinded paste and tamarind juice.Add required salt and mix well.
Paruppu Urundai Kuzhambu Recipe


Now let the gravy thicken and boil for few minutes. Simmer it after boiling and let it cook for another 2-3 mins. When the gravy is as thick as in the below pic, Switch off and garnish with chopped coriander leaves.
Paruppu Urundai Kuzhambu Recipe


I have watched amma making it many times and wanted to give a try and this is the 2nd time I'm trying it myself....Its my favorite gravy with rice. The lentil balls in coconut tamarind sauce tastes best, I luv it even with dosas and chapathis. This seems to be a lengthy process but once you taste it am sure you will not regret for the pain taken.


Paruppu Urundai Kuzhambu Recipe


My Notes:
  • I was very much skeptical about adding the lentil balls as such in the gravy but it works fine. I've heard from my friends that the balls need to be steamed before adding it to the gravy but I find adding it directly is messfree and easy.


  • Be careful in turning over the balls before its cooked. Also add them only after the water starts boiling and dont forget to simmer after the balls are added.


  • The texture of the balls is purely your choice, we usually like it a bit smooth. You can make it even more coarse too.


Paruppu Urundai Kuzhambu Recipe
Flavorful & Tempting Lentil Balls

Thursday, December 9, 2010

Poondu Thokku (Garlic Pickle)

This pickle/thokku with tangy taste of tamarind is the best combination for curd rice. It is easy to make, you can add in onions too with this thokku.
Poondu Thokku (Garlic Pickle) Recipe


Ingredients:
  • Garlic - 1/2 cup
  • Mustard seeds - 1 tsp
  • Red Chillies - 1
  • Tamarind - 1 small sized ball
  • Powdered Jaggery - 1.5 tsp
  • Oil - 1 tbsp
Method:
  1. Peel the garlic skin and grind it with red chillies to a coarse paste and keep aside. Dont make it to a fine paste, the bits of garlic in the pickle tastes best.


  2. Add tamarind to 1/4 cup water and extract thick pulp from it and keep aside


  3. Heat oil, add mustard seeds allow it to crackle then add the garlic paste and saute till raw smell leaves and it starts turning light brown.


  4. Now add tamarind pulp, powdered jaggery and mix well. Keep sauting till the mixture turns brown color as in the pic. Switch off and store in a airtight container.


Poondu Thokku (Garlic Pickle) Recipe
I like this thooku with almost anything idli, dosa, roti or rice. Sometimes I have this as such too :)


Saturday, December 4, 2010

Kadai Paneer Gravy Recipe | Indian Paneer Recipes

Lately I found out that there were increasing hits for my moist chocolate cake with no egg and butter eventhough it was posted long back. Felt even happy when I saw it in google search results so this and few reader requests made me to again make the cake, and update it this time with stepwise too. I made this cake yest for updating it in my old post and also using it for trying out black forest trifle.
Kadai Paneer Recipe
Coming to todays post : I am fond of trying out new paneer dishes because I'm bored of trying the same PB masala. So googled to find out other paneer recipes and this kadai paneer caught my eye, and set out to try it. It turned out to be a hit at home. Paneer cooked in tomato coriander sauce simmed in a kadai - do u need any other tempting description?! :)


Ingredients:
  • Paneer - 1 packet cubed [It comes to 1 cup approximately]
  • Capsicum - 1 chopped
  • Onion - 1 chopped finely
  • Jeera - 1 tsp
  • Red chilli powder - 1 tsp
  • Turmeric powder - a pinch
  • Garam masala powder - 1 tsp
  • Ginger garlic paste - 1 tbsp
  • Kasuri methi / dried fenugreek leaves - 1 tbsp
  • Oil - 2 tsp
  • Red Chillies - 1
  • Coriander leaves - to garnish
  • Salt to taste
For grinding:
  • Tomatoes - 2
  • Coriander seeds - 1.5 tsp
  • Red Chillies - 1


Kadai Paneer Recipe


Method:
  1. Dry roast coriander seeds and red chillies one by one seperately and grind it with tomato to a fine paste.


  2. Heat half a tsp of oil, add cubed paneer and toast it for 2mins. Dont let it brown then transfer the toasted paneer in hot water for 5mins, drain and keep aside


  3. Heat remaining oil in a kadai, add jeera allow it to crackle then add red chillies and fry for a minute. Add onions, ginger garlic paste and saute till raw smell leaves and onions turn slightly browned.


  4. Then add the ground tomato paste and fry for 3-4mins till raw smell leaves. Sprinkle little water if its very thick. Then add the chilli, turmeric and garam masala powder, mix well and fry for few mins.


  5. Next add the capsicum and saute till its cooked but retain its crunchiness dont let it become soft.


  6. Add kasoori methi and salt to taste. Finally add the cubed paneer and mix gently until well combined. Simmer for 3 mins so that the paneer get nicely blended with the gravy. Switch off , Garnish with coriander leaves and serve hot with rotis/chapatis.


My Notes:
  • After toasting the paneer, transfer to hot water and take it out within 5mins and drain it else the paneer would become rubbery.


  • Dont skip the kasoori methi as it gives a nice and unique flavour to the gravy.
Kadai Paneer Recipe
Happy Weekend and Week ahead!!


Wednesday, December 1, 2010

Dates Tamarind and Green Chutney for Sandwiches and Chats | Chat Chutneys

Green & Red Chutney Recipe

Red Chutney(Dates Tamarind) and Green Chutney(Coriander Mint)

Does anyone say no to chats?! I am not a crazy fan of chats but then few items like dahi poori and pav bhaji are my fav. One fine day when I was craving for a chat and it was raining outside, I decided to give a try at home myself. So my first attempt was to make these chutneys ready. And these chutneys comes in handy for sandwiches too, it gives a nice flavour to it.Stay tuned for the low fat chats coming up soon here...so get ready with ur chutneys and store them in advance :)


Dates Tamarind Chutney(Red Chutney) Ingredients:
  • Dates - 10
  • Tamarind - 1 tbsp
  • Jaggery - 3/4 tbsp
  • Jeera - 1tsp roasted powder [Dry roast it and grind it to a coarse powder]
  • Red Chilli Powder - 1 tsp
Method:
  1. Pressure cook dates and tamarind(seperately in a small container) with very little water for 2 whistles.


  2. Grind dates to a smooth paste. Extract thick pulp from tamarind and mix with dates mixture.


  3. Take a kadai/pan add dates tamarind paste, then add jaggery and bring it to a boil.


  4. Now add red chilli powder and roasted jeera powder and give another boil till the chutney becomes thick like sauce consistency.


  5. Switch off and store it in clean container, refrigerate until use.


Green & Red Chutney Recipe


Coriander Mint Chutney(Green Chutney) Ingredients:
  • Coriander Leaves - 1/4 cup
  • Puthina/Mint Leaves - 1/4 cup
  • Green Chillies - 1
  • Lemon juice - 1 tsp
  • Garam masala / Chat masala powder - 1/2 tsp
Method:
  1. Clean mint and coriander leaves,remove the root part and wash it well.


  2. Grind all the ingredients mentioned above along with coriander and mint leaves to make a smooth chutney.Add water while grinding as needed but the chutney should be a little thick in consistency.


  3. Now add lemon juice to the chutney and mix well. Transfer to a clean container and refrigerate it until use.


Green & Red Chutney Recipe
This green chutney has become my fav these days. It goes well with murukku, papad or any fry items apart from being a main ingredient for chats and sandwiches. The puthina with coriander flavour is so good, try it for urself and see.


You can use this chutneys even for sandwiches. Spread one layer red chutney and another layer green chutney in 2 breadslices with raw onions in one layer and enjoy your sandwich. You can toast them too.


Green & Red Chutney Recipe

Sunday, November 28, 2010

Eggless Dates Walnut Muffins

I was waiting to try muffins once I got my muffin pan.First of all, it wasnt easy for me to get the muffin pan then came the pain of getting the liners for the muffins. The ones I got and have used here are very thin and thats the reason its hardly seen in the pic also the fancy ones are no way in reach to me. I am on the look out for a good shop to get these liners, let me see if I can make it any sooner.
Eggless Dates Walnut Muffins Recipe


Ingredients: [Recipe Source : VegBowl]
  • Maida/APF - 1 and 1/2 cups (225 gms)
  • Chopped Dates - 1/4 cup (10 to 15 packed)
  • Hot milk - 1 cup (250 ml)
  • Oil - 1/4 cup (60 ml)
  • Powdered Sugar - 1/2 cup (125 gms)
  • Baking soda - 1/2 tsp
  • Baking powder - 1/2 tsp
  • Ground Cinnamon - 1/4 tsp
  • Walnuts roughly broken - 2 tbsp
  • Vanilla essence - 1 tsp


Method:
  1. First add dates to hot milk and allow it to sit for 10mins. By then, the dates would have softened.Now grind it in a mixer till a pasty consistency. Bits of dates here and there is ok too.


  2. Take flour in a wide bowl, add oil and vanilla essence to the dates milk mixture and mix well.


  3. Add baking powder, soda and ground cinnamom to the flour and sieve twice atleast which ensures even mixing.Now add in powdered sugar and mix well.


  4. Now make a well in the flour mixture and pour in the dates milk mixture, mix well till combined properly. Fold in walnuts finally.


  5. Preheat oven to 180ÂșC. Grease 6 cups of a muffin pan with little butter. Spoon mixture into muffin pan, bake for 20-25 minutes until a fork inserted comes out clean.


Eggless Dates Walnut Muffins Recipe


I was very much thrilled to try muffins for the first time and to my surprise it turned out well too. The above mentioned quantity gives 6 large muffins. It doesnt need any extra frosting, I just topped them with powdered walnuts for the extra look for the pics :)


Muffins are easy to make and have the advantage of flopping very rarely. Also it bakes quickly atleast most of them and does not make us wait long to dig in :)


This is one easy recipe, just fold in all the ingredients together with the exact measurements and your yummy muffins are ready in no time without any extra effort - Perfect for the lazy me and the main thing is that its a low fat version too.


Eggless Dates Walnut Muffins Recipe


This is for sure a must try for all dates lovers. I didnt make much variation just followed the orginal recipe and it turned out good. It doesnt raise much as you see in the pic, but the texture and the muffins were very delicious.Isnt that intersting?! No eggs and butter yet the muffins turned out good.


Eggless Dates Walnut Muffins Recipe
Happy week ahead, Enjoy cooking and eating!!


Tuesday, November 23, 2010

Broccoli Stir Fry

The first time I tasted Broccoli was at Taj Prego. My friend had ordered Nethili fry and what came as an accompaniment was broccoli stir fry. It first looked to me like no flavoured stir fry(It was an Italian restaurant and to me everything looked uncooked ;)) so didnt want to taste at all, but then knowing the health benefits and my friends compulsion I wanted to give a try.And to my surprise, it didnt have a bit of any raw smell though it looked so. It tasted awesome...the olive oil with the mild seasoning tasted sooo gud that the main attraction was the broccoli than the nethili :)
Broccoli Stir Fry Recipe
Last month, I found nice fresh broccolli at a nearby store so wanted to try a stirfry with mild seasoning and this is it. Since then this is one of my favorite veggies.

Ingredients:
Broccoli - 1 small floret
Big Onion - 1 finely chopped
Pepper powder/Sambar powder - 1 tsp
Salt As needed

To Temper:
Oil - 2 tsp (Olive oil recommended)
Mustard - 1 tsp
Cumin seeds - 1.5 tsp

Method:
  1. Cut broccoli into small bite size pieces, like we cut for cauliflower. Wash the florets well and put it in hot water(not boiling water) for 5mins and then drain to keep aside. This is to clean as well as avoid worms if any.

  2. Heat a pan with oil, add mustard seeds let it crackle , now add jeera and saute for a minute.

  3. Then add chopped onions and fry for a minute. Add the pepper powder/ sambar powder and salt. Now stir well and add the broccoli florets and mix well again.

  4. Sprinkle little water say 1 tbsp and cook closed for 3 to 5mins.Keep in low flame and allow it to cook , dont let it become very soft.

  5. Once the raw smell leaves and brocolli is well blended switch off and serve hot.

Broccoli Stir Fry Recipe

My Notes:
  • Dont overcook, as broccoli tends to lose its beneficiary values. Also take care not to change the color and crunchiness.

  • Broccoli with olive oil combination works best, try it and see.

  • Select the broccoli floret which is nice green in color with no black spots.

Broccoli Stir Fry Recipe
Few Health Facts: [Source : Google]
  • Avoid over cooking broccoli as about half of its beneficial substances may be destroyed in the process. Also, microwaving is thought to remove valuable nutrients from broccoli.Light steaming is best. Steam the broccoli for just a couple of minutes, until it turns bright green.

  • Broccoli health benefits include weight reduction, reduction of cholesterol and few birth defect risks can also be lowered.It has almost as much calcium as whole milk

  • Broccoli helps fight cancer and there is strong evidence that broccoli may reduce the risk of heart disease. It is an antioxidant and helps with stress.
Broccoli Stir Fry Recipe
There is always a saying that any veggie that is green has numerous health benefits...Its so true!!!