Wednesday, March 30, 2011

Vegetable Kati Roll / Kathi Roll | Indian Wrap

Rolls or Wraps or Frankies I like them very much. They are perfect for on the go snacks/breakfast for kids.I had this feeling in mind that making kathi roll was time consuming until I saw the recipe in a TV show. It was well explained and sounded simple to me.So here goes the recipe with minor modifications from the orginal.And now u know how I finished the paneer bhurji :)
Kati Roll Recipe


Kathi Roll | Indian Wrap Recipe:
Recipe Courtesy:Vijay Tv show
Makes 5-6 kathi rolls


Ingredients:


For parathas:
  • Whole wheat flour - 1 1/4 cups
  • Maida - 1/4 cup
  • Salt - to taste
  • Oil - 1 tsp
  • Milk - as needed to knead the dough


For the stuffing:
  • Mixed vegetables(I used carrot,capsicum and beans) - 3/4 cup (Chop it lengthwise)
  • Turmeric pwd - a pinch
  • Garam masala powder or chat masala - 1/2 tsp
  • Ginger green chilli paste - 1 tsp (Recipe below)
  • Lemon juice - 1 tbsp
  • Green chutney - few tbsp
  • Onion -1 finely sliced
  • Olive oil - 1 tbsp
  • Salt to taste


Kathi Roll RecipeMethod:


To make ginger green chilli paste:
Take a small piece of ginger and 1 green chilli, grind it to a smooth paste with little salt and your ginger green chilli paste is ready :)


To prepare the parathas:
  1. Mix salt, wheat flour and maida. Add milk slowly to form a soft dough.
  2. Keep covered and let it rest till the stuffing is done
To prepare the stuffing
  1. Heat oil, add onions and saute until golden brown.Add ginger chilli paste and saute for a min then add all the veggies, saute for 3mins or until cooked till the veggies are crunchy.
  2. Add turmeric, garam masala powder and lemon juice mix well. Cook keeping lid closed for 2more minutes and switch off.
Paneer Bhurji Kati Roll Recipe
To make it as a wrap:
  1. Pinch a lemon sized ball from the dough and flatten it like we do for chapathis. Dust flour if needed.
  2. Then heat a dosa pan,once it is hot place the prepared parathas and cook on both sides.Likewise prepare all the parathas and keep aside.
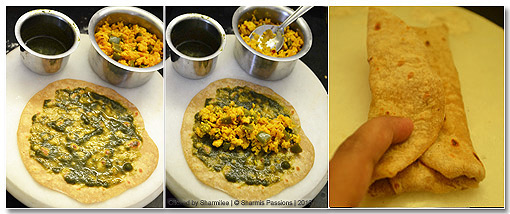
  3. At the time of serving, add little oil and toast the prepared parathas . Then spread 1/2 tbsp of green chutney, add a heaped tbsp of stuffing(either paneer bhurji/veg stuffing).
  4. Then gently seal it from the bottom then close it tightly from the both the sides(left & right) to form a roll as shown in the pic(Rolling this way avoids stuffing from dropping out)
  5. Then wrap the lower part of the parathas with butter paper/silver foil and enjoy ur kati rolls.
Kati Roll Recipe

I love paneer bhurji in wraps and rolls. So reserved little for this sake itself and made these rolls. You can keep the stuffing in middle and close from oth the sides and prick a tooth pick in the middle and serve but wrapping in the above said method avoids filling from coming out and its easy to hold too :)


The recipe is the same for paneer bhurji too just filling differs and you can find paneer bhurji recipehere.


When I googled to find the orgin of Kathi rolls, found that it orginated from Kolkata where kathi roll is a famous street food.
Veg Kati Roll RecipeMy Notes :
  • The stuffing idea is endless, you can even make chicken vegetable stuffing. You can also makepaneer tikka kathi roll.
  • You can make the stuffing and parathas ready the previous night and just assemble the wrap, there you go with your yummy, filling on the go wraps for breakfast. It is a perfect evening snack for kids.
  • Serve with tomato sauce or can be had as such itself also. The thickness of each parathas can be slightly thicker also.
Veg Kati Roll Recipe
And I am sending this to Fast Food NOT Fat food event


Monday, March 28, 2011

Bread Vegetable Masala Sandwich / Bread Masala Toast

Have u ever tasted Iyengar bakery bread sandwiches?! If not do give a try and am sure you will not regret and will ask for more. I just love them so much and when I saw the recipe I wanted to give a try instantly. Its easy, quick and tasty sure a must try for all bread lovers like me :)
Bread Masala Toast Recipe


Bread Vegetable Masala Toast / Iyengar Bakery Style Sandwiches Recipe
Recipe Source : Sailus Food


Ingredients:
  • Bread - 4 slices
  • Onion - 1
  • Carrot - 1 chopped finely
  • Capsicum - 1 chopped finely
  • Tomato - 1/2 finely chopped
  • Green Chillies - 1 finely chopped
  • Chilli powder - 1/2 tsp
  • Tomato sauce - 3 tbsp
  • Ghee - to toast
  • Coriander leaves - 1 tbsp chopped finely
  • Oil - 2 tsp


Bread Vegetable Masala Sandwich Recipe
Method:
  1. Heat oil, add onions and green chillies. Saute until onions turn golden brown. Add tomatoes,carrot and capsicum, saute till raw smell leaves.
  2. Now add turmeric powder, red chilli powder and saute for 3-4mins. Add a tbsp of tomato ketchup, give a quick stir.
  3. Garnish with coriander leaves and switch off. Now the stuffing for sandwich is ready.
  4. Toast bread slices until slightly cripy with a tsp of ghee. Apply tomato sauce on one side then spoon out the vegetable stuffing and spread it on the sauce. Your open sandwich is ready
  5. You can make it as a regular sandwich also by spreading the vegetable stuffing between two slices of bread with tomato sauce applied on one side of the slice.


Bread Masala Toast Recipe
My Notes
  • You can add any vegetable of your choice, you can even include tomato if you like them.
  • You can either make it as open sandwich(iyengar bakery style) or make it as a sandwich in sandwich maker and enjoy them.
  • The vegetables should not be mushy, it should be crunchy and firm enough to bite.
  • Toasting slightly is enough, it need not be very crispy.You can use wheat(brown) bread too.
Bread Vegetable Masala Sandwich Recipe


This is easy to fix up with very less effort(so sure my kind of recipe) and yet a tasty snack for kids. If you are packing up you can make it as a sandwich and enjoy them.


The vegetables are your choice, but the iyengar bakery sandwiches uses these veggies I used them too :)
Bread Vegetable Masala Sandwich Recipe


Saturday, March 26, 2011

Paneer Bhurji Recipe | Paneer Recipes

Recently had some home made paneer which was in a semi crumbled state so that was the reason I tried my hands at Paneer Bhurji. I would say its vegetarian scrambled egg :) Its mild yet flavourful and goes well with rotis and rice too.
Paneer Bhurji Recipe


Ingredients:

  • Paneer - 1 cup
  • Onion - 1 finely chopped
  • Tomato - 1/2 chopped (I dont like tomato pieces much so reduced you can add 1 whole tomato too)
  • Capsicum - 1 finely chopped
  • Green chillies - 1 finely chopped
  • Turmeric powder - a generous pinch
  • Garam masala powder - 1/2 tsp
  • Jeera(Cumin seeds) - 1 tsp
  • Red chilli powder - 1 tsp
  • Coriander leaves - 1tbsp to garnish
  • Oil - 2 tsp
  • Salt - to taste


Method:
  1. First crumble paneer well and keep aside.
  2. Heat oil in a kadai add jeera allow it to crackle. Now add onion, green chillies and tomato then saute for few mins until onions turn golden brown and tomatos are slightly mushy.
  3. Now add capsicum and saute for 3mins. Then add salt, turmeric, red chilli, garam masala powder and mix well. Capsicum should be firm and crunchy.
  4. Now add the crumbled paneer and saute for 2mins until the masalas get blended with the paneer.Garnish with the coriander leaves and serve warm with rotis or use in a sandwich.


Do you want to know how I used my paneer bhurji, then stay tuned to check the post that is coming up soon :)


Paneer Bhurji Recipe


Thursday, March 24, 2011

Gobi Paratha Recipe

I think most of us like cauliflower, I have heard and seen only very few people who dislikes cauliflower. Be it gobi 65 or gobi manchurian or gobi masala dosa or this gobi paratha I would prefer to have it any time of the day. And love gobi masala dosa very much,am yet to try it myself so recipe will be up soon :)
Gobi Paratha Recipe


Gobi Paratha Recipe
Makes 6-7 gobi parathas


Ingredients:
For the dough:
  • Wheat flour - 1.5 cups
  • Salt - as needed
  • Oil - 2 tsp
  • Water - as required
For stuffing:
  • Grated Cauliflower - 3/4 cup
  • Coriander leaves - 2 tbsp(finely chopped)
  • Ginger garlic paste - 1 tsp
  • Turmeric powder - a generous pinch
  • Garam masala powder - 1/2 tsp
  • Red chilly powder - 3/4 tsp
  • Cumin seeds - 1 tsp
  • Oil - 2 tsp
  • Salt- as required


Gobi Paratha Recipe
Method:
  1. Add the flour, salt, oil and mix well. Add water little by little to make a soft dough. Allow it to rest for atleast 30mins.


  2. Heat oil in a kadai/nonstick pan, add jeera allow it to crackle. Then add ginger garlic paste and saute for 2mins. Then add grated cauliflower, salt, red chilli powder, turmeric and garam masala powder and mix well.


  3. Saute till raw smell of cauliflower leaves then cook it with lid closed for 5mins in sim stirring in between. Sprinkle little water if needed to cook faster. Saute in medium flame for another 5 mins.


  4. By now cauliflower would have turned soft and fried well, add coriander leaves give a quick stir and switch off.The filling is ready now.Now divide the chapathi dough into equal parts and roll into smooth balls. Flour the surface and roll the chappathi dough slightly thicker.


  5. Then add a generous spoon full of gobi filling and gather the dough from all sides sealing it finely( You can refer Aloo Paratha stepwise for this). Now again flatten it slightly with your palms and then start rolling gently. Roll it without the filling oozing out.


  6. Heat a dosa tawa , transfer the gobi parathas, drizzle little oil and cook on both sides and enjoy it.


Gobi Paratha Recipe
My Notes:
  • Another way of making gobi parathas is rolling a chapathi, spread the filling and then placing another chapathi over it and then rolling it again. But I find this stuffing method easier and mess free.


  • I have skipped green chillies and have added chilli powder instead to avoid green chillies disturbing while eating.


  • If the shredding of cauliflower is fine, then rolling would be easier.


  • Do not add more than the mentioned quantity of garam masala as it would overpower and spoil the taste.
Gobi Paratha Recipe


Tuesday, March 22, 2011

Pasta Payasam / Macroni Kheer | Pasta Recipes

I still remember the first time I tasted this payasam...It was in one of our relatives home when we went there for dinner. I was a kind of puzzled to see pasta/macroni being served as a dessert but it was so tasty that I wanted to recreate it. All these days to me pasta means savoury now I have found an alternate tasty option too :)


Macroni Kheer / Pasta Payasam Recipe


Pasta Payasam Recipe :
Serves 2


Ingredients:
  • Macroni - 1 cup (I used Bambinos disc shaped macroni)
  • Milk - 2.5 cups
  • Sugar - 2 to 3 tbsp (adjust according to you taste)
  • Condensed milk - 1 tbsp
  • Cardamom powder - a pinch (optional)
  • Cashews - 2 tsp broken
  • Ghee - 1 tsp
Method:
  1. Boil about 1.5 cups of water an add the macroni and cook it until slightly soft. Drain water completely and keep the macroni aside.


  2. In a non stick pan add ghee and fry the cashews until golden brown, set aside.


  3. In the same pan, boil milk, add sugar and allow it to dissolve completely. Now add the half cooked macroni and simmer it. Allow the macroni to get cooked in milk till soft and slightly mushy but still firm enough to hold its shape.


  4. Add condensed milk and cardomom powder and give a quick stir. When the milk starts thickening, add the ghee fried cashews and switch off.


  5. Allow it to cool down then refrigerate for 30mins and serve chilled.


Macroni Kheer / Pasta Payasam Recipe


I have always had the confusion whether macroni and pasta are same?! After a quick googling found that macroni is a type of pasta which gets its name by the shape of it like shell, disc etc.And other pasta includes Spagetti, Lasagna noodles, Rigatoni, Penne etc


I have shell type pasta in a easy milk creamy way.....I like both savoury and sweet versions of pasta and my personal favourite is always penne so that means recipes with penne pasta will be coming up soon :)


Macroni Kheer / Pasta Payasam Recipe
My Notes:
  • See to it that while cooking macroni in water it should only be half cooked so that it doesnt smash up while cooking in milk. The key taste to this dessert is cooking the pasta in milk so that the pasta blends well with the milk.


  • You can even add raisins and other nuts of your choice for garnishing.You can also add coconut to this payasam to make it even more rich and tasty.


  • I have used disc type pasta here, you can even use penne or shell type pasta too.


  • Dont thicken the milk too much, it should be slightly thick but when you pour it should still be in running consistency.
Macroni Kheer / Pasta Payasam Recipe


I have always been on hunt for trying out new recipes in pasta and this was a very interesting dessert to the usual savoury pastas. Not to tell about the taste, the pasta cooked in simmed milk and the smell of condensed milk combination is just awesome!!


This payasam/kheer is sure a different alternative to our usual semiya and javarisi payasam. What are you waiting for?! Try this yummy payasam to impress your guests :)


Disc Pasta Payasam Recipe


Sunday, March 20, 2011

Side dish for Idly, Dosa | Onion Tomato Chutney

We are just back from Chennai, though it was tiresome I'm back with lots of memories and contentment. And when it came to shopping the only shop I insisted to go was Santosh super stores and I enjoy(ed) shopping there :)


Thanks EC for featuring me in Sundays Super Blogger Series :)


Now coming to todays recipe, am sure everyone makes this chutney in their own variation. I wanted to share ammas version of making this chutney in thokku style and here it is:


 Onion Tomato Chutney Recipe


Onion Tomato Chutney Recipe
Serves 3


Ingredients:
To grind to a smooth paste:
  • Tomato -3
  • Onion - 1/2
  • Garlic - 6 cloves
  • Red chillies -2
To temper:
  • Oil - 2 to 3 tsp
  • Mustard Seeds - 1 tsp
  • Urad Dal - 1/2 tsp
  • Onion -1/2
  • Curry leaves - 1 tbsp halved


Onion Tomato Chutney Recipe
Method:
  1. First grind the ingredients under 'to grind' to a smooth paste and keep aside.


  2. Heat oil, add mustard seeds, urad dhal and allow mustard seeds to splutter and urad dal to brown a little. Then add curry leaves fry for a min then add onions and saute until golden brown


  3. Now add the ground paste and allow it to boil with 1tbsp of water. Saute it and simmer it until the raw smell leaves and the chutney thickens like thokku. Switch off and transfer to serving bowl or an airtight container.
Onion Tomato Chutney Recipe


Serve the chutney with idlis / dosas or even rotis. Amma makes this chutney 2 other ways too but this version is liked by all of us so wanted to share it here.


This chutney goes well with idlis and rotis too and thats the speciality with this chutney that it goes almost with any tiffin item. The chutney should be in thokku consistency. And you can add gingelly oil(nalennai)/ ghee and enjoy it with hot idlis. I served them with kuzhipaniyaram and it tasted divine :)


Onion Tomato Chutney Recipe
My Notes:
  • It keeps good for 3 days when refrigerated, ideal for a days travel too,


  • Allow the chutney to thicken in sim, saute it now and then to avoid burning at the bottom. Thickening in simness gives it a unique flavour and taste.


  • You can omit onions for sauting and add it fully for grinding too.
Onion Tomato Chutney Recipe


Thursday, March 17, 2011

Lemon Rice Recipe

I am not fond of variety rice until I started cooking. Now I know how handy they are and are apt for travels too. Lemon rice with papad is my fav combination.
Lemon  Rice Recipe


Ingredients:
  • Cooked rice - 2 cups
  • Coriander leaves - 1 tbsp
  • Lemon - 2 medium sized
  • Salt - to taste
For tempering:
  • Oil - 1 to 2 tbsp
  • Mustard Seeds - 1 tsp
  • Channa Dal - 1 tbsp
  • Red chillies - 2
  • Ginger - a small piece
  • Hing - A generous pinch
  • Turmeric powder -1 tsp
  • Curry leaves - 1/2 tbsp(chopped finely for garnishing)


Lemon  Rice Recipe
Method:
  1. Cook rice(basmati or normal rice) with 1:2, rice:water ratio such that the grains are seperated, allow it to cool and keep aside.


  2. Now heat oil, add mustard seeds allow it to splutter, then add channa dal and saute until golden brown.


  3. Next add ginger,redchillies, saute for 2mins, then add curry leaves, turmeric powder and hing.Add required salt and switch off and allow it to cool completely.


  4. Now take juice from 2 lemons and add it to the tempered items. Add the rice and mix well.Garnish with coriander leaves.
Lemon  Rice Recipe


Tuesday, March 15, 2011

Eggless Whole Wheat Garlic Buns / Garlic Rolls - Step by Step Recipe

I am fond of the flavoured buns and rolls which we get in bakeries. When I saw these buns I quickly wanted to try it and so far I have made it thrice with different proportions of the flour. I always want to try my hands with wheat flour when it comes to buns/rolls - One such example is these savoury buns because it is the only chance I can experiment. Because I havent succeeded using wheat flour for cakes , atleast cookies I can say they are good.


Whole Wheat Garlic Rolls Recipe


Whole Wheat Garlic Rolls Recipe
Makes 6 medium sized rolls
    Ingredients:
    • Wheat Flour - 1 and 1/2 cup
    • Plain Flour - 1/2 cup
    • Warm Water- 3/4 cup
    • Milk - 2 tbsp (optional)
    • Yeast - 1/2 tbsp
    • Salt - 1 tsp
    • Sugar - 1/2 tbsp
    • Olive Oil - 1/2 tbsp
    • Sesame seeds - 1 tbsp
    For Garlic Spread:
    • Salted butter, at room temperature - 2 tbsp
    • Minced garlic - 6 big cloves
    • Chopped coriander leaves - 1 tbsp
    • Green chillies - 1 finely chopped / paste


    Whole Wheat Garlic Rolls Recipe

    Method:

    Add warm water,milk,oil,sugar and salt in a wide bowl, add yeast to it and dissolve completely.Then add maida, wheat flour and knead it to a soft sticky dough.


    Whole Wheat Garlic Rolls Step1

    Keep the dough in a warm place(near your kitchen stove) undisturbed for 1 hr. Keep covered with a wet muslin cloth/plastic wrapper. By this time the dough would have raised well. Now knead it once again with 1/2 tsp of oil and spread it out using chapathi roller for about 1/2inch thickness to form a rectangle/square. Dust flour if needed.

    Whole Wheat Garlic Rolls Step2

    Prepare the garlic spread by mixing butter, coriander leaves and chilli paste. Now spread this garlic spread on one side of the rolled dough.Roll from one end to another gently and firmly.Reserve little spread for the topping.

    Whole Wheat Garlic Rolls Step3

    Now cut it into 2 halves. Then cut each halves into 3 rolls each so that you get 6 large rolls(I got a extra tiny one too:)). Brush it with little milk on top. Then spread the remaining garlic spread on top of the cut side and sprinkle sesame seeds on top of it.Now keep them arranged in a greased tin with cut side up.

    Whole Wheat Garlic Rolls Step4

    Now allow it to raise again for 30mins. Then preheat the oven for 180 deg C for 10mins.Keep the tin near the oven for good raising again, it will start sticking to each other.The first pic below is after 30mins, the second pic is after the preheating time. Bake it at 180 deg C for 25-30mins or until the buns starts browning like in the third pic below.

    Whole Wheat Garlic Rolls Step5


    Now pull them apart and enjoy every bite.These buns are very soft and has a very aromatic flavour which fills in your home with its flavour when its baking.


    Whole Wheat Garlic Rolls RecipeMy Notes:
    • Water quantity purely depends on the flour so adjust accordingly. Judge the dough such that the dough is slightly sticky.


    • You can add 1 tbsp yeast to make to raise even faster. You can even add 1tsp and allow it to raise for a longer time say 2-3 hours.


    • The spread can be your own choice, you can even try vegetable/paneer stuffing. You can use the same method for making basic buns too.


    • You can also replace the entire 2cups of flour with maida for a even more softer and bakery kind of bun. With full maida you will get a very softer bakery style buns.


    • The buns starts browning to golden brown only during the last 10-15mins so dont panic like me :) Check if the buns are done after 25 mins then proceed with the extra baking time.


    Eggless Whole Wheat Garlic Buns


    Sunday, March 13, 2011

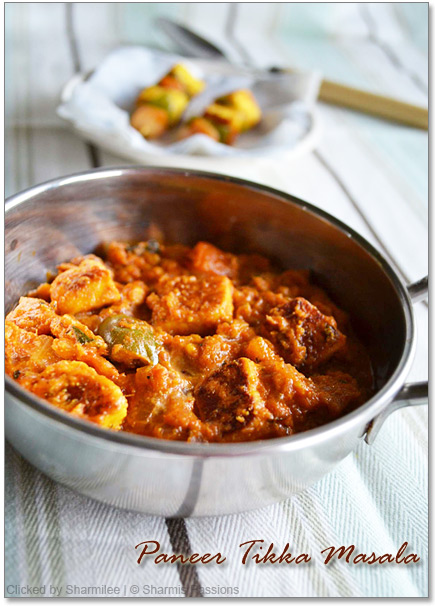
    Paneer Tikka Masala and Paneer Tikka Recipe(Stove-top method) | Paneer Recipes

    My constant order in restaurants after PB masala is this Paneer Tikka masala. I found this recipe in vahrevah and quickly tried it. It tastes almost close to the restaurant type gravy.I was totally surprised when I heard him saying that this is the top veg paneer side dish in most of the restaurants.


    I have recently tried paneer tikkas in oven and thoroughlly enjoyed it.I felt the smoky flavour is the best in these tikkas which will be missing in stove top method. But for paneer tikka masala stove top method works good. For the individual tikkas grilling option is better than the stove top so check out for my 'paneer tikka in oven' post.


    Paneer Tikka Masala Recipe


    Paneer Tikka Masala Recipe
    Recipe Source : Vahrevah.com
    Serves 2


    Ingredients:
    For the Paneer Tikka marination:
    • Paneer - 15 cubes
    • Thick/Hung Curd - 3 tbsp
    • Chilli powder - 1tsp
    • Turmeric powder - 1 tsp
    • Garam masala powder powder - 1 tsp
    • Dried kasturi methi leaves - 1/2 tsp
    • Lemon juice - 1 tsp
    • Salt - to taste
    • Capsicum - 1/2 cubed
    • Onion - 1/2 cubed
    • Tomato - 1/2 cubed
    • Oil - 1 tsp


    For the Tikka Masala:
    • Tomato puree - taken from 3 tomatoes (comes to 1 cup)
    • Onion- 1
    • Jeera - 1/2 tsp
    • Ginger garlic paste - 1 tsp
    • Maida - 1tsp
    • Chilli powder - 1 tsp
    • Turmeric powder - 1 tsp
    • Coriander powder - 1 tsp
    • Oil - 1tbsp


    Paneer Tikka RecipeMethod:
    1. Making hung curd: If you dont have thick yogurt then hang 1/4 cup curd in a muslin cloth and keep aside for 30mins, Your hung curd is ready. This makes about 2-3 tbsp of hung curd which is required for this recipe.


    2. First mix curd with masala powders, kasoori methis,lemon juice, salt to a fine paste then add paneer, tomato and capsicum to the fine paste and marinate for an hr. After an hr (by this time make the gravy ready) roast the marinated paneer along with capsicum and tomatoes in a tawa until slightly golden brown then drain in a tissue paper and keep aside.


    3. Prick them alternatively in a tooth pick and enjoy ur stove top paneer tikkas.
    Paneer Tikka Masala RecipeFor the Paneer tikka masala :
    1. Heat oil, add jeera allow it to splutter then add onions and saute until slightly golden brown.Add ginger garlic paste saute for a min. Add maida, salt, turmeric and coriander powders and mix well.


    2. Add tomato puree, chilli powder and saute until oil oozes out and the gravy thickens.Once the raw smell of tomato leaves add 1/2 cup water and allow it to boil for 2mins. Adjust salt if required.


    3. Then add the roasted paneer to the gravy and allow it to cook for 5mins. Then garnish with coriander leaves, mix once and switch off.
    Paneer Tikka Masala RecipeMy Notes:
    • Maida is added to thicken the gravy says the chef. Ever since I started watching his cooking videos I have been referring a lot from his site, he makes things simpler and easier than it is.


    • Always roast the marinated paneer when the gravy is about to complete may be you can start roasting them in parallel when the tomato puree gets cooked.


    • You can skip tomatoes if you dont like them and add different color capsicums.
    Paneer Tikka Recipe

    Friday, March 11, 2011

    Lime Mint Cooler / Minty Lemon Cooler

    I'm trying different juices and milk based drinks to beat this summer. It has become really hot here these days...I recreated this juice after tasting in Pazhamudhir Nilayam with minor modifications.


    Lime Mint Cooler Recipe


    Ingredients:
    (Serves 2)
    • Mint/Pudina leaves - 1/4 cup
    • Lemon - 1 whole
    • Sugar / Honey - 1 tbsp(adjust according to taste)
    • Ginger juice - 1 tsp (optional)
    • Cold Water - 2 cups
    • Crushed ice - 1 tbsp
    • Yellow/Green food color - a pinch (optional)
    Method:
    1. Remove the seeds and extract the juice from the lemons and keep aside.


    2. Grind mint leaves with little water in a mixer until nicely grinded. Then add remaining water,lime juice, ginger juice, honey and blend it for a minute.


    3. Filter it, then mix food color,add crushed ice and serve chilled.


    Lime Mint Cooler Recipe


    Lime Mint Cooler is a very refreshing, and also a feel good drink to beat this summer. I had this drink in palamuthir nilayam and tried to recreate it at home and it tasted almost the same. With the tanginess of lemon and the flavour of mint leaves, the drink looks really fresh and cool. Now I am seeing this juice very common in many fruit shops.


    Lime Mint Cooler Recipe


    Lime mint cooler is similar to lime juice with a slight twist of adding mint which gives a wonderful flavour. You can skip the food color , I just added it for the extra zing for the pics. As mint gives a dark green color it wasnt that appealing so added the food color to make it look bright ;) But I just thought green food color would be apt which the fruit shops use. Apart from chutneys, thogayals and biriyani, we can use mint in juices too, its cool, fresh and flavourful.


    Lime Mint Cooler Recipe


    Tuesday, March 8, 2011

    Golden Lentil Soup

    As I've already mentioned I am not a soup person so didnt bother to try soups all these days. But when I saw this protein rich soup in Tarladala cookbook I wanted to give a try. The orginal recipe called for masoor dhal since I didnt have it, I went ahead with moong dhal. Its a easy, quick and a filling soup.
    Golden Lentil Soup Recipe


    Ingredients:
    Makes 2 bowls
    • Moong Dhal - 1/4 cup
    • Carrot - 1 small
    • Tomato - 1
    • Turmeric powder - a pinch
    • Chilli powder - 1/2 tsp
    • Pepper powder - 1 tsp
    • Salt - to taste
    • Lemon juice - 1/2 tsp
    To temper:
    • Cloves -1
    • Cinnamom - 1/4 inch piece
    • Garlic - 3 cloves
    • Onion - 1/2

    Golden Lentil Soup Recipe
    Method:
    1. Soak moong dhal for 15mins, drain water and keep aside.

    2. Heat oil in a pressure cooker, add cinnamom, cloves let it fry for a min then add garlic and onions allow it to saute until onions turn golden brow.

    3. Then add carrot, tomatoes, saute until tomatoes turn slightly mushy. Now add soaked moong dhal, turmeric powder, chilli powder, required salt. Add 3 cups of water and pressure cook for 3-4 whistles.

    4. When pressure releases, open and let it cool. Discard cinnamom and cloves alone, and grind the remaining ingredients in a mixie until smooth. Add pepper powder and mix well.

    5. Add water if the soup is thick, adjust according to your likeness.Garnish with lemon juice and serve hot with bread/soup stick.

    Golden Lentil Soup Recipe

    My Notes:
    • For the above mentioned quantity it gives 2 generous bowls of soup. It is very thick so add water according to ur liking.

    • Adding carrot is purely optional, you can very well skip it or add any other veggie of your choice.

    • I didnt want the flavour of cloves and cinnamom to dominate so I discarded it before grinding. You can grind with it too.
    Golden Lentil Soup Recipe