Tuesday, January 18, 2011

Oats,Cornflakes Fruit and Nut Bars | Breakfast Bars

I tried these oats cornflakes fruit and nut bars long back, And since then its often in my do list atleast once a month. I have modified the recipe after trying with 2-3 variations of measurements and finally sticking to this one. This is ideal for breakfast with a cup of milk which is very filling at the same time you can be happy to have started the day on a healthy note. Isnt that nice?!
Oats,Cornflakes Fruit & Nut Bars


Ingredients: [Recipe Source : Sunitas world]

Yields 9 bite sized squares
  • Oats - 1 cup (100gms)
  • Cornflakes/Wheat flakes - 1/2 cup (50gms) - I used wheat flakes
  • Wheat flour - 2 tbsp
  • Raisins - 1.5 tsp
  • Walnuts - 1.5 tbsp chopped
  • Choco Chips - 1/2 tbsp
  • Jaggery - 1/2 cup (50gms)
  • Yogurt - 1/2 cup (50 gms)
  • Cooking oil - 1.5 tbsp
  • Coco powder - 1 tsp [optional]
Method:
  1. In a wide bowl, mix together oats,wheat flakes, wheat flour, walnuts, raisins and choco chips, coco powder together. Just crush the wheat flakes with your hands if the flakes are very big.


  2. Just add water to jaggery till immersing level say 1tbsp and leave it for few mins for it to become a syrupy consistency. Then add it to the flour oats mixture. Now add yogurt and oil to the mixture. Just mix to bring everything together.


  3. Preheat oven to 180 deg C for 10mins. Meanwhile grease a baking tray with little oil and spread the mixture on it with 1/2 inch thickness. Use back of a spoon to smoothen the top.


  4. Bake it for 35-40 mins till it is nicely browned. Keep an eye after 30mins because mine got baked perfectly in 35mins. Transfer it to the wire rack and cool it for 10mins before marking squares.Store it in airtight container and enjoy.


Nuts and oats combination is not only healthy, they are very tasty and ideal for on the go breakfast.The batter looks a bit sticky...These bars sounds close to granola bars but tastes different with the addition of wheat flour, yogurt and jaggery.


Oats,Cornflakes Fruit & Nut Bars


I like to try different types of cereal bars as they are not only healthy and ideal for breakfast, at the same time they fill in our after 3PM tummy cravings too. Only the baking time is a little more, otherwise the preperations are nothing at all.


My Notes

  • I wanted to try the chocolate flavour so added coco powder, you can omit that too. I have tried both ways and luved both of them :)


  • The nuts and dry fruits that goes in the bars are purely our choice, Some variations can be adding dates, black currant etc. The top is slightly crispy and softer, chewy inside.


Oats,Cornflakes Fruit & Nut Bars


Sunday, January 16, 2011

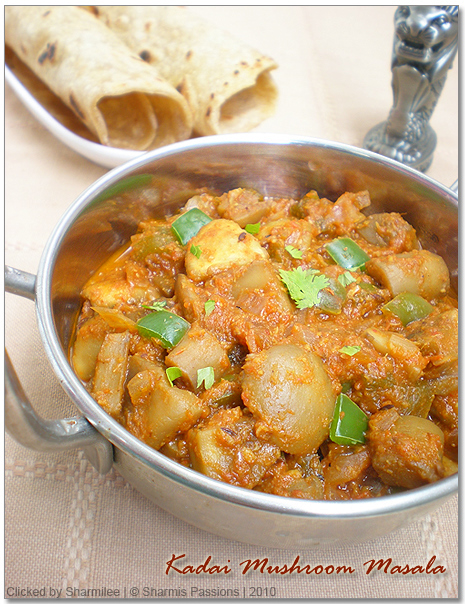
Kadai Mushroom Masala

Mushroom being our family favourite, I pick them from the market whenever I see fresh ones. Sorry for the delay in posting this kadai mushroom masala even after putting it up in coming soon section since last week. Just blame it on the priority of the vada recipe for pongal festival. Now am finally here with the recipe:
Kadai Mushroom Masala Recipe


Ingredients:
  • Mushroom - 1 packet cubed [It comes to 1 cup approximately]
  • Capsicum - 1 chopped
  • Onion - 1 chopped finely
  • Tomato puree - from 2 tomatoes
  • Jeera - 1 tsp
  • Red chilli powder - 1/2 tsp
  • Coriander powder - 1/2 tsp
  • Turmeric powder - a pinch
  • Garam masala powder - 1 tsp
  • Ginger garlic paste - 1 tbsp
  • Kasuri methi / Dried fenugreek leaves - 1/2 tbsp
  • Oil - 2 tsp
  • Red Chillies - 1
  • Coriander leaves - to garnish
  • Salt- to taste


Kadai Mushroom Masala Recipe


Method:
  1. Clean and wash mushroom. Then chop into small cubes. Keep aside.


  2. Heat oil, add jeera allow it to crackle then add red chillies and fry for a minute. Add onions, ginger garlic paste and saute till raw smell leaves and onions turn slightly browned. Next add the capsicum, saute well retaining its crunchiness.


  3. Then add the tomato puree and fry for 3-4 mins till raw smell leaves. Add 1/4 cup water if its very thick. Then add the chilli, turmeric, red chilli and garam masala powder, mix well and fry for few mins.


  4. Add the mushroom and mix gently until well combined. Simmer for 3 mins and keep closed so that the mushroom gets cooked and nicely blended with the gravy. Once the mushroom gets soft, add kasoori methi and salt to taste.


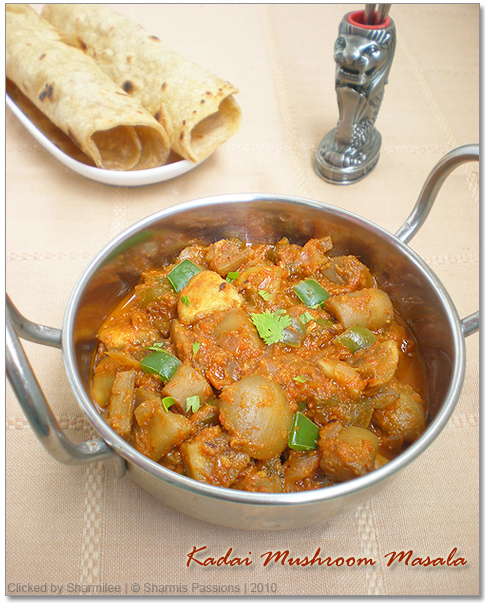
  5. Simmer for 3 mins then switch off , Garnish with coriander leaves and serve hot with rotis.


This gravy is close to the kadai paneer recipe and goes well with chapathis or even fried rice.I confidently wanted to try after trying out kadai paneer and it didnt disappoint us.


Kadai Mushroom Masala Recipe


This is the first time I am trying kadai mushroom masala, I didnt refer to any specific recipe but googled here and there and made up my mind to go with a recipe which is close to the kadai paneer recipe I posted earlier :)


Now let me take a break and come back soon with the healthy oats cornflakes fruit and nut bars which is coming up next...Stay tuned!


Kadai Mushroom Masala Recipe


Friday, January 14, 2011

Pongal Wishes!!

Pongal Wishes

Wishing all my readers and fellow bloggers a very happy pongal!
May every drop of pongal add sweetness to your life and bring happiness, prosperity and goodwill!


Pongal Wishes

Wednesday, January 12, 2011

Ulunthu Vadai / Medhu Vadai Recipe

Hubby's favorite is this ulunthu vadai but I like paruppu vadai than this one. I wanted to try this since long seeing amma making it for years for any festive ocassions. The only problem I faced was the perfect round shaped vadas......I wanted to do justice to this post here, so the ones posted here are the ones made by amma. Mine looked more like bonda shaped, you can see the ones at the back hiding ;) he he but sure am trying hard to get it perfect.
Ulunthu Vadai Recipe


Ingredients:
  • Urad dal / Ulutham paruppu (without skin variety) - 1 cup
  • Green chillies - 1 finely chopped
  • Coriander leaves - 1/2 tbsp finely chopped
  • Curry leaves - 1 tbsp finely chopped
  • Small onion - 10 finely chopped
  • Jeera - 1.5 tsp crushed
  • Salt - to taste
  • Water - as required


Method:
Soak urad dal for 1 hour at least. Drain water and keep aside (I usually drain the water completely and then sprinkle little by little while grinding , doing so you can be sure of the quantity of water).


Now grind it to a fluffy texture sprinkling water now and then. Dont add much water as the batter will become runny. Once the batter is ready, add chopped onions, jeera, coriander, curry leaves, chillies to the batter, mix well and keep aside.
Ulunthu Vadai Recipe


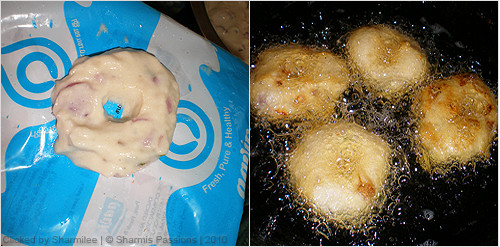
Heat oil in a kadai. Take a polythene sheet or milk cover slightly greased with a drop of oil. Wet ur right hand, then make a small ball out of the batter and pat it on the milk cover. Now make a hole in the middle and carefully transfer it to the kadai( It only comes by practise,I havent mastered it too).


Fry the vadai in medium flame, turn over to other side once it becomes firm. Take out and drain it in a tissue once it becomes golden brown on both sides.


Ulunthu Vadai Recipe


You can have it as such or with coconut chutney. My option is to dunk it in sambar and then have it....Yummy combination!! Other than sambar vadai I luv it dunked in paysam, it is another yum combo. I used to reserve vadais at the last for this reason :)


You can make chat style thayir vada too using the bread dahi vada recipe that I posted few weeks back.


We always make this vadai when there is any padayal at home. Other than that, a perfect guest traditional meal is incomplete without this vadai. It is very crispy on the outside and soft inside.


Ulunthu Vadai Recipe


My Notes :
  • Wet ur hands now and then before making balls to avoid stickiness. Once you master this, you can try with simply making vadas with your hands without polythene cover which is messfree too.


  • Add water little by little, If the batter becomes runny the vadas will drink more oil. For perfect crispy and soft vadas the batter should in correct consistency.


  • Incase your batter becomes runny add little rice flour say 1 -2 tsp not more than that.


Ulunthu Vadai Recipe


Sunday, January 9, 2011

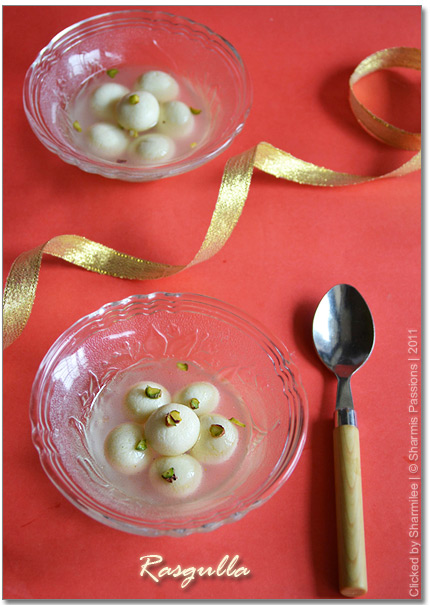
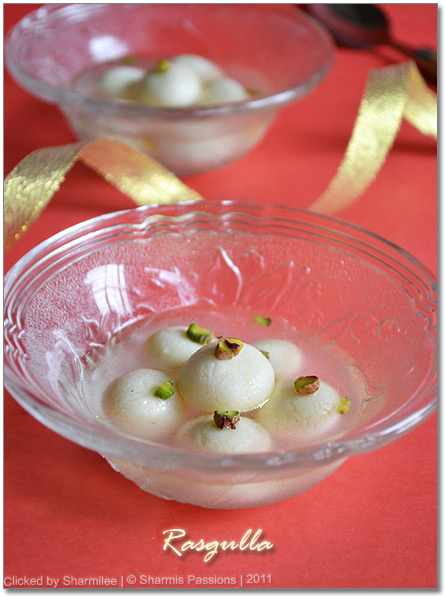
Rasgulla / Mini Rasgulla - Step by Step Recipe

I am fond of sweets and rasgulla is no doubtedly in my favorite list. The first time I tried rasgulla at home was during diwali time, but was not completely satisfied with the result so didnt post here. After almost 2 months when I tried last week with little variation, I could reproduce the exact shop taste and texture.


I took the measurements from Sailus food, for method I referred hers but followed ammas cook book too.
Rasgulla Recipe


I am not sure what went wrong but the pressure cooking method which I tried for the first time didnt work out perfect for me, the rasgulla texture was very chewy and not like the shop ones. So followed ammas cookbook method this time and got perfect rasgullas.


I did reserve few rasgullas for rasmalai and the post is ready too :) Both were very tasty and was emptied in a jiffy.I made them as mini rasgullas and they were looking cute as snow white balls :) So here goes the step by step recipe from my kitchen, hope its useful who wants to try your hands on rasgulla.


Rasgulla Recipe


Ingredients:

  • Milk - 1/2 litre
  • Lemon Juice - 1.5 tbsp (or) Curd - 2 tbsp
  • Water - 1 and 3/4 cups water
  • Icecubes - 4 to 5
  • Sugar - 3/4 cup
  • Cardamom powder- A generous pinch
  • Pistachios - 3 to 4 chopped finely for garnishing


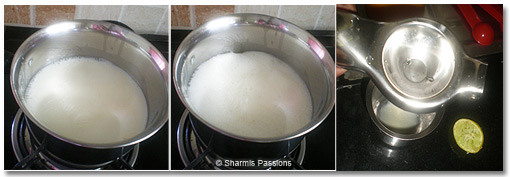
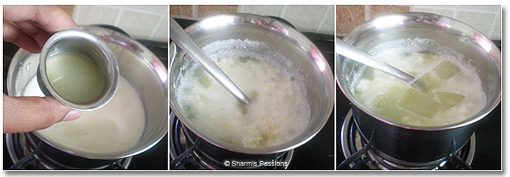
Heat milk, bring it to boil and simmer it. Take 1.5 tbsp lime juice from a lemon and keep it ready.
Rasgulla Recipe


When milk starts boiling, add the lemon juice to the boiling milk and stir properly. Stir continuosly till the whey water clears and the milk curdles completely. Before adding icecubes you can take some whey water which can be reserved for future use which is what I did. Now switch off the stove, add ice cubes and allow it to melt completely.
Rasgulla Recipe


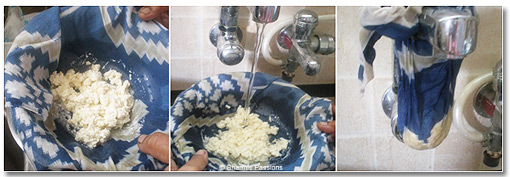
Take a muslin cloth and pour the curdled milk,filtering the whey water completely.Wash it well in running cold water to remove the lemon smell. Squeeze the excess water and hang it aside for 30mins without disturbing it.
Rasgulla Recipe


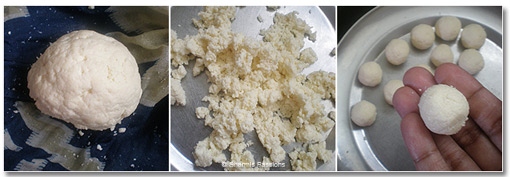
After 30mins, the paneer would be crumbly in texture. Now knead it well for 10mins. Once everything comes together to a smooth pilable dough, form them into smooth mini/normal lemon sized balls and keep aside. I made around 13-15 mini balls.
Rasgulla Recipe
Heat water in a wide bottomed vessel, then add sugar and keep stirring till sugar dissolves completely. When the sugar syrup boils and starts bubbling, add the balls slowly one by one and simmer it for 3mins.


The balls will go to the corner, move them to the middle. Keep in medium flame and close with a lid. Cook for 10mins opening the lid every 3-4 mins this is to ensure the vapour passes out not allowing the sugar syrup to ooze out. After 10 mins, the balls would be closely doubled in size.
Rasgulla Recipe
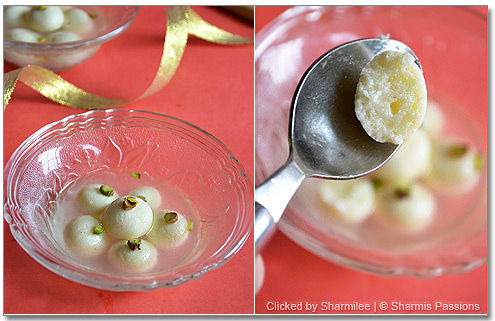
This is the stage when your rasgullas are done. Cool it completely, add chopped pistachios and chill it for an hour and serve chilled. This method was from ammas cookbook and I find it easy as you can open and see the rasgullas now and then.


Though amma kept on saying to try with whey water to make the paneer as that is the traditional bengali style of making rasgullas, this time I am completely satisfied with the results. But sure to make it once with whey water and update it here with my feedback.


Rasgulla Recipe


My Notes:
  • The whey water can be used for making chapathi dough which makes chapathis very soft. It can also be used to curdle milk while making rasgulla next time which is the traditional bengali method.


  • After the lemon juice/curd is added stir well and continuosly till the whey water clears out completely.


  • The smoother the balls you make, the rasgullas will not crack out when getting cooked. Also Make sure to simmer once the balls are added for the first time.


  • I felt adding curd better as I could feel the faintest smell of lemon juice which noone else felt at home.


  • The rasgulla texture purely depends on the way the balls are getting cooked so follow the procedure as mentioned.


Rasgulla Recipe


Wednesday, January 5, 2011

Double Beans Curry / Masal

Double Beans is my favorite, but we dont get fresh ones often so buy it whenever I see in palamuthir nilayam. I've tried dried ones too which is readily available in most of the supermarkets but fresh ones are even more tasty. More than kuzhambu this curry is our family favorite.
Double Beans Curry Recipe

Ingredients:
Fresh Double beans - 3/4 cup
Onion - 1 chopped finely
Turmeric powder - a pinch
Salt - as required
Oil - 1.5 tsp

To grind for the spice powder :
Coconut - 3 tbsp
Red chillies - 1
Garlic - 3 to 4 flakes
Pepper - 1 tsp
Dry roast one by one for a minute and grind to a dry powder

For Tempering
Pattai - 1/4 inch piece
Krambu - 1
Curry leaves - few
(or)
Mustard Seeds
Jeera
Curry leaves - few

Some dont like the masala flavour in their curry so they can use the 2nd tempering option. I like both ways :)


Double Beans Curry Recipe
Method:
  1. Pressure cook the double beans for 4 to 5 whistles. If you are using dried double beans then soak it overnight and then pressure cook it.

  2. Heat oil in a pan, add the 'to temper' items according to ur taste either cloves, cinnamom or jeera mustard. Then add curry leaves and chopped onions saute till its lightly browned.

  3. Now add pressure cooked double beans, add turmeric and sambar powder fry for 3mins till the masalas are blend with the beans.

  4. Then add the grinded spice powder and mix well. Sprinkle little water, keep closed and simmer it for 2mins.When water is completely evaporated, stir well till beans is roasted well and the masalas are nicely browned. Switch off and serve with sambar or curd rice.

Sunday, January 2, 2011

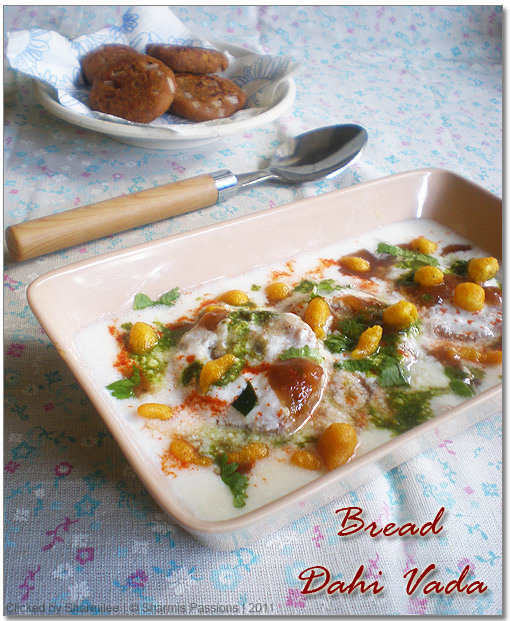
Bread Dahi Vada and Bread Dahi Chat

Hope you all had a great new year. I made a simple baking on new years eve - Eggless basic sponge cake which is everyones favorite at home, will post the recipe sooner. The day went great too, started off with receiving phone calls, then visiting temple, then to a near by park finishing it up with a dinner at a new restaurant.


When it comes to chats I can never say no to it. Bread being my favourite thought to give a try chats with it and it has been a instant hit at home. Here goes the easy and sure low fat chats:


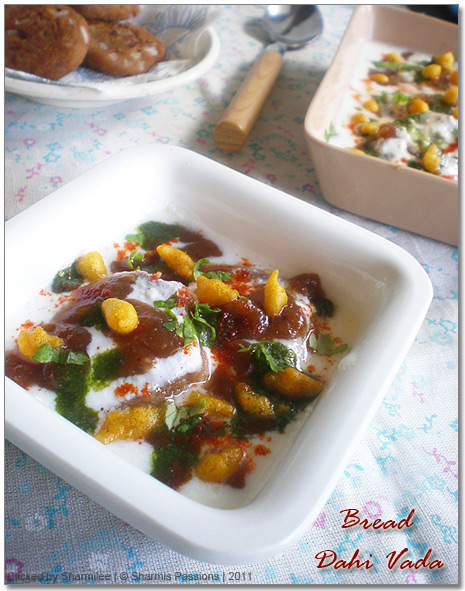
Bread Dahi Vada - Chat Style Recipe
Bread Dahi Vada - Ingredients :
Makes 8 to 10 vadas
  • Wheat Bread - 4 slices
  • Onion - 2 tbsp chopped finely
  • Salt- to taste
  • Turmeric powder - a pinch
  • Chilli powder - 1/2 tsp
  • Red Chutney - 1 tbsp
  • Green Chutney - 1 tbsp
  • Boondi - 1 tbsp
  • Chopped coriander leaves - 1 tbsp
  • Oil - to toast
  • Curd - 3/4 cup
Bread Dahi Vada - Chat Style Recipe
Method:
  1. Dip the bread slices in water, immediately squeeze it and transfer this to a bowl and smash it.


  2. Now add chopped onions, turmeric powder, chilli powder and mix it well enough to form patties. Now form small sized balls and pat them using ur palms. Heat oil in a dosa pan and toast the vadas till slightly cripsy and browned


  3. Now for the assembling : First add little curd mixed, drizzle very little green and red chutneys then add the vadas on top of it add the remaining curd enough for the vadas to immerse fully. Then drizzle the remaining green and red chutney on top. Garnish with boondis and finely chopped coriander leaves.
Bread Dahi Vada - Chat Style Recipe
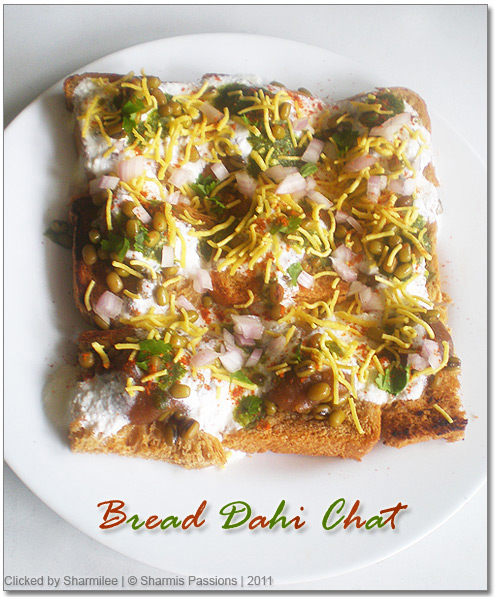
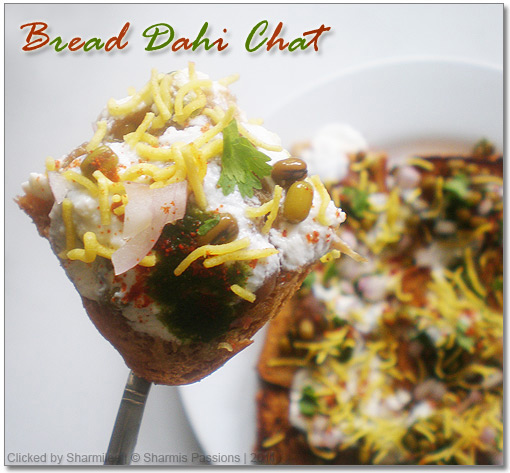
Bread dahi chat is an out come of trying to reproduce dahi poori cutting down the deep frying and potatos alone. So instead of bread you can use pooris too.


Bread Dahi Chat - Ingredients
  • Wheat Bread - 4 slices
  • Red Chutney - 1 tbsp
  • Green Chutney - 1 tbsp
  • Sev - 1/4 cup
  • Green Gram - 1/4 cup
  • Raw Onions - 2 tbsp
  • Chopped Coriander Leaves - 1 tbsp
  • Curd - 3 tbsp
Method :
  1. Soak green gram for 30mins and pressure cook until soft and keep aside.


  2. Dry toast the bread in a dosa pan (or add little oil and toast) until crispy or toast it using a toaster which makes it very crispy. Cut each bread slice into 4.


  3. Now for the assembling : Lay the bread slices first(may be 9 peices in a plate), add boiled green gram, then add the chutneys generously. Spread a layer of curd over it, then chopped raw onions then garnish it with sev and chopped coriander leaves.


Bread Dahi Chat Recipe
Both the chats are very easy to make if you have the chutneys ready. The chutneys keeps well for about a month so make it in advance and refrigerate them.


The idea of bread dahi vada was from a TV show but I vaguely remembered the recipe, so modified it according to our taste, it is ammas most favorite and bread dahi chat is my favorite :)


Bread Dahi Chat Recipe