Showing posts with label Diwali Special. Show all posts

Sunday, January 9, 2011

Rasgulla / Mini Rasgulla - Step by Step Recipe

I am fond of sweets and rasgulla is no doubtedly in my favorite list. The first time I tried rasgulla at home was during diwali time, but was not completely satisfied with the result so didnt post here. After almost 2 months when I tried last week with little variation, I could reproduce the exact shop taste and texture.


I took the measurements from Sailus food, for method I referred hers but followed ammas cook book too.
Rasgulla Recipe


I am not sure what went wrong but the pressure cooking method which I tried for the first time didnt work out perfect for me, the rasgulla texture was very chewy and not like the shop ones. So followed ammas cookbook method this time and got perfect rasgullas.


I did reserve few rasgullas for rasmalai and the post is ready too :) Both were very tasty and was emptied in a jiffy.I made them as mini rasgullas and they were looking cute as snow white balls :) So here goes the step by step recipe from my kitchen, hope its useful who wants to try your hands on rasgulla.
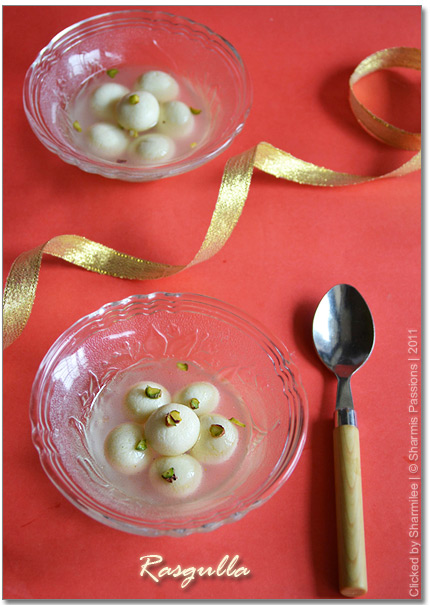

Rasgulla Recipe


Ingredients:

  • Milk - 1/2 litre
  • Lemon Juice - 1.5 tbsp (or) Curd - 2 tbsp
  • Water - 1 and 3/4 cups water
  • Icecubes - 4 to 5
  • Sugar - 3/4 cup
  • Cardamom powder- A generous pinch
  • Pistachios - 3 to 4 chopped finely for garnishing


Heat milk, bring it to boil and simmer it. Take 1.5 tbsp lime juice from a lemon and keep it ready.
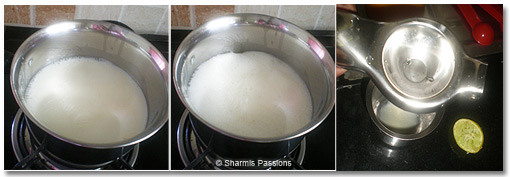
Rasgulla Recipe


When milk starts boiling, add the lemon juice to the boiling milk and stir properly. Stir continuosly till the whey water clears and the milk curdles completely. Before adding icecubes you can take some whey water which can be reserved for future use which is what I did. Now switch off the stove, add ice cubes and allow it to melt completely.
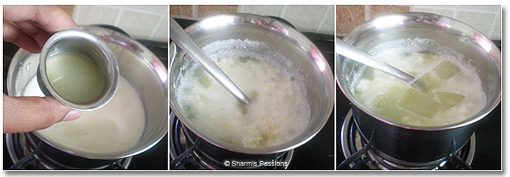
Rasgulla Recipe


Take a muslin cloth and pour the curdled milk,filtering the whey water completely.Wash it well in running cold water to remove the lemon smell. Squeeze the excess water and hang it aside for 30mins without disturbing it.
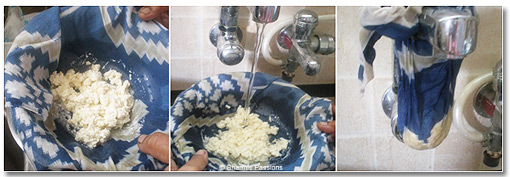
Rasgulla Recipe


After 30mins, the paneer would be crumbly in texture. Now knead it well for 10mins. Once everything comes together to a smooth pilable dough, form them into smooth mini/normal lemon sized balls and keep aside. I made around 13-15 mini balls.
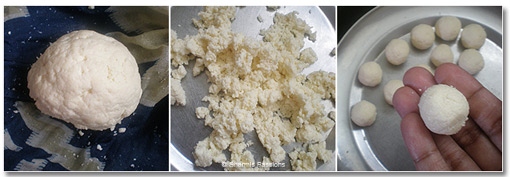
Rasgulla Recipe
Heat water in a wide bottomed vessel, then add sugar and keep stirring till sugar dissolves completely. When the sugar syrup boils and starts bubbling, add the balls slowly one by one and simmer it for 3mins.


The balls will go to the corner, move them to the middle. Keep in medium flame and close with a lid. Cook for 10mins opening the lid every 3-4 mins this is to ensure the vapour passes out not allowing the sugar syrup to ooze out. After 10 mins, the balls would be closely doubled in size.
Rasgulla Recipe
This is the stage when your rasgullas are done. Cool it completely, add chopped pistachios and chill it for an hour and serve chilled. This method was from ammas cookbook and I find it easy as you can open and see the rasgullas now and then.


Though amma kept on saying to try with whey water to make the paneer as that is the traditional bengali style of making rasgullas, this time I am completely satisfied with the results. But sure to make it once with whey water and update it here with my feedback.
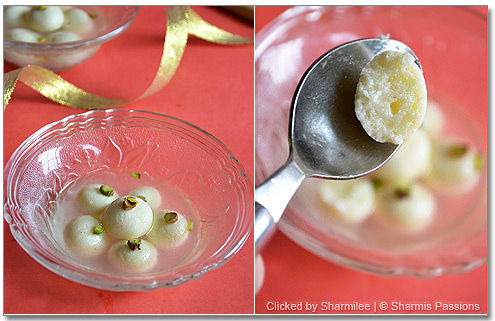

Rasgulla Recipe


My Notes:
  • The whey water can be used for making chapathi dough which makes chapathis very soft. It can also be used to curdle milk while making rasgulla next time which is the traditional bengali method.


  • After the lemon juice/curd is added stir well and continuosly till the whey water clears out completely.


  • The smoother the balls you make, the rasgullas will not crack out when getting cooked. Also Make sure to simmer once the balls are added for the first time.


  • I felt adding curd better as I could feel the faintest smell of lemon juice which noone else felt at home.


  • The rasgulla texture purely depends on the way the balls are getting cooked so follow the procedure as mentioned.
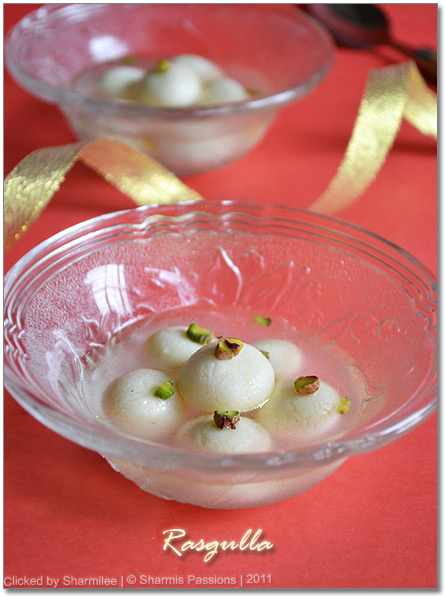

Rasgulla Recipe


Tuesday, November 2, 2010

Kaju Katli (Cashew Burfi) for Diwali!

To me Diwali means sweets :) New dresses and crackers comes next. Though am not fond of crackers, I like watching the colorful lights high in the sky and kids playing with great excitement. I am not sure how mittu is going to react to crackers bursting all around, though last year was her first diwali, she was too small to watch the lights.
Kaju Katli Recipe
When I thought of a sweet that would be special and apt for the occassion the 3 sweets I finalised were Jangiri, Badusha and Kaju Katli. But jangiri was nowhere in my reach with the messy kitchen and things all around . Kaju Katli was quick, I am glad I tried, it is so easy yet rich and tasty.
Ingredients:
  • Cashews - 1 cup
  • Sugar - 1/2 cup
  • Water - just to the level of sugar immerses (5 tbsp)
  • Ghee - 1 tsp
Kaju Katli Recipe
Method:
  1. Dry your mixer completely without any moisture and wetness. Now grind the cashew to a fine powder.


  2. Grease the back of a flat plate with few drops of ghee and keep it ready. Grease the chapathi roller with remaining ghee.


  3. Take half cup sugar in a thick wide bottomed pan(preferably non-stick), and pour 5tbsp of water till it get immersed. Mix well till sugar is dissolved completely. Simmer and then keep checking continuously.


  4. The sugar syrup will become sticky, take a drop and check. Next stage is it will get thickened and form bubbles as shown below:
  5. Kaju Katli Recipe
  6. This is the stage , now add the cashew powder and mix well. Dont allow any lumps to be formed, break them incase they are formed.


  7. Keep in low flame itself and keep stirring for 2-3 minutes. The dough will be non sticky and when u take a small piece, roll and see, it should form a very flexible ball as shown in the above pic, it shouldnt break.


  8. Now switch off , allow it to cool for 5mins. Then knead it till a soft dough is formed then transfer this to the greased plate and roll them evenly of 1/4 inch thickness with chappathi roller. Cut them into diamonds and store them in air tight container.
    Kaju Katli Recipe
My Notes :
  • The sugar syrup and the cashew dough consistency is very important, if it becomes a bit thicker than mentioned, then your katlis would be difficult to roll as they will tend to break.


  • You can alternatively use a greased sheet of silver foil which would actually be mess free.


  • This recipe for the above given measurement will yield medium sized 10-13 katlis. I am sure kids will love it!


DIWALI- THE FESTIVAL OF LIGHTS!! [Source : Google]
  • The word Diwali means “rows of lighted lamps”. It is called the “Festival of Lights” because people light diyas (small oil lamps) to welcome the goddess Lakshmi into their homes. Hindus believe that the goddess brings wealth with her when she visits. Hindus place the diyas around their home, by doors and windows, on roof tops, and along outer walls. The lights are left burning all night so that Lakshmi may feel welcomed and enter.


  • Diwali is celebrated for a period of 5 days. Each days has it’s own significance, rituals and myths. The third day is celebrated as the main Diwali festival, and is known as the “festival of lights”. The five days of Diwali are : Dhanteras , Narak Chaturdashi, Deepawali, Govardhan and Bhaidooj.
Though not incidental , I luv the pic below with mittus hands, Isnt it cute? :)) She enjoyed the kajus as well.
Kaju Katli Recipe
And wishing all my readers a very happy and safe diwali. Enjoy, have fun and most importantly play safe!

Thursday, October 28, 2010

Coconut Burfi / Thengai Burfi - A Quick Diwali Sweet !!

Coconut Burfi is my hubbys fav and my MIL is an expert in making this, To me she makes the best burfis - perfect in texture and shape too. As diwali is nearing, I wanted to try this simple and tasty sweet with easy to get ingredients too. This is my first try, And I was warned by my mother many times when I tried to click the consistencies that If I miss the consistency the burfi would either be hard as brick or like halwa....but thank god I got it right :)
Coconut Burfi Recipe


Ingredients:
  • Coconut - 2 cups
  • Sugar - 1 cup
  • Water - 1/2 cup
  • Cashews broken - 1 tbsp
  • Ghee - 2 tsp
  • Cardomom powder - 1/2 tsp [optional]


Coconut Burfi Recipe
Method:
  1. First take wide bottomed pan(non-stick is preffered), add coconut and dry roast it till the moisture leaves and its dry enough, it takes just 3-4 mins taking care not to change the color of the coconut. Keep aside.


  2. Now add lil ghee, roast the broken cashews and keep aside.Now in the same pan, add sugar and water mix well till sugar dissolves completely.


  3. Keep stiring continuosly, cook till a single thick string consistency : If you take a drop between your thumb and index finger you can see a single string forming - thats the right consistency.


  4. Add roasted coconut and remaining ghee at this stage and mix well. Simmer the stove and cook till bubbles ooze out as shown in the pic below: Sorry for the poor lighting, it was a night shot.
  5. Coconut Burfi RecipeAt this stage add cardomom powder, roasted cashews and mix well till it combines well. After 5-8mins after the bubbles ooze out, the mixture would be thick enough and comes off easily from the sides of the pan - Now its right time to turn off.


  6. Immediately transfer to a ghee greased plate and flatten them using a spoon to make the top even. Allow it to cool for 30mins, then mark pieces and store in an airtight container.
Coconut Burfi Recipe


My Notes :
  • While scrapping the coconut take care not to scrap till the brown sides.If you like ur burfi to be very fine then grind the coconut once in mixie, but I prefer the orginal coarse texture so didnt do it. If you want your burfi to be pure snowy white, then roast the coconut just for few mins before the color changes.


  • Testing the sugar syrup is not that difficult, First the sugar syrup becomes very sticky only then single string consistency is reached. If you are a first timer like me check it every now and then till the desired consistency is reached.


  • After the roasted coconut is added and the desired stage is reached act very fast and transfer to the greased plate, else the burfis would become hard.


  • Make sure you cool them completely, before marking pieces else its hard to get perfect squares.


Monday, October 25, 2010

Crispy Masala Vada / Paruppu Vadai - Step by Step Recipe

Masala Vada or Parrupu vadai is my fav so wanted to give a try at home. As I've been used to the shop bought ones, was very skeptical whether I wud succeed in my try. But the recipe proved me wrong, it came out super crispy outside and crunchy inside...making it perfect. Ammas fav too so another reason to give a try :)
Masala Vadai / Paruppu Vadai Recipe


Ingredients:
  • Channa Dal - 1 cup
  • Rice flour or Rava - 1 tbsp
  • Cinnamon - a half inch stick [optional]
  • Cloves - 2 [optional]
  • Fennel Seeds(Sombu) - 2 tsp
  • Red Chillies - 3
  • Garlic - 6 cloves
  • Ginger - a half inch piece
  • Coriander Leaves - 2 tbsp finely chopped
  • Curry leaves - 1 tsp
  • Small Onion - 8 very finely chopped
  • Salt to taste
  • Oil for deep frying


Masala Vadai / Paruppu Vadai Recipe
Method: [Updated with stepwise]
Wash and soak channa dal for 2 to 3 hrs. Then drain the water completely and keep aside. Grind together cinnamon, cloves, fennel seeds, garlic, ginger and red chillies with channa dal. Make sure you grind them coarsely and not to a fine paste. The batter should be very thick.
Masala Vadai / Paruppu Vadai Recipe


Then transfer the batter to a bowl. Add onions, mix well then add rice flour, coriander, curry leaves, salt and mix well.
Masala Vadai / Paruppu Vadai Recipe


3. The mixed batter is ready. Make equal sized small balls out of the mixture, and pat them on your palm to form a circle to 1/4 inch thickness, and arrange them in a plate ready to deep fry.
Masala Vadai / Paruppu Vadai Recipe


Heat oil in a kadai and deep fry them till golden brown, turning over both sides. Drain it on a tissue paper. Serve hot with any chutney of ur choice.
Masala Vadai / Paruppu Vadai Recipe

My Notes :
  • The method is very easy, the only thing to note down is the consistency and texture of the batter. It should very thick and in coarse form.Sprinkle little water while grinding ONLY if its too dry.


  • I usually add small onions as it gives nice taste to the vadas, You can alternatively use big onions too.If you like garlic in your vadai then you need not grind them, just chop them finely and add it with onions to the batter.


  • Rice flour is added to give nice crispness to the vadas. If your batter becomes runny also, this rice flour comes to our rescue, so add in more than the above mentioned quantity incase your batter is very runny. Rava/Sooji also gives a good amount of crispiness so use either rice flour or rava.


  • This is deep frying so we can make it occassionally may be for festive seasons . Enjoy the crispy masala vadas.


Crispy Masala Vadas ready to be served!
Masala Vadai / Paruppu Vadai Recipe
Hope you are all set for the festive mood. I am all set to prepare/try new sweets this time. So stay tuned to check the festive specials for this diwali.

Tuesday, August 31, 2010

Rava Laddu / Rava Laddoo for Krishnar Jayanthi

"Krishnar Jayanthi / Gokulashtami" - The festival I look forward each year.....the little footprints drawn gives the home a divine look. In hindu customs, it is believed that the footprints drawn brings little krishna home :) Last year I planned to draw footprints of my lil one but amma warned me as she was only 2months old and she was scared that she might catch cold.....so this year I was waiting...so after a great struggle with the hyperactive kiddo managed to get her footprints here which is going to be treasured :)
Rava Laddo RecipeFew facts about Krishnar Jayanthi:
Sri Krishna Jayanti marks the celebration of the birth of Bhagavan Sri Krishna. Lord Sri Krishna was born on the 'Rohini' nakshatram (star) on Ashtami day. The festival Sri Krishna Jayanti is also known as Gokulashtami or Janmashtami. The actual day of celebration can be on two different days as the star 'Rohini' and Ashtami may not be on the same day.


The birthday of this marvellous child is celebrated as a festive and sacred day on the eighth day of the dark fortnight in the month of Sravana called Aadi in Tamil which corresponds to the English months of August-September.
Rava Laddo Recipe


Ingredients:
Makes 15 rava laddus
  • Fine Sooji/ Rava - 2 cups
  • Sugar - 1 cup
  • Cardamom powder - 1 tsp
  • Broken cashew nuts - 1 to 2 tbsp
  • Hot milk (Hand bearable) - A little more than 1/4 cup (Adjust enough to form a ball) - You can substitute milk fully with ghee too
  • Ghee - 2 tbsp
NOTE : If you want more shelf life then use ghee else go ahead with milk if you are looking out for a low fat version.


Rava Laddo Recipe
Method:
Heat ghee in pan and roast cashews till golden brown, keep aside.Then add rava and roast it in the remaining ghee in the tawa till nice aroma comes. Take care not to brown them, turn off heat, keep aside and allow it to cool. Add the sugar for powdering in a dry mixer.
Rava Laddo Recipe


Powder the sugar very fine, set aside in a bowl. Then grind the roasted rava to a fine powder. Transfer this to a wide bottomed bowl. Now add powdered rava to powdered sugar and mix well till sugar is even on all sides.


Rava Laddo Recipe

Add ghee, fried cashews, raisins(if you use) and cardamom powder to the powdered rava sugar mixture and mix well, it looks crumbly like in the second pic below. Now take hot milk and add little by little say one tablespoon at a time.


Rava Laddo Recipe

Mix everything together. Mix it and keep adding milk till the mixture starts to form a ball. Now stop adding milk and quickly form into balls using the palms of your hands. Grease your palms with few drops of ghee if the mixture is sticky.Your guilt free rava laddus are ready to be served. Enjoy!!

Rava Laddo Recipe


The festive day is known by different names. Some call it Krishna Jayanti day. A few call it Janma Ashtami day, while a good many call it Gokula Ashtami and Krishnar Jayanti. You can view my Akkaravadisal recipe here which amma made earlier.


My Notes :
  • While roasting rava take care not to brown the rava, be very careful to turn over if not it might get browned at the bottom giving you a light brown color.


  • Add milk little by little, the lesser the milk the better, the result will be soft melt in your mouth rava laddus. If you add more milk, the laddus will be a little harder. You can substitute milk with ghee too.


  • It keeps well for 3 days when kept outside itself. If you want to store them for few more days refrigerate it but when refrigerated the laddus become a little harder.So few mins before serving keep the laddus outside may be in a warm place.


  • While mixing rava and sugar, mix thoroughly so that the sugar is evenly coated on all sides.After the milk is added quickly form them into balls, dont let it dry. If its dried add few drops of ghee and form into balls.


Rava Laddo Recipe

Monday, October 12, 2009

Peanut Ladoos & a short break!

How many of you like peanuts? Count me in first, but I dont prefer roasted instead like the boiled ones. I have seen these ladoos in many blogs n finally here I am with it. As its diwali time thought of posting a quick and easy ladoo....!
Peanut Ladoos
Now coming to the break : I m leaving to my inlaws place this weekend and will be on a break from blogging for 15 days.......Dont knw how I m going to manage as these days I m kind of addicted to my blog.....Meanwhile dont forget me and I am assuming that u will keep visiting my space even in my absence :) Once I return....have to join back work so am sure its gona be pretty hectic. Ok now to the recipe :

Ingredients:
Raw Peanuts - 1 cup
Jaggery - 1/2 cup

Method:
1. Dry roast peanuts in a tawa until they turn light brown. There will be nice aroma and the skin will start splitting up thats the stage you should remove from flame.

2. Remove the skin. Blend the peanuts for few seconds to form a coarse powder then add jaggery and grind it again for 5seconds till both peanuts and jaggery are well blended.

3. Set it in a plate and make small sized balls. You need no ghee for it as the oil the peanut leaves is just enough to roll them into balls.

4. Store it in a air tight container.

Peanut Ladoos
Happy and Safe Diwali wishes to all my fellow blogger friends! Seeya sometime sooner..!!

Sunday, August 16, 2009

Chocolate Pedas

Mahimas choco pedas has been in my to do list for long and I finally made it. I really am looking for some quick recipes/snacks as I find very lil time to spend in the kitchen :) Trust me, these choco pedas tasted so yummy...I wud say its a definite try for all chocolate lovers!

Chocolate Pedas
Ingredients:
Coco powder - 1.5 tbsp
Milk Powder - 4 tbsp
Almond powder - 3 tbsp [Just powder the almonds/badams raw]
Marie Biscuits - 3 small powdered
Boiled milk - as needed to make the dough [I used 2 tbsp ]

Method:
1.Mix all the above ingredients together and make a soft dough.
2.Add 2 drops of oil/ghee to ur hands while rolling it into ur desired shapes to avoid stickyness.
This yielded me 5 pedas!

Monday, May 25, 2009

Besan Peda

I tried Ramyas Besan peda which turned out soo good! I modified the measurements a bit, didnt add saffrons and thats y the color was light brown and at a quick glance looked to me like badushah - tats one of my fav sweets too :)

Ingredients:
Gram Flour (Besan flour) - 1 cup
Sugar - 1/4 cup
Butter - 1/2 tbsp
Milk - 1/2 cup
Cardamom - 1
Cashews - as required (optional)


Besan PedaMethod:
1.Heat butter, let it melt and roast besan flour in that till it becomes light brown.
2.Add sugar and cardamom powder. Pour milk and keep stirring for 5mins without any lumps.
3.Switch off the flame and allow it to cool for 10mins.
4.Roll them into small pedas, press cashews on top.

When refrigerated it will last upto a day.

Friday, March 6, 2009

Carrot Halwa (Gajar ka halwa)

One of the recipes that comes out well every time I do! And thats the 9th wonder in my case....;) Here goes the recipe from my kitchen:
Carrot halwa
Ingredients:
  • Carrot- grated - 2 cups
  • Sugar - 1/2 cup
  • Milk - 1 cup
  • Broken cashews - 1 tbsp
  • Cardamom powder - a pinch [optional]
  • Ghee - 1 tbsp
Carrot halwa
Method:
  1. Heat ghee in a pan and roast the cashews till golden brown and keep it aside. In the same pan, add grated carrot.

  2. Saute it in medium flame till the carrots changes color and gets cooked and raw smell leaves.

  3. This is the stage, then take 1 cup of boiled milk. Add this milk to the carrot and continue to cook carrots in milk.

  4. When carrots start abosorbing milk, add sugar. Continue to cook until the halwa gets thick, the ghee gets seperated and will come out on the sides of the pan.

  5. Add the cardamom powder, mix well, garnish with nuts and serve.
    Carrot halwa
Tastes divine when had with a scoop of vanilla icecream. This dessert is yummy when served cold or hot. A simple yet rich dessert.

Carrot halwa