Thursday, June 16, 2011

Sweet Corn Soup and Cup Corn Chat

As I always say, I am not a soup person but when it comes to tomato soup and sweet corn soup, I just can break the rule. The sudden change of chill climate makes me crave for something hot and this soup perfectly fits the bill. Its easy and tasty, do try and see.
Recipe


Sweet Corn Soup Recipe:
Serves 2


Ingredients :

Serves 2

  • American Sweet Corn Cob - 1
  • Butter - 1/2 tsp
  • Water - 1.5 cups
  • Pepper - 1 tsp
  • Salt - to taste
  • Corn Flour - 1 tbsp (mix it with 5 tbsp's of water)
  • Vegetable Stock - 1/4 cup (optional)
  • Soy Sauce - 1/4 tsp


Recipe
Method:
  1. Pressure cook the corn for 4-5 whistles or until soft with a cup of water. After the pressure releases, take the corn cobs and shred the kernels completely.
  2. Grind the corns kernels with little water say 1/2 cup to a thick paste. Reserve few for garnishing.
  3. Add the corn flour with water , mix well without any lumps and keep aside
  4. Heat a pan with butter, add the corn paste, allow it to boil for 3mins. Add 1 cup water, vegetable stock(boiled vegetable water), cornflour water paste and mix well. Add required salt.
  5. Add soya sauce,pepper and mix well. Allow it to boil for 5-7 mins until the soup is thick. Switch off. Garnish with remaining corn kernels and serve hot with soup sticks or bread.
RecipeMy Notes:
  • Adding soyasauce gives a nice flavour to the soup. If you dont have vegetable stalk just ignore and proceed with the remaining ingredients.
  • Adjust water according to the thick consistency of the soup.
  • Spring onions can also be added for garnishing
  • After adding corn flour the soup thickens faster so adjust water accordingly at this stage.
Recipe

Cup Corn Chat Recipe:

Serves 2


Ingredients:

  • Corn cob - 1
  • Butter - 1 tsp
  • Garam masala / chat masala powder - 1/2 tsp
  • Pepper - a pinch
  • Lime juice - 1 tsp
  • Salt - for taste


Recipe
Method:
  1. Pressure cook corn cob in water with salt for 5mins or until soft.
  2. Once the pressure releases, remove the cobs from water. Shred the corn kernels with a knife in a serving bowl.
  3. Add butter, garam masala powder, pepper powder and lime juice to it. Mix well and enjoy.
Recipe

Tuesday, June 14, 2011

Vegetable Cutlet

This is my favourite from my childhood days. I'm sure this is the best way to make kids eat veggies. I got the recipe from amma and here it is for you....Whan I was in the middle of clicking my daughter came running to me with the pizzahut stand(in the 2nd pic) and asked to keep it so she was the sole reason for that idea :)Vegetable Cutlet Recipe


Vegetable Cutlet:
Makes around 10-12 cutlets

Ingredients:
  • Potato - 2 big sized
  • Other mixed veggies - 1/4 cup (I used carrots, peas and beans)
  • Onions - 1/2 chopped finely
  • Bread - 1 slice
  • Bread crumbs - 1/2 cup
  • Ginger garlic paste -1/2 tsp
  • Red chilli powder - 1 tsp
  • Garam masala powder - 1/2 tsp
  • Coriander leaves,chopped - 2 tblsp
  • Lemon juice - 1 tsp
  • Maida - 1 tbsp
  • Salt - as required
  • Oil - As required for deep frying / toasting

Vegetable Cutlet Recipe
Method:
  1. Pressure cook the veggies with required amount of water until soft. Peel off the skin of potatos and mash it well and add it to other veggies, add finely chopped onions too. Crumble the bread with your hands and add the bread to the veggies. Mix well.
  2. Add ginger garlic paste, red chilli powder, garam masala powder, required salt and coriander leaves to the veggies with bread. Add lemon juice and mix well to form a dough.
  3. Make equal sized round balls and slighly press it between your palms to make it flat.Keep aside.
  4. Now in a seperate plate, mix maida and water to form a thick paste. Now dip each cutlet in the paste such that both sides are coated well then coat it with breadcrumbs as show in the below pic.
  5. Repeat the same for all other cutlets too. You can deep fry them or toast the cutlets(like what I did) till crispy.Serve the cutlets hot with tomato sauce.

Vegetable Cutlet Recipe
    You can prepare the cutlets before hand and refrigerate them, and toast/deep fry when you want it to serve hot. I have tried a day prior to the guests arrived and it was good. So make sure you make the cutlets only a day prior and not more than that as the veggies will get spoiled easily.
Vegetable Cutlet RecipeMy Notes:
  • You can also add beetroot for an extra color.
  • You can deep fry them if you are making in bulk as it saves time
  • Those who like eggs can use egg for coating and then dip them in breadcrumbs
  • I usually keep the bread slices in oven at 180 deg C for 4-5mins by the time it will turn crispy then is easy to powder it in a mixer.Your breadcrumbs are ready in minutes.I used wheat bread so the color is brown.
  • Amma usually sautes onion and tomato well and then add it to the other other ingredients. You can try this too as tomatoes give a nice flavour.
Vegetable Cutlet Recipe

I am sure this is a kid pleaser, you can make innovative shapes and impress the kids. Any fussy eater will sure like this cutlet and ask for one more. You can make this as a tea time snack for kids and serve them hot with tomato sauce - yum combination. As all the veggies are added and if you toasting it then what more do you need - Its a tasty and healthy evening tea time snack.Enjoy ur cutlets guiltfree.

Vegetable Cutlet Recipe

Sunday, June 12, 2011

Mango and Vanilla Custard Verrines | Mango Custard Desserts

I am always bowled out by the idea of layered desserts so when I saw this in Vegbowl I know I'm surely going to try. Verrines are layered desserts in a small glass - the variation of layering is endless either sweet or savoury. I felt I didnt get the layers evenly but I say this is truely luxury in a shot glass :)
Vanilla Mango Verrines Recipe


Mango & Vanilla Custard Verrines Recipe
Recipe Reference : Veg Bowl


Ingredients:
  • Milk - 1 cup
  • Custard powder - 1 tbsp (or substitute with 1 tbsp corflour and 1 tsp vanilla essence)
  • Sugar - 3 tsp (Adjust sweetness according to your taste)
  • Thick undiluted mango pulp - 1/2 cup
  • Cherries - 1 tbsp chopped just for garnishing (optional)


Mango & Vanilla Custard Verrines RecipeMethod:
  1. Mix custard powder in 1/4 cup milk, mix well and keep aside. Heat the remaining milk with sugar, bring it to a boil and then add the custard powder milk mixture to it.
  2. Stir continuosly so that no lumps are formed. This will thicken up soon so keep stirring.
  3. When the mixture starts bubbling and looks thickened(if you pour, it should not be runny) switch off. Allow it to cool down completely.
  4. Now to assemble the verrines add a tbsp of prepared vanilla custard alternating it with a tbsp of mango pulp till it reaches the brim of the glasses. Add the chopped cherries in top.
  5. Refrigerate the verrines atleast for an hr and serve chilled.
Mango & Vanilla Custard Verrines RecipeMy Notes:
  • The custard seems to thicken very faster, so keep an eye and stir continuosly to avoid lumps.
  • The topping is of your choice, you can also add in nuts of your choice.
  • You can use 1/2 cup milk and 1/2 cup cream but I used milk as it was readily available in my kitchen as yes I was calorie conscious and also had the extra serving in mind when milk was used :)
  • Adjust sugar according to the sweetness of the mangoes and to ur taste.
  • The alternating flavours in every spoon was very yummy.
Mango & Vanilla Custard Verrines Recipe


Layered desserts are my fav both preparing and eating :) I usually make my desserts in a small glass as desserts are mostly had after our heavy lunch on sundays. Vanilla and mango flavours are always a winning combination and this one is no exception to it.


I always look forward for new interesting dessert ideas while hosting a dinner or lunch. And my choice is always a low fat one to help another serving.


Mango & Vanilla Custard Verrines Recipe
Other Verrines Ideas:
  • Strawberry yogurt verrines
  • Coffee and vanilla
  • Chocolate and vanilla
You can use the same base of vanilla flavoured custard powder and add coco powder or any other flavour accordingly.


Mango & Vanilla Custard Verrines Recipe

Thursday, June 9, 2011

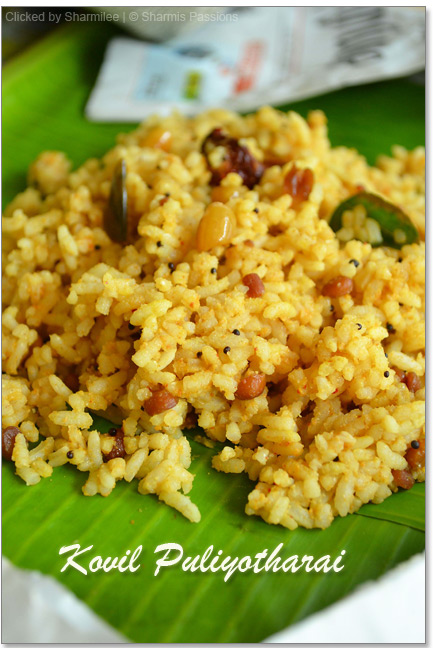
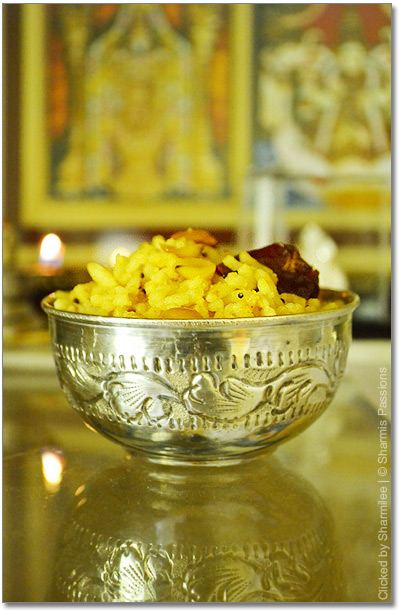
Kovil Puliyodharai / Puliyodharai Recipe

I tried this from Akshayapatram long back and since then whenever its puliyogare I go blindly with this recipe as my family loved this version as its very close to kovil puliyodharai. Thank you Priya for such a nice keeper recipe, am glad that I tried this. Once when I brought this to office, my collegues were in praises for me :)


I've already tried a slightly different version of Puliyogare and when I saw this first, I doubted whether adding the roasted powder seperately - will that give such a huge difference because my older version was close to this. But believe me, adding the roasted powder seperately gives a totally nice flavour and sure it tasted differently. Now I have 2 versions I never get bored of Puliyodharai :)
Kovil Puliyodharai Recipe


Kovil Puliyodharai Recipe:
Recipe Reference : Akshayapaatram


Ingredients:
  • Cooked Rice - 2 cups
  • For the pulikaichal:
  • Gingelly Oil (Nallenai) - 3 tbsp
  • Peanuts - a fistful (Skin removed)
  • Mustard Seeds - ½ tsp
  • Channa Dal - 1 tbsp
  • Urad Dal - 1 tsp
  • Dried Red chillies - 2
  • Curry Leaves - few
  • Powdered jaggery - 1 tsp
  • Turmeric Powder - 1/2 tsp
  • Hing (Perungayam) - a generous pinch
  • Tamarind - lemon sized ball
  • Salt - to taste


For the powder:
  • Oil - 1 tsp
  • Channa Dal - 1 ½ tbsp
  • Urad dal - 1 tbsp
  • Coriander Seeds - ½ tbsp
  • Dried Red Chillies - 2
  • Fenugreek Seeds(Venthyam) - ½ tsp
  • Sesame seeds - 1 tbsp


Kovil Puliyodharai Recipe
Method:
  1. First add 1/2 cup water to tamarind, let it soak for 15mins.Now squeeze out thick tamarind pulp and keep aside.
  2. Meanwhile heat oil and roast the ingredients 'for the powder' one by one in the same order as above until golden brown.Allow it to cool and powder it to a fine powder. Keep aside.
  3. Heat gingelly oil in a kadai on medium low heat and add the peanuts. Roast until slightly browned. Now add mustard seeds,channa dal, urad dal,curry leaves, red chillies, turmeric powder and hing. Toast until they are browned evenly.Check and add salt.
  4. Now add the tamarind extract and allow it to boil for 10-15mins. Add jaggery and mix well.When oil begins to seperate and the mixture will become at one stage oozing out oil at the edges, at this stage switch off.
  5. Take the cooked rice spread it in a wide bowl, drizzle a tsp of oil on top, add the pulikaichal mix well without mushing up the rice.
  6. Add salt if required. Now add the roasted powder and give a quick stir. Keep covered and allow it to rest atleast for 30mins before you serve.
Kovil Puliyodharai Recipe
My notes:
  • Check the pulikaichal once mixed with rice and then add salt accordingly. This is a sticky puliyodharai version as it is in temples.
  • I just reduced the chillies quantity from the orginal as I felt a bit spicy for our taste buds, otherwise no major change at all. It was perfect.
  • Adding jaggery is optional, I always like that tangy sweet taste in my puliyodharai
  • You can store both the pulikaichal and the roasted powder in fridge and it stays well for about a week. Do not reduce oil if you are planning to store.
  • You can use basmati or normal rice. This time I used normal rice but basmati rice is recommended.
Kovil Puliyodharai Recipe
Usually when I am planning to make puliyogare, I made the roasted powder the before day and refrigerate it. So on the day of making puliyogare, its only the pulikaichal and rice and you r done with your puliyogare in minutes.


Kovil Puliyodharai Recipe

Tuesday, June 7, 2011

Eggless Custard Powder Snack Cake - Step by Step Recipe

I tried this cake long back and was totally impressed with it. This recipe is a winner as it withstood my experiment ;) Yes as usual I reduced the butter totally and the cake came out just awesome. Most of the time I make sure my baked goodies are low fat so that we dont feel the guilt of enjoying them but yeah there are exceptions always....:)


After my successful try with custard powder in biscuits I went ahead with this custard powder cake as I got very tempted seeing in many blogs. But when I saw it in Divyas blog I tried it the same day as I cudnt resist myself anymore.....:)
Puliyogare Recipe


Eggless Custard Powder Snack Cake Recipe:
Recipe Reference : Divyas Cook Book
Ingredients:
  • Maida / All Purpose flour - 1 and 1/2 cups (225 gms)
  • Vanilla flavoured Custard Powder or Cornflour - 3/4 cup (100 gms)
  • Baking powder - 1 1/4 tsp
  • Granulated Sugar - 3/4 cup (200 gms)
  • Vanilla extract - 1/2 tsp (only if you are using cornflour else skip it)
  • Butter - 2 tbsp
  • Milk - 1 and 1/2 cups (375 ml)


First add milk in a bowl add butter mix well.Next add vanilla essence and mix again with a whisk.


Eggless Custard Powder Snack Cake Step1


Then add the sugar, mix till it completely dissolves. Alternatively you can powder the sugar and then add so that it dissolves quickly. Sieve maida, custard powder and baking powder then add them to the milk butter mixture. Sieving is always done to avoid any dust particles and also to ensure even spread of the baking powder.
Eggless Custard Powder Snack Cake Step2


Mix until a creamy batter shown below is formed. Then grease a baking pan(I used a 4X4 inch cake pan) with a butter paper and pour the batter into it. Preheat the oven to 180 deg C for 10mins and bake the cake for 35-40mins. Test by inserting a toothpick in the middle of the cake before you switch off.


Eggless Custard Powder Snack Cake Step3


Cool it completely for atleast 20mins then cut into pieces. I halved the orginal recipe and choose a smaller pan accordingly.


Eggless Custard Powder Snack Cake Recipe
My Notes:
  • As I wanted a low fat version I used demerara sugar so my cake was a little brown in color.You can use normal sugar too.
  • Since my cake mould was a bit smaller , my cake was done in 40mins. But the orginal recipes says it might take 45mins and might extend upto an hour depending on the oven type and cake mould you use.
  • I have reduced the butter totally and added more milk instead. The result was a very soft tasty cake.
  • As the name says snack cake, the sweetness is slightly lower than the usual cakes. So you can increase the sugar to 1 cup if you prefer a sweeter cake.
  • The top and bottom slightly browns up giving it a golden yellow in the middle.
Eggless Custard Powder Snack Cake Recipe


I just topped up with some left over choco chips. It is a perfect snack time cake as the sweet is very mild making it ideal with a cup of coffee or tea. The cake was over the same day I baked it so I can promise you on the taste.


Eggless Custard Powder Snack Cake Recipe


The custard flavour gives a very nice flavour to this cake.If you dont have custard powder just substitute it with cornflour and vanilla essence and it gives the same result. When I started trying out custard powder I disliked the taste but slowly started liking it and now have been trying many pudding combinations using it.


Eggless Custard Powder Snack Cake Recipe

Sunday, June 5, 2011

Paneer Jalfrezi | Paneer Recipes

Hope you all had a great weekend. Mine went great too with my old friend meet up and family together times which I always look forward during weekends. Whenever guests arrive, the desserts and snacks section is always mine. This time I made paneer pizza and carrot kheer, my friend asked whether the base was also homemade as it was very soft :)
Paneer Jalfrezi Recipe


Paneer Jalfrezi Recipe:
Serves 2


Ingredients:

  • Paneer- 1 cup
  • Carrot- 1
  • Onion - 1
  • Capsicum - 1/2
  • Ginger garlic paste -1 tsp
  • Tomato puree - from 1 tomato
  • Tomato ketchup 1 tbsp
  • Red chilli powder 1 tsp
  • Garam masala powder - 1/2 tsp
  • Jeera - 1/2 tsp
  • Salt - as required
  • Oil - 2 tsp


Paneer Jalfrezi Recipe
Method:
  1. Heat oil, add jeera and allow it to splutter. Add onions and ginger garlic paste saute until slightly browned.
  2. Now add the tomato puree and saute until raw smell leaves, this may take atleast 5mins. Add turmeric, chilli, garam masala powder and tomato sauce. Add required salt.
  3. Then add carrot saute for 2mins then add 3 tbsp of water and keep covered to let it cook. When the carrot turns slightly soft yet crunchy to bite, add capsicum giving a quick stir.
  4. Add the paneer cubes and toss it well until the .paneer cubes are well coated with the gravy. Allow it to cook for 2mins then switch off.
Paneer Jalfrezi Recipe
My Notes:
  • You can add any veggies of your choice, you add add corn, beans,cabbage - Its purely ur choice to go with the veggies.
  • Chop all the veggies thin and lengthwise to get cooked soon and crunchy
  • You can use readymade tomato puree also. I used freshly prepared homemade puree.
Recipe


As still the apartment work has not yet finished, the waste wood keep piling off and on. So my latest hobby being going round the apartment in search of food props.I got this wooden board (which I have used in these pics) from one of these unwanted wood bins :) The only thing that embarasses me is when the watchman asks "why do u always dig in that dust?" And I dont bother saying him that "I want some wooden planks for a project" ;) And he says I am the one who cleans that place often reducing his work he he


Paneer Recipes


Chop the veggies and paneer, you are done with this easy breezy side dish. This goes well with rotis, prathas and even rice with dhal which is my favourite combination. I love corn in jalfrezi but I didnt add the stock was over. And I am not used to use the frozen ones I went ahead with the veggies I had in hand.
Paneer Jalfrezi Recipe

Thursday, June 2, 2011

Papaya Milkshake

The city looks like naturally air conditioned and am loving every bit of the cool breeze which is the typical CBE climate. The summer is slowly creeping away and am happy to welcome the chill weather but the only thing I hate about this gloomy weather is that it makes me lazy. Now blame it on the weather though I am lazy even in hot summers ;)


I am very bad at eating fruits and was keeping my fingers crossed that my daughter shoudnt take after me and thank god she is liking most of the fruits, hope her eating habit continues the same.


Papaya Milkshake Recipe


Papaya Milkshake:
Makes 2 small cups


Ingredients:

  • Papaya - 1 cup cubed
  • Milk - 3/4 cup
  • Sugar - 1 tbsp(adjust according to the sweetness of papaya and to ur taste)
  • Elachi powder - 1 tsp


Papaya Milkshake Recipe
Method:
  1. Add little milk and the cubed papaya in a blender/mixer and blend it to a very smooth paste.Do not blend it for a longer time it will make the milkshake bitter
  2. Then add sugar and remaining milk and blend until smooth.
  3. Add elachi powder , give a stir and serve chilled.
Papaya Milkshake RecipeMy Notes:
  • Do not blend it for a longer time it will make the milkshake bitter. And also dont refrigerate for longer time(5-10mins is ok) have the milkshake fresh...else it will give a bitter taste. But if you want it to be chilled then add crushed ice while blending itself.
  • The raw smell of the papaya will be reduced by the flavour of elachi powder so dont skip it.
  • You can add 2 cubes of crushed ice and blend it along with papaya and milk.
  • Adding honey will give a nice taste too so you can replace sugar with honey.
  • For the above mentioned quantity I got 2 small cups of milkshake.
Papaya Milkshake Recipe

Papaya has lot of health benefits and read it gives a nice glow to the skin and can be used as a nice bleaching agent to the face......It also helps in reducing weight. So girls have I tempted you enough to eat papaya?! Having said all these now I can say the truth that I am a avid hater of papaya ;) he he as I can have papaya only in the form of jams as it hides the papaya taste completely.

Papaya Milkshake Recipe

I made this milkshake especially for amma as she is fond of papaya. Amma loves this fruit so she was very happy to have this milkshake :) This milkshake is so tasty that was the statement that came from amma. Make sure to choose a papaya that is ripe enough to enjoy a yummy milkshake.


Papaya Milkshake Recipe