Thursday, August 26, 2010

Lets Munch:Light Tea Time Snacks - Round up Part 1

First I should say a big thanks for the support and encouragement I got for this event. I really didnt expect so many lovely entries for my first event....I started working on the roundup every now and then so the order purely depends on the entries that came in. Do leave in a comment if I have missed any of ur entries. I am posting in 2 parts as the entries are more. Here comes the roundup Part 1:

Name: Kalva
Blog name: Curry In Kadai
Recipe Name: Chekka Idly
Camera Used : Canon PowerShot G2

Name: Kairali sisters
Blog name: Pazham Pappadam Payasam
Recipe Name: Kerala spicy mixture, Kaya Nurukku/ Banana chips Sadhya style
Camera Used : Panasonic Lumix FZ8

Name: Akheela
Blog name: Torviewtoronto
Recipe Name: Bread pudding, Beetroot party sandwiches
Camera Used : Canon Rebel T1l

Name: Jay
Blog name: Tasty Appetite
Recipe Name: Vegetable Mint Sandwich, Crispy Thattai
Camera Used : Canon Rebel T1l

Name: Aparna Vijay
Blog name: Aparna's Vegetarian Cuisine
Recipe Name: Vegetable Mint Sandwich, Hot Vegetable Crispy Pakodas
Camera Used : Canon - IXUS 65

Name: Supriya
Blog name: Queen of my Kitchen
Recipe Name: Vegetable Cutlets
Camera Used : Sony Handycam

Name: Priya (Yallapantula) Mitharwal
Blog name: Mharo Rajasthan's Recipes
Recipe Name: Makai Paneer Pakoda -(Corn and Cottage Cheese Fritters)
Camera Used : Sony Handycam

Name :Nayna
Blog Name :simply.food
Recipe Name : Methi parthas
Camera Used :Samsung ES55

Name :Satyasree
Blog Name :Super Yummy Recipes
Recipe Name : Bite Size Pastry Puffs With Veggies
Camera Used :Canon powerShot SX 20 IS

Name :PJ
Blog Name :Seduce Your Tastebuds
Recipe Name : Palak Pakoda , Masal Pori
Camera Used :Sony DSC T10

Name :Nidhya
Blog Name :Aaha Oho
Recipe Name : Rava Paniyaram , Murukku
Camera Used :Panasonic Lumix DMC-ZS3

Name :Srividhya Ravikumar
Blog Name :Vidhu's kitchen
Recipe Name : Salsa with biscuits, Peas balls
Camera Used : Olympus FE-320

Monday, August 23, 2010

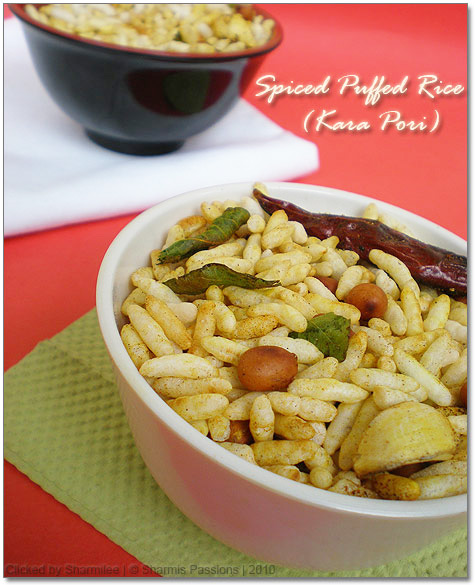
Kara Pori / Spiced Puffed Rice

Just back from the trip to CBE....had a funfilled week with family, relatives and friends. I was not accessible to net for these days though mobile browsing now and then was a different story ;) Hope all is fine with you as well......Mittu enjoyed the journey and the trip...she was so excited in the train that she didnt sleep half of the night making me take her walks in the train. I wonder how kids easily grab everyones attention.....Be it the lady in the Krishna sweets offering her a sweet and another sweet when said thanks or be it the friends she made in the hotel within the short time :) She was called 'friendly kiddo' by everyone whom she met for the first time....exactly opposite the way I was during my childhood days.....I was a timid and reserved kiddo. May be her dads genes at work :)
Spiced Puffed Rice (Kara Pori) Recipe
Now coming on to the recipe...Kara pori is my fav....esp during the rainy season.

Ingredients:
  • Puffed Rice/Puri - 2 cups
  • Oil - 1 tsp
  • Peanuts - a fistful
  • Mustard Seeds - 1 tsp
  • Dry red chillies - 1
  • Curry leaves - a fistful
  • Turmeric powder - 1/2 tsp
  • Red chilli powder - 1 tsp
  • Garlic pods - 5 big ones
  • Salt as per taste
Spiced Puffed Rice (Kara Pori) Recipe
Method:
  1. In a wide bottomed pan, heat oil. Add mustard seeds let it splutter. Add peanuts & fry on low flame for a 2-3 mins.

  2. Add red chillies, turmeric, red chilli powder, curry leaves, garlic pods all in one go and fry for sometime till garlic turns lght brown.Fry on low heat until groundnuts become crisp.

  3. Add puffed rice, salt and mix well till the puffed rice is mixed well with spices and becomes crispy.

  4. Allow it to cool and store in airtight container.
Spiced Puffed Rice (Kara Pori) Recipe
I am sending this to my own event which is closing this 26th. I am sure everyone wud luv to munch on tea time snacks for this chilli weather so do rush in ur entries soon. And a bunch of thanks for all those who are sending/sent their entries. Hope you remember the logo in which I've used this kara pori picture which is why I skipped the logo here.

Tuesday, August 17, 2010

Raw Garlic Chilli Chutney (Poondu Molaga Chutney) | Side dish for Idly, Dosa

I like this chutney for the garlic flavour and its simplicity.Whenever we feel very tired or in no mood to cook, its always idly with this molaga chutney.But mostly for dinner as we dont want to smell garlicky in the mornings when we move out for work :) This chutney brings back memories of my childhood days when we used to pack idly with this chutney and boiled eggs while moving to ooty. It was around 3-4hrs journey by road from coimbatore to ooty and we would relax a bit in conoor for our breakfast....idly with this chutney is my all time fav! The spicy chutney compliments well with soft hot idly, with ghee its so divine!!

Raw Garlic Chilli Chutney Recipe
Ingredients:
  • Red Chillies - 2
  • Garlic - 7 to 8
  • Curry leaves a a fistful
  • Coriander leaves - 1 tbsp
  • Salt to taste
Method:
  1. Grind the above to a course or smooth paste.

  2. Add ghee/gingelly oil and serve with hot idlis
As its raw, d
ont be doubtful of the taste
, its simple but flavourful!

Raw Garlic Chilli Chutney Recipe
I tried googling few tips of how to Get Rid of Bad Breath from Garlic/Onions and here it is:
  • Drink lemon juice
  • Brush your teeth
  • Try chewing mint or spearmint flavored gum
  • A glass of tea also helps
  • Yogurt can reduce gases in the mouth that cause garlic breath.
I have tried lemon juice and it works well to avoid garlic odour.

Raw Garlic Chilli Chutney Recipe
I am moving to my native 2mrw and will be back only next week, so off from blogging and bloghoping for a week...!

Sunday, August 15, 2010

Pudina Pulao / Mint Pulao

If I say Pudina Pulao, my family members wud turn back to run..... not that it tastes that bad but I have made it around 3-4 times in the past 1 month and they are bored of it. It was because that I wasnt satisfied each time with my click I had to repeatedly cook it ;) Not that this pic satisfied me but this was ok among the others. Taste wise no complaints from them...even my lil one likes it when mixed with raita inspite of her being a sambar girl....Yes she loves sambar so much that she wants sambar rice everyday :) I always luv the flavour of puthina either in chutney or thovayal or biriyani. To my mother biriyani is only when u add puthina she wudnt go for biriyani if puthina is missing, I've heard this from my MIL too.
Pudina Pulav/Pulao Recipe
Ingredients:
  • Rice - 1 cup (I used basmati rice)
  • Onion - 1 chopped lengthwise
  • Potato - 1
  • Ginger garlic paste - 3 tsp
  • Cloves - 2
  • Cardamom pod - 1
  • Cinnamon - 1/2 inch piece
  • Ghee - 1 tbsp
  • Salt to taste
Grind to smooth paste
  • Puthina leaves - 1 bunch (it will come to around 1/2 cup)
  • Coconut - 2 tbsp
  • Tomato - 1/2
  • Green Chillies - 1
Method:
1. Soak the rice in water for 30mins. Drain rice and keep aside.


2. Grind the pudina leaves with the coconut, green chillies and tomatoes to a fine paste.


3. Heat ghee in a pressure cooker, add cardamom, cloves and cinamom, and saute for about a minute Then add the ginger garlic paste fry for 2mins next add chopped onions and saute until the onions turn light brown.


4. Add the ground paste to the pan and fry till raw smell of tomatos and puthina goes off. Now add potato, required salt and basmati rice and mix well with the masalas and fry for 2-3 mins.


5.Add 1.5 cups of water to the above mixture and pressure cook it for 8-9mins.When the pressure releases gently turn over taking care not to break the rice.You can garnish with ghee fried cashews.


NOTE: I usually use 1:1.5 cups as rice:water ratio when rice is soaked for 30mins.
Pudina Pulav/Pulao Recipe

Wednesday, August 11, 2010

Masala Buns / Khara Buns (Mini Savoury Buns)

I tried Bharathys mini savoury buns long back......I like breads and buns very much so cudnt wait to try her buns which was tempting me so much. Her stepwise was so well presented that even a a beginner in baking could go ahead with it. The steps sounds and looks like a very lengthy process, but only the raising time tests our patience or atleast mine ;) I modified the recipe a bit by including wheat flour and reducing APF.....otherwise no major difference. They call it masala buns or khara buns in bakeries and they are little spicy.
Mini Savoury Buns

Ingredients:
  • Wheat/Atta flour - 1 cup (100 gms)
  • Maida/APF - 1 cup (100 gms)
  • Active dry yeast - 1 tsp
  • Sugar - 1/2 tsp
  • Salt - 1 tsp
  • Sesame seeds - 1 tsp
  • Coriander leaves - 3 tbsp finely chopped
  • Garlic - around 10 minced
  • Green Chillies - 1 chopped very finely
  • Chilli powder - 1 tsp [optional]
  • Butter - 1/2 tbsp


Mini Savoury Buns


Method :
  1. Mix yeast in warm water(have 1 cup) along with sugar and salt. Keep aside undisturbed for 30mins. If you check after 30mins the frothy layer on top will be seen.


  2. In a bowl take maida and wheat flour add 1/2 tsp salt to it. Add chopped fresh coriander leaves, chilly powder, greencchillies, minced garlic with melted butter.


  3. Mix the flour and spice mixture well, add the frothy yeast water little by little and Knead it to a soft pliable dough. Keep the dough undisturbed for 2hrs near a warm place covered with a slightly wet muslin cloth.


  4. After 2 hours, the dough must have doubled in size, punch it once to removed the trapped air. Gently knead it again. Now divide the dough into 8 to 9 equal golf sized balls. Brush melted butter, sprinkle sesame seeds on top.


  5. Place the balls on the tray with silver foil/butter paper.Leave it near a warm place for another 30mins to raise a bit.


  6. Preheat the oven for 10mins at 200 deg C, place the tray in the oven and bake it for about 35-40 mins.Check if its golden browned thne apply remaining melted butter on top before serving.


Mini Savoury Buns
The garlic and coriander leaves, fills the house with nice aroma forcing the neighbours eagerly peeping into the kitchen to ask whats cooking in? ;) The warm buns with a cup of coffee was heavenly.


My Notes :
  • The dough should be very soft closely to the texture of the chapathi dough. Dont add the full 3/4 cup of the frothy yeast solution. Add it little by little till its combined to a soft pilable dough.


  • Place the dough to raise near the stove which is cooking. As its warm throughout, the dough gets nicely raised.If there is no froth in ur yeast solution then ur yeast is not fresh/active, the dough will not raise as expected, so be very careful in checking the brand and expiry date of the yeast while buying.


  • I added more garlic as I like them, you can reduce if you dont like garlic much.The buns were slightly crispy on the base and top while they were very soft on the inside.


  • I added half of maida and atta so the baking time differes from the orginal recipe as usually atta flour takes more time to bake. If you are using maida completely then 30 mins must be enough.


  • I have tried these buns twice, once completely with maida and the second time with half and half of maida and wheat flour .If you are using wheat flour the buns are little hard compared to the fully maida buns, on the healthier side I compromised to the texture, but tastewise both are very tempting and got emptied in a jiffy. If you want a very soft crusty buns go ahead with maida fully.


  • Keep the tray in the middle to ensure even cooking and browning of the buns.Keep an eye after 30mins, check if the buns are golden browned and cooked inside using a fork/toothpick then proceed with another 5-10mins.

Sunday, August 8, 2010

Veg Hakka Noodles

This is one of my recent favs......what started as a experiment is now regular in our breakfast menu atleast monthly once :)
Veg Hakka Noodles
Ingredients:
  • Veg. Hakka Noodles - 1 Packet
  • Veggies - 1 cup of finely chopped carrot, beans and capsicum
  • Soya Sauce - 1 tsp
  • Vinegar - 1/2 tsp [U can use lemon juice alternatively]
  • Ginger garlic paste - 4 tsp
  • Onion - 1 chopped lengthwise
  • Tomato Sauce - 1 tbsp
  • Pasta/ Pizza Sauce - 2 tbsp
  • Oil - 1 tbsp
Method:
  1. Boil water(around 2-3 cups well enough for the noodles to immerse fully) and add a tsp of oil in water. In boiling water add the pack of hakka noodles, Let it boil for 3-4 mins . Check if its cooked then drain the water and keep the noodles aside.

  2. Heat oil in a wide pan.Add ginger garlic paste and fry it for 2mins.Then add onions fry till light brown then add finely chopped vegetables.Sprinkle water just to let the veggies get cooked without losing the crunchiness.

  3. Add soya sauce, tomato and pasta sauce.Stir well until veggies gets mixed well with the sauces.

  4. Now add boiled and drained Noodles to the pan and mix well with sauces and veggies. Squeeze lemon juice / vinegar. Toss the noodles for 2mins.

  5. Switch off the flame and Serve hot!
My Notes :
  • Add oil to boiling water so that the noodles dont stick to each other once cooked.

  • After the veggies are added dont overcook as the veggies will become very soft. The veggies should be crunchy not soft.

  • If you dont have pasta sauce, you can replace it with the maggi/top ramen masala powder that comes with the packet.

Tuesday, August 3, 2010

Crunchy Oven Roasted Chickpeas( Channa)

I saw this from RedChillies first then at few more sites so gave a try at home.....These truely are a guilt free tasty snack to be munched at tea time. These are a lil spicy and crunchy and we loved it with tea.This rainy season makes me crave for hot spicy snacks.
Crunchy Oven Roasted Chickpeas
Ingredients:
  • 1 cup chickpeas(channa)
  • Oil - 2 tsp
  • Salt to taste
  • Red chilli powder - 1 tsp
  • Pepper powder - 1/2 tsp
  • turmeric - 1/2 tsp
  • Lemon juice - 1 tsp
Method:
  1. Soak the channa overnight. Pressure cook them next day until soft...it may take 5-6 whistles

  2. Drain the water completely, may be wiping with tissue will work as well to remove the moisture from the channa.

  3. Preheat the oven to 220 deg C for 10mins.Meanwhile in a wide bowl combine oil, salt, chilli and turmeric and pepper powder with channa. Then finally squeeze few drops of lemon juice. Keep aside and allow it to marinate for 10-15mins.

  4. Line a silver foil/butter paper and spread the channa. Bake it in 220 deg C for 35-40 mins. But check inbetween 15mins and toss it to avoid from burning.

  5. Take it out of the oven and allow it to cool completely to get the crunch.
Crunchy Oven Roasted Chickpeas
And also to my event Lets Munch! - Tea time snacks

Crunchy Oven Roasted Chickpeas